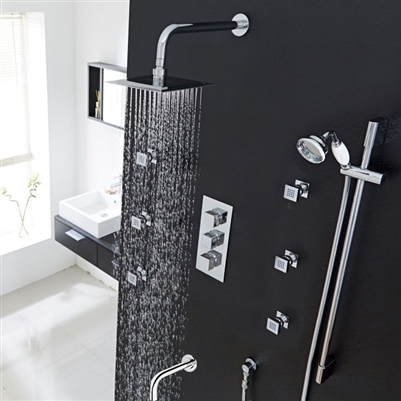
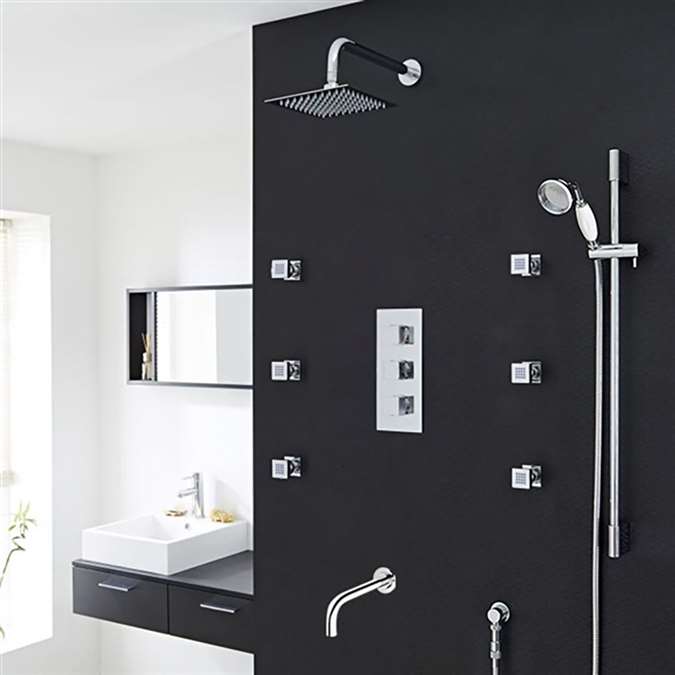
Catania Square Bathroom Shower Set with Rainfall Shower Head & Hand Shower
Catania offers best value for money for its class on the shower sets market. It is a high-quality product, complete with rainfall shower, handheld shower, six body massage jets and a practical tub spout. The controls for the shower functions and the hot and cold-water flow are also included and easy to use. You can customize the size of the main shower head according to your wishes. The finish is classic chrome, making this set a suitable addition to any contemporary bathroom design. Everything is wall mount, easy to install. Only the best materials have been used and the valve core material is ceramic for a long-lasting lifetime. It comes complete with accessories and installation instructions.
Catania Bathroom Shower Set with Rainfall Shower Head & Hand Shower Specifications
Type : Square Shower Set
Features : Rainfall Shower Head, Body Massage Jets, Tub Spout & Hand Shower with Slider Bar
Hot / Hold Water : Yes
Cold/Hot Water Control Type : Single Holder Dual Control
Installation Type : Wall Mount
Surface Finish : Chrome
Surface Treatment : Polished
Valve Core Material : Ceramic
Shower Head Size : See Options
|
|
BathSelect® Manufacturer Warranty Information
Installation Instructions for Catania Square Bathroom Shower Set
- Before you begin, please read the installation instructions below. Observe all local building and safety codes.
- Unpack and inspect the product for any shipping damages. If you find damages, do not install.
- Please note all showers must be installed by a professional and certified plumber otherwise warranty might be voided
|
|
Shower Head Installation
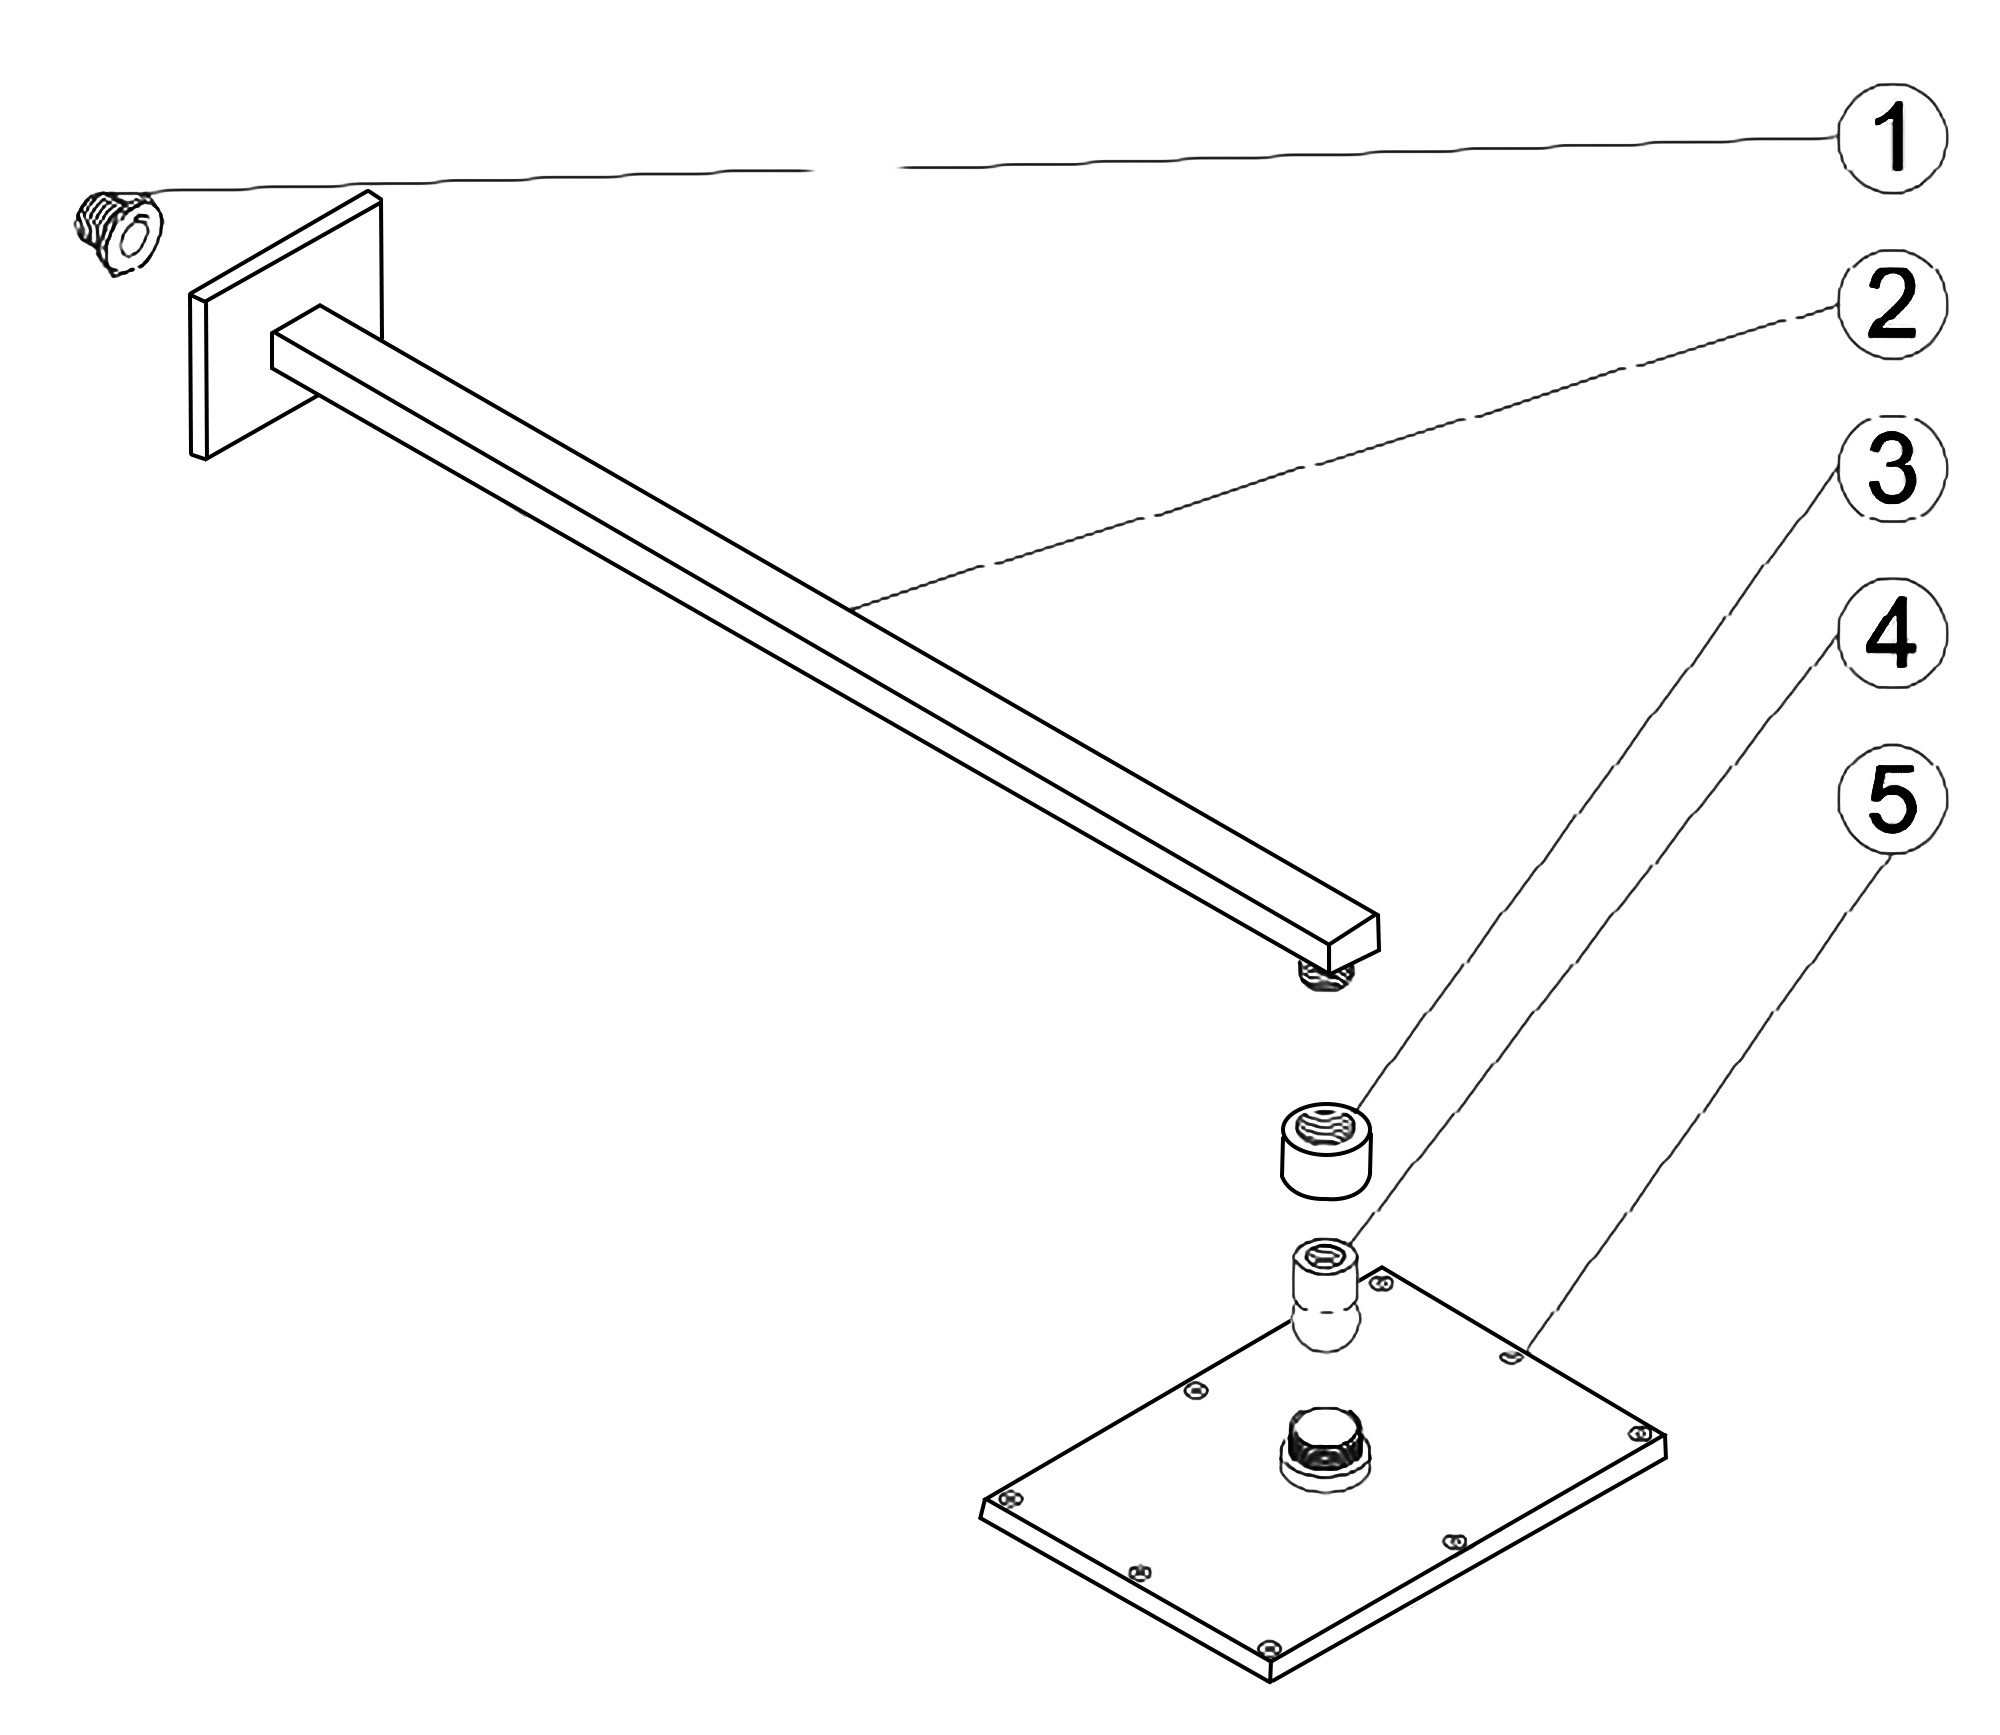
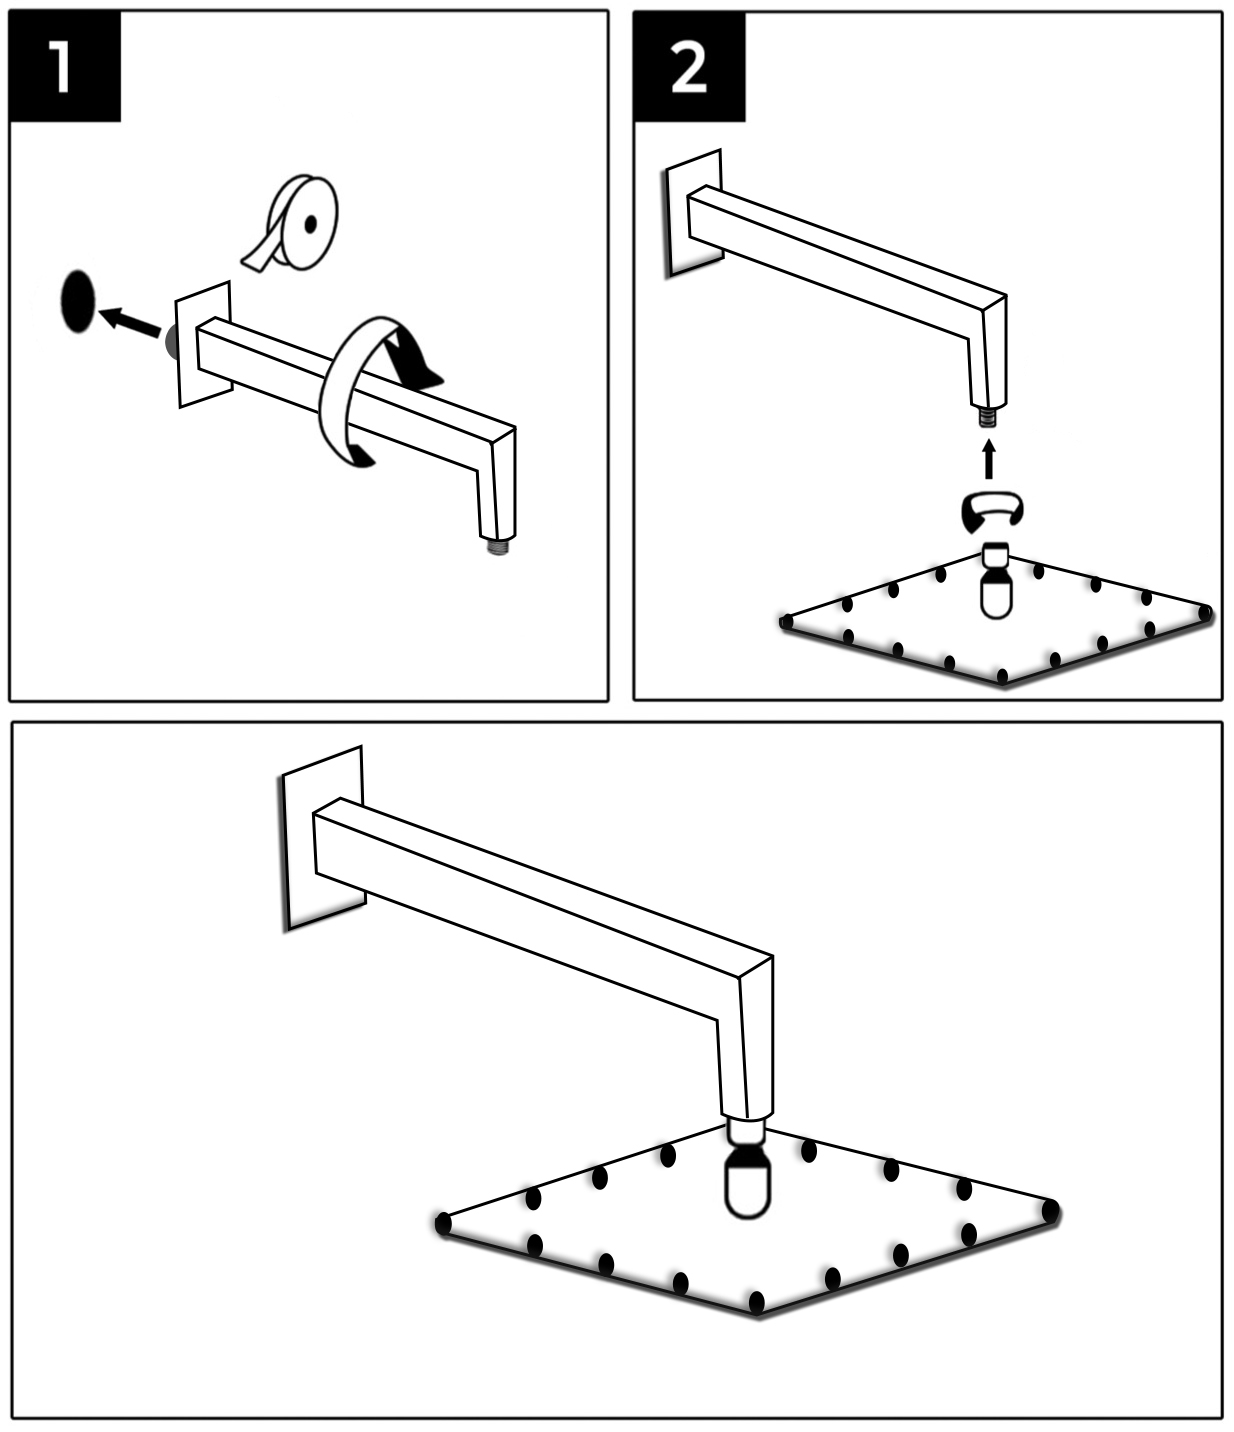
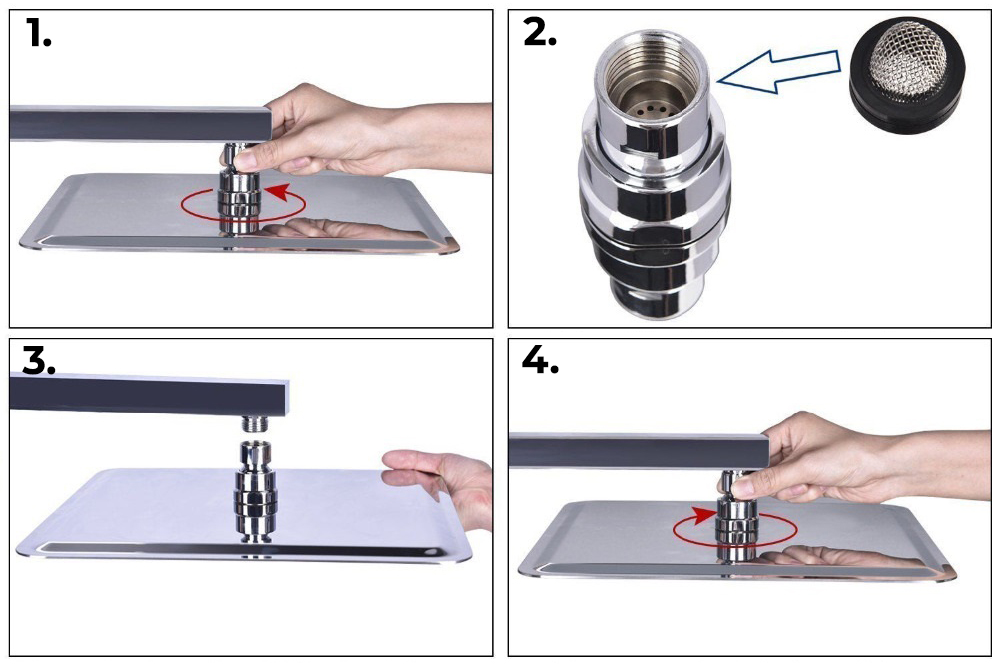
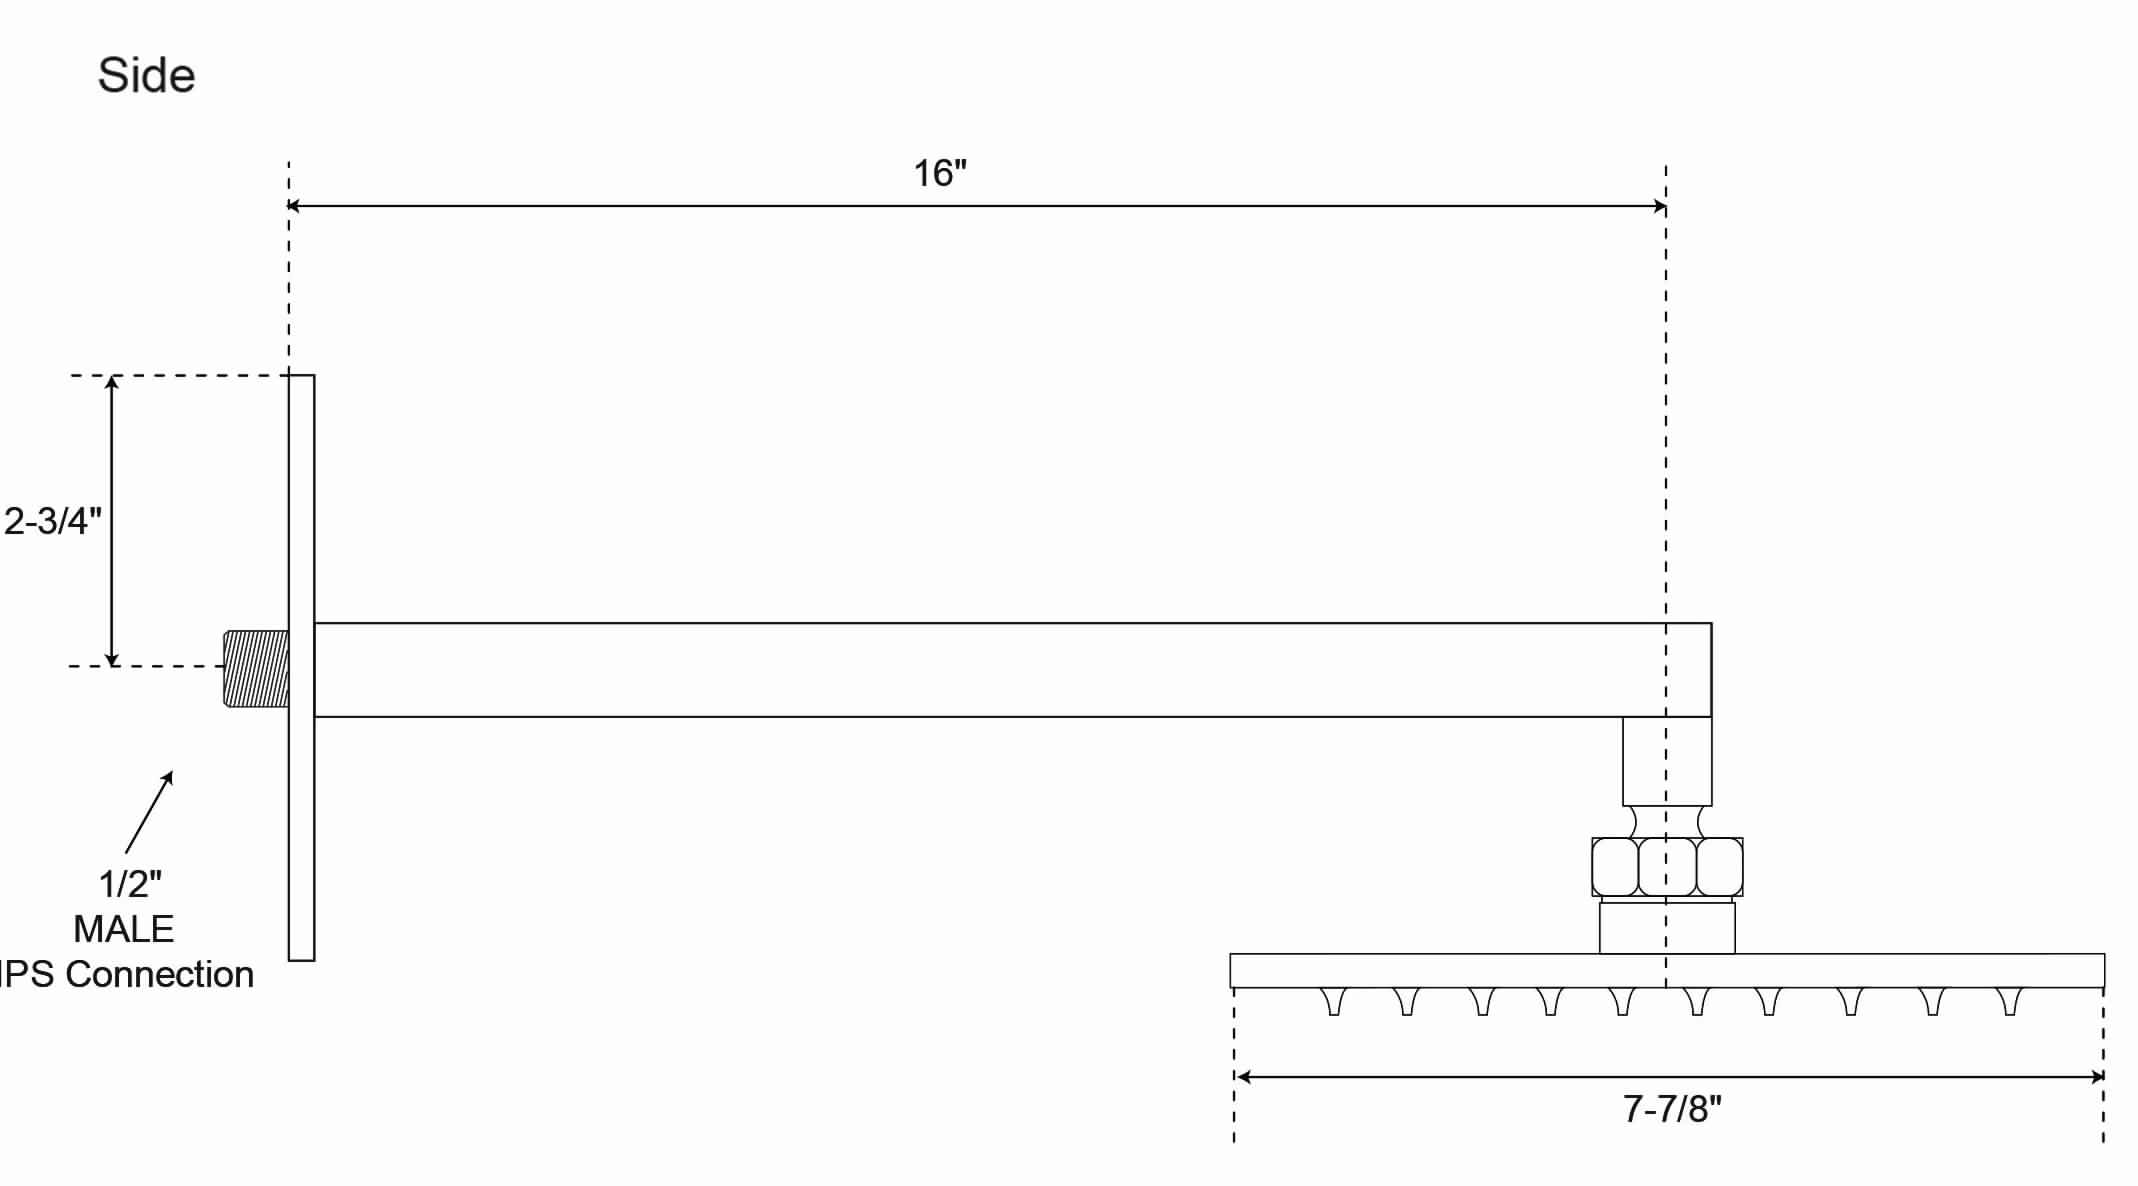
No tools required, ½ connector fits standard-sized shower plumbing.
-
Use your hands counterclockwise to unscrew the old showerhead and removed it.
-
Take out the showerhead, make sure the shower filter is placed in the connector.
-
Ensure the showerhead full horizontal alignment wall mounted shower arm thread.
- Use your hands clockwise to tighten showerhead.
Hand-Held Shower Instructions
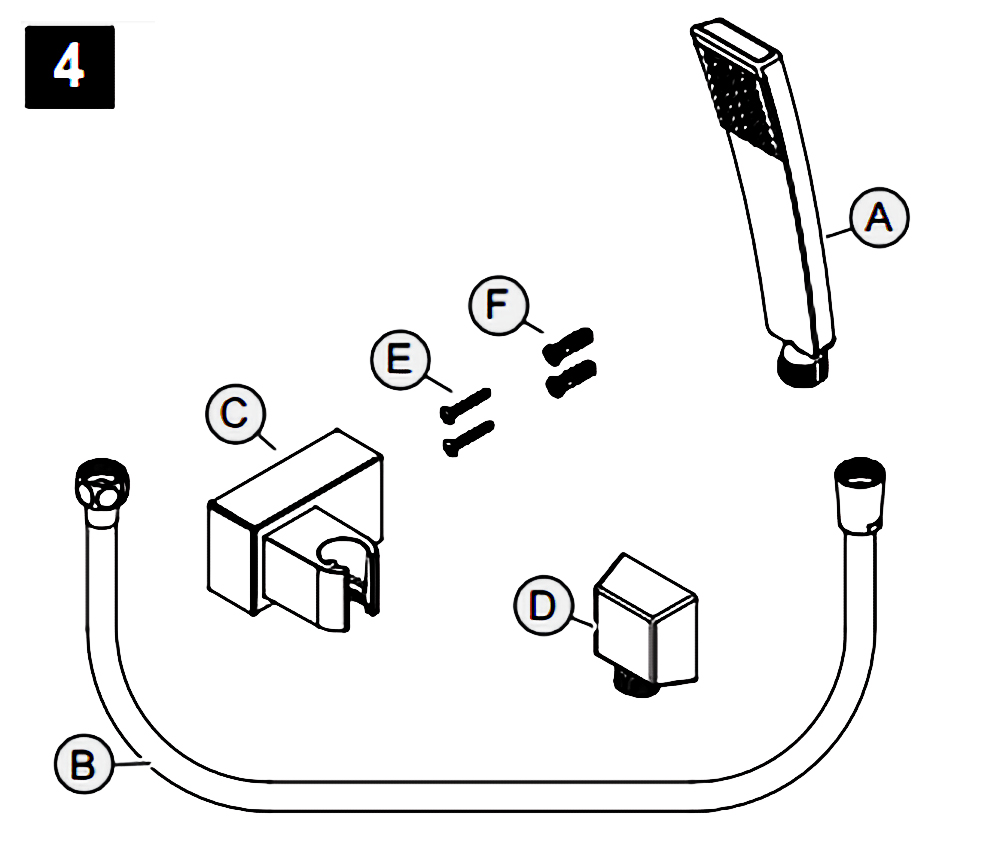
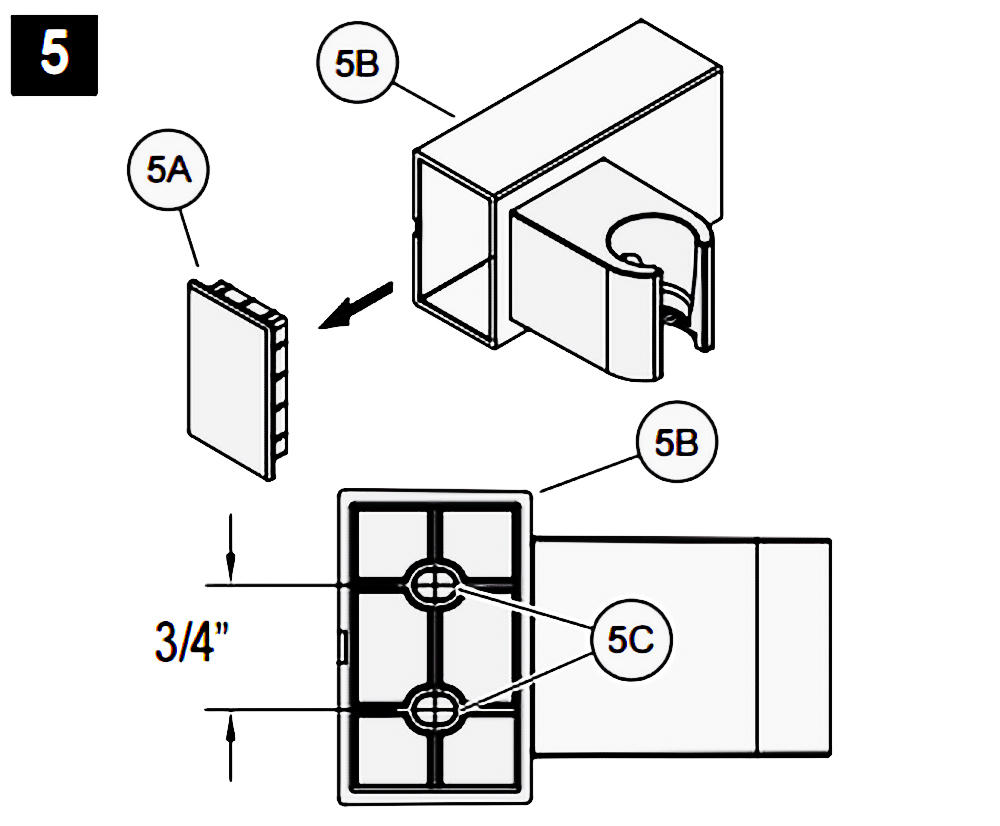
5. Hole Locations For Wall Mount
Remove Front Cover (5A) from Wall Mount (5B). Use Wall Mount Screw Holes (5C) to place the desired location. Using a punch or awl, tap the screw hole locations. Holes must be vertically aligned.

7. Wall Mount Installation
Place Wall Mount (7A) into wall and inset Mounting Screws (7B) through Wall Mount Holes (7C) and tighten until Wall Mount (7A) is flush with the wall. Do Not Over Tighten! Insert Front Cover (7D) into Wall Mount (7A).
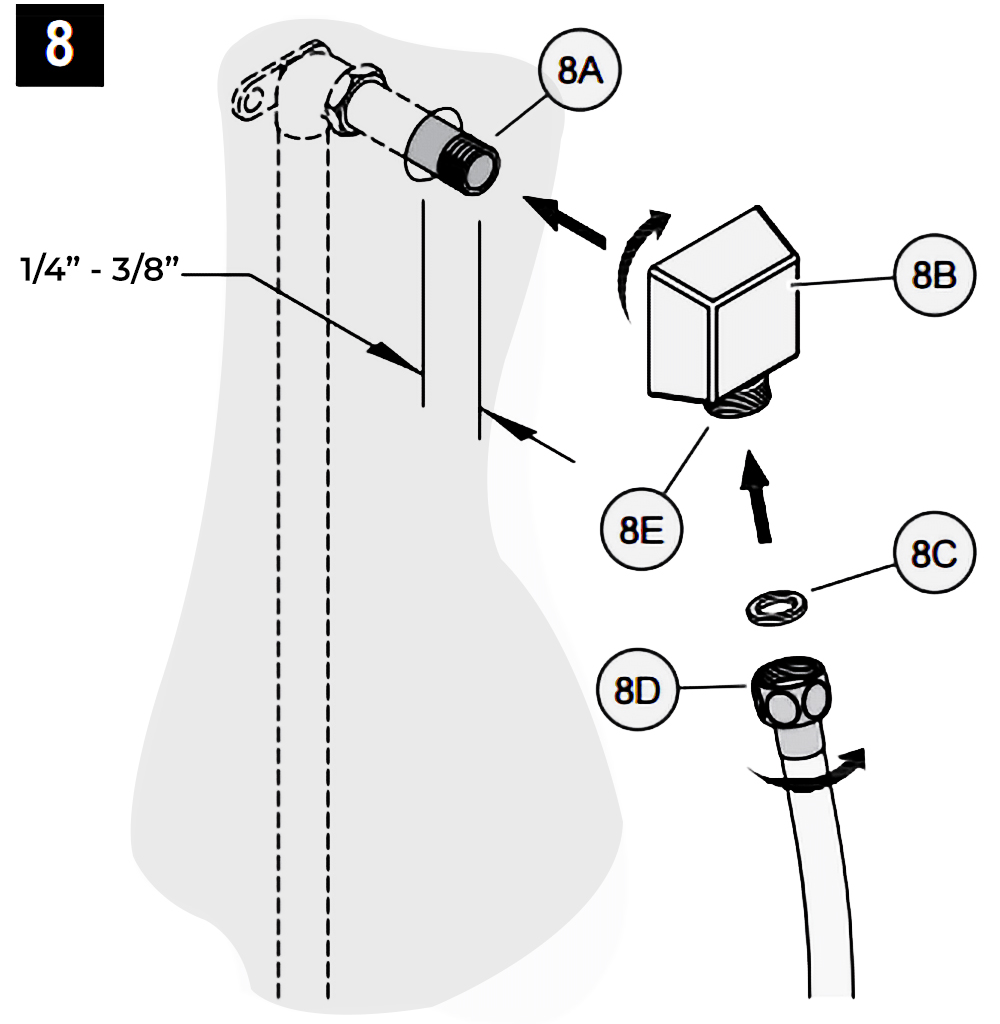 8. Drop Elbow & Hose Installation
Apply PTFE plumbers tape on both ends of Pipe Nipple (8A) (not included). Screw Pipe Nipple (8A) into the elbow inside the wall. The Pipe Nipple (8A) is to project 1/4 3/4 from the finished wall. Screw Drop Elbow (8B) onto Pipe Nipple (8A) and tighten until Drop Elbow (8B) is property positioned and flush to the finished wall.
Place Rubber Seal (8C) inside Hex Hose Fitting (8D). Connect Hex Hose Fitting (8D) into Drop Elbow Outlet (8E) by turning Hex Hose Fitting (8D).
9. Unit Start Up
Turn on hot and cold water supplies, and check al connections for leaks.
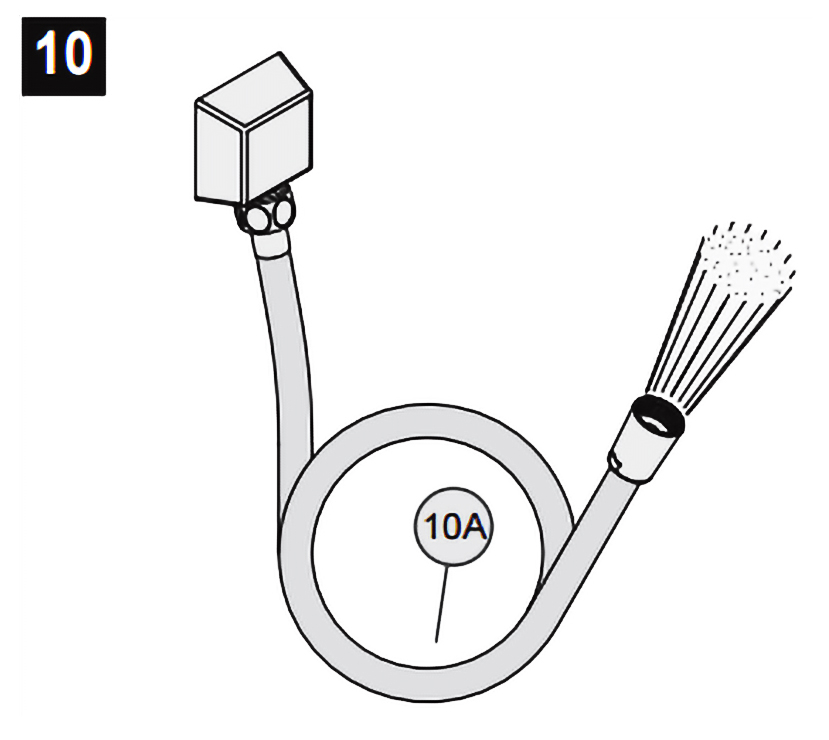 10. Final Flushing
For final flushing, turn valve on and allow water to run through the Hose (10A) for several minutes. Allow water to run for several minutes until all foreign matter clears the line.
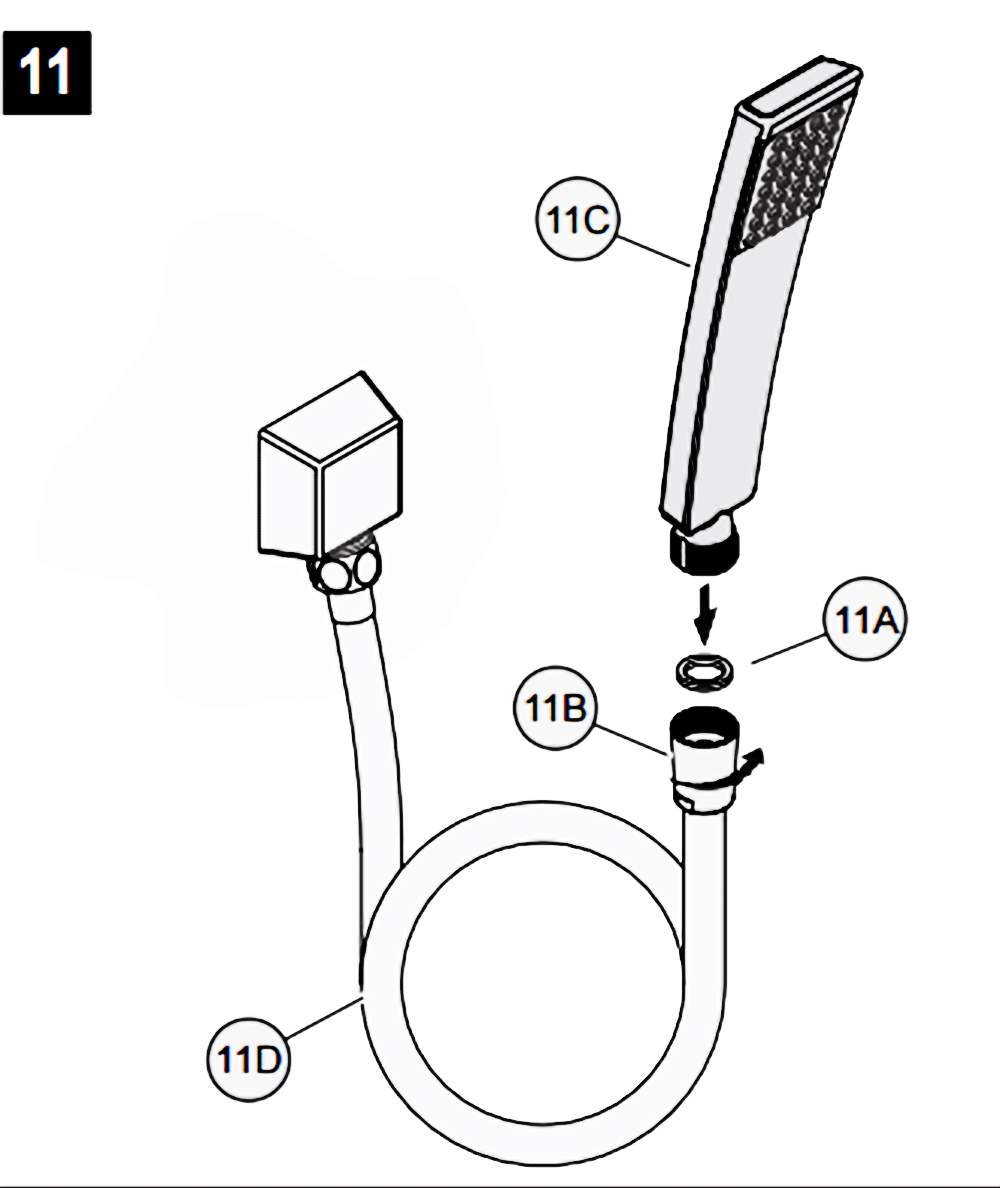
11. Shower Arm Installation
Place Rubber Seal (11A) inside Tapered Hose Fitting (11B). Conned Hand Shower (11C) to Hose (11D) by turning Tapered Hose Fitting (118) clockwise.
Warning: Make sure Hand Shower (11C) is securely tightened to Hose (11D).
Shower Body Jets Installation
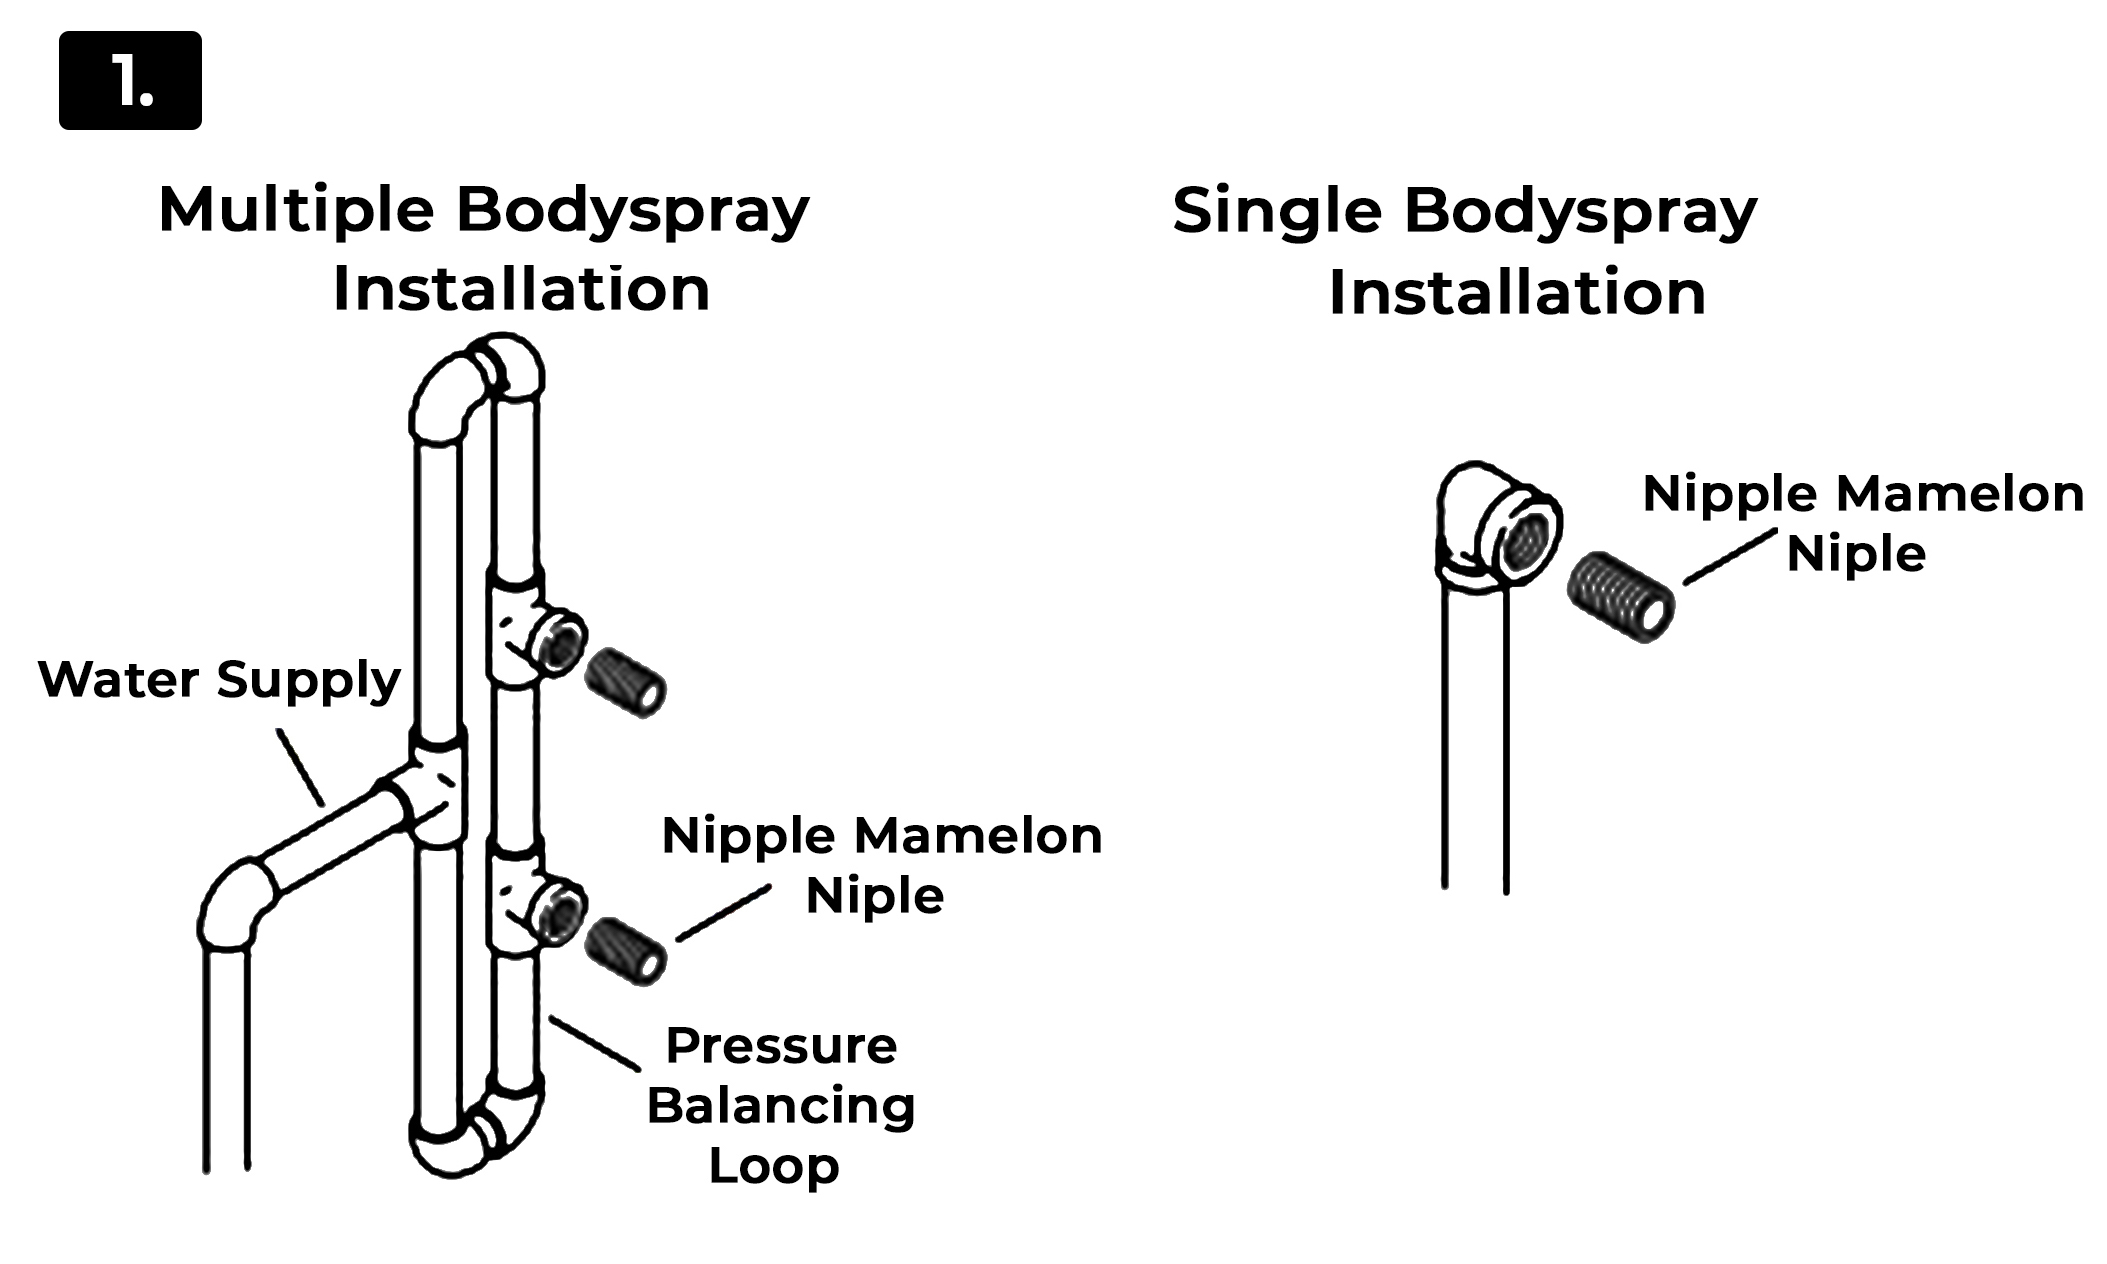
Multiple Bodyspray Installation
Water Supply
Nipple Mamelon Nipple
Pressure Balancing Loop
1. Route the water supply lines.
2. If installing more than one bodyspray off the same supply line, construct a pressure balancing loop. Locate a tee along the loop at each bodyspray installation location.
3. Do not strap the pipes at this time.
Single Bodyspray Installation
Nipple Mamelon Nipple
1. Route the water supply line.
2. Install an elbow to the end of the supply pipe at the bodyspray installation location.
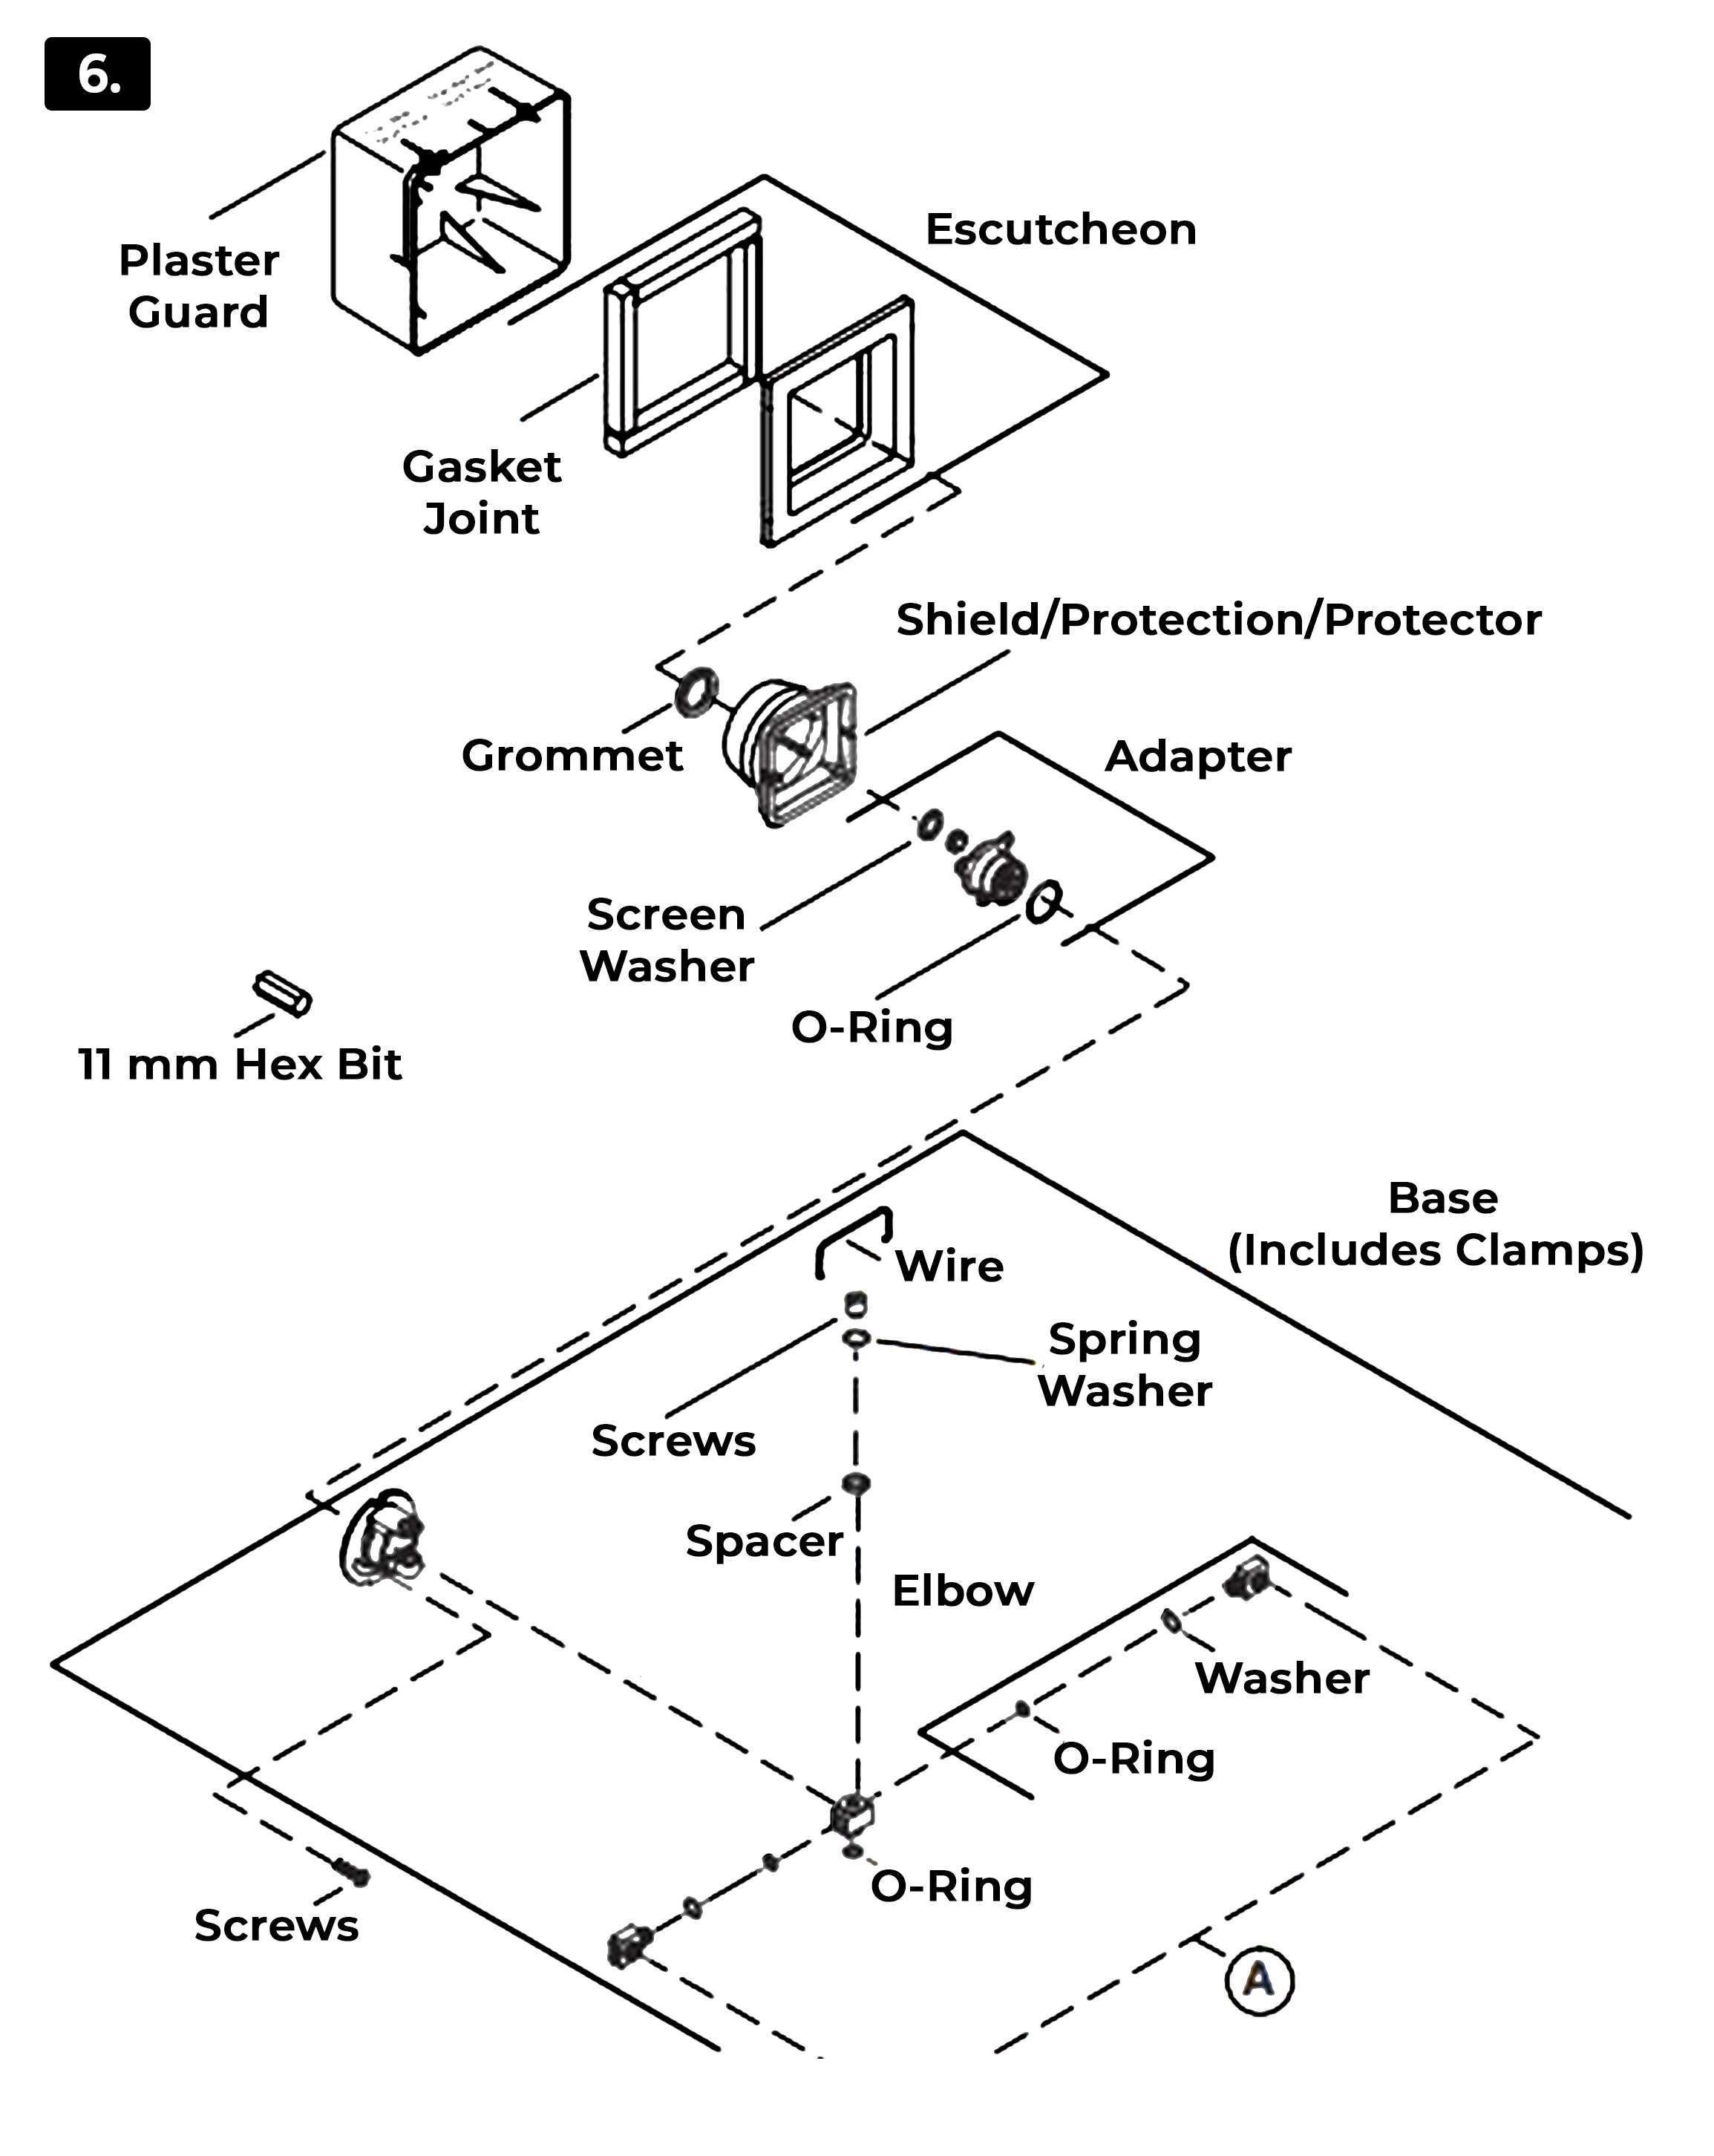
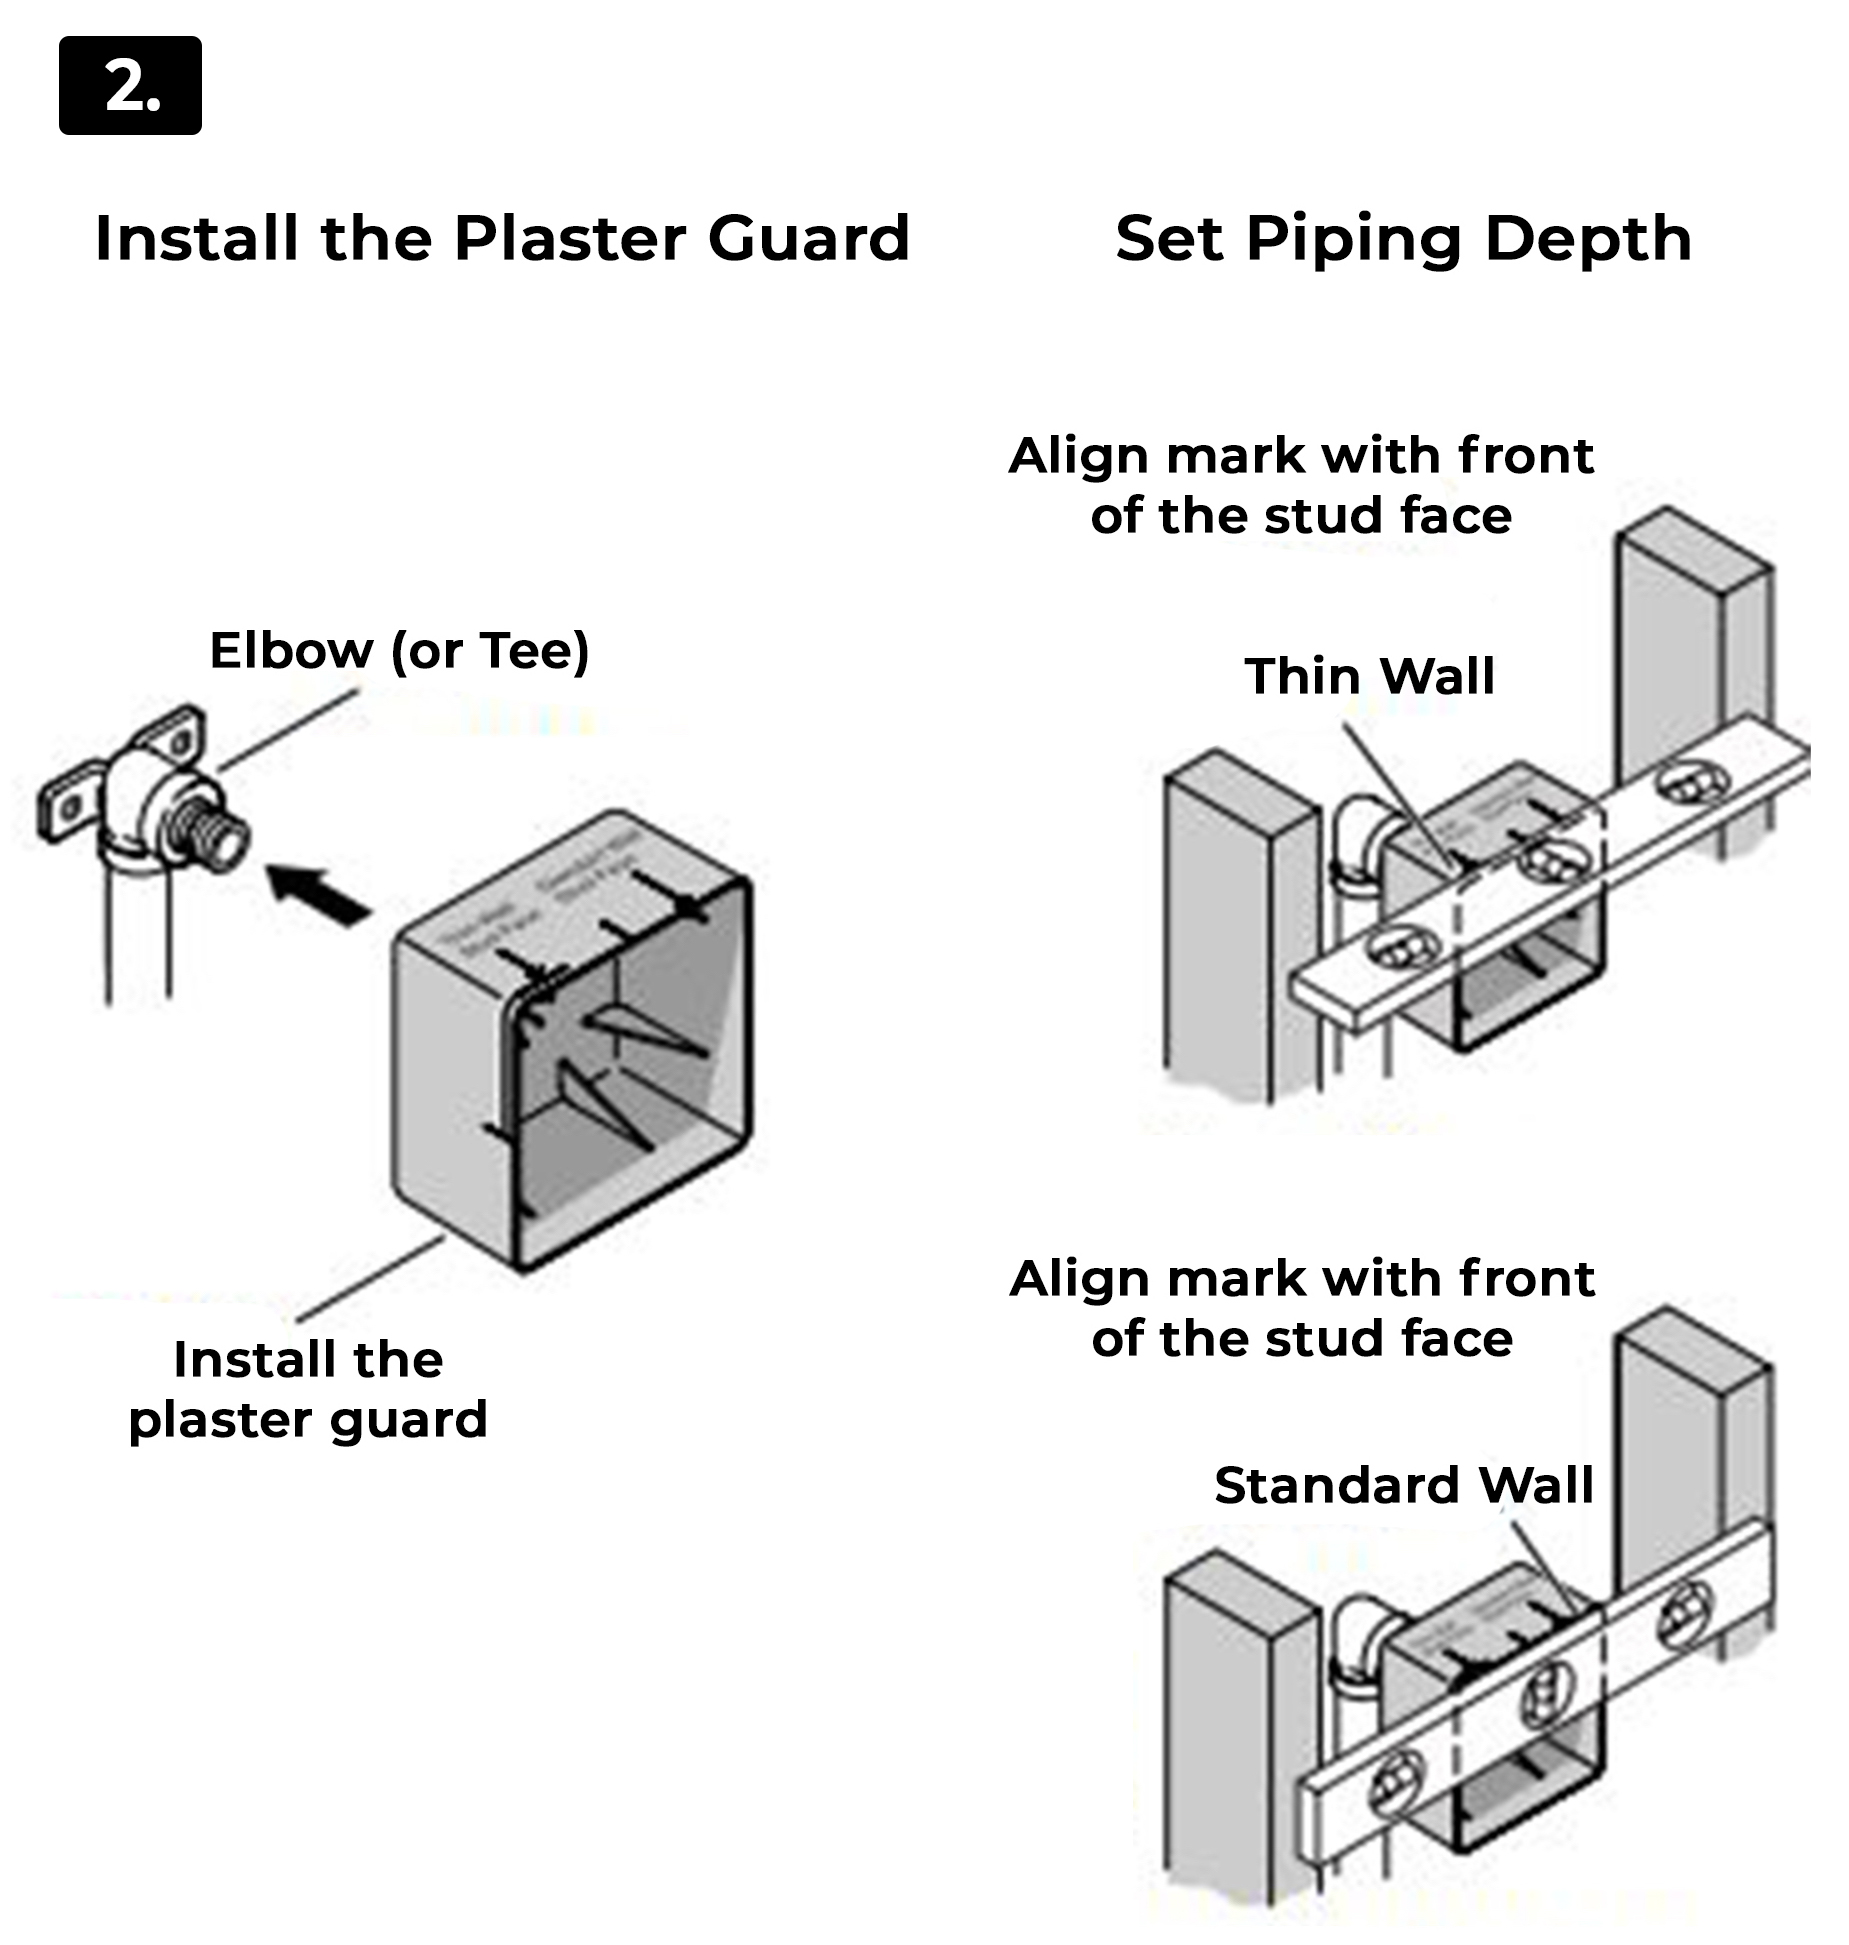 Install the Plaster Guard
Elbow (or Tee)
Install the plaster guard
Set Piping Depth
Align mark with front of the stud face
Thin Wall
Align mark with front of the stud face
Standard Wall
Install the plaster guard. Push until the plaster guard is snug against the face of the elbow (or tee).
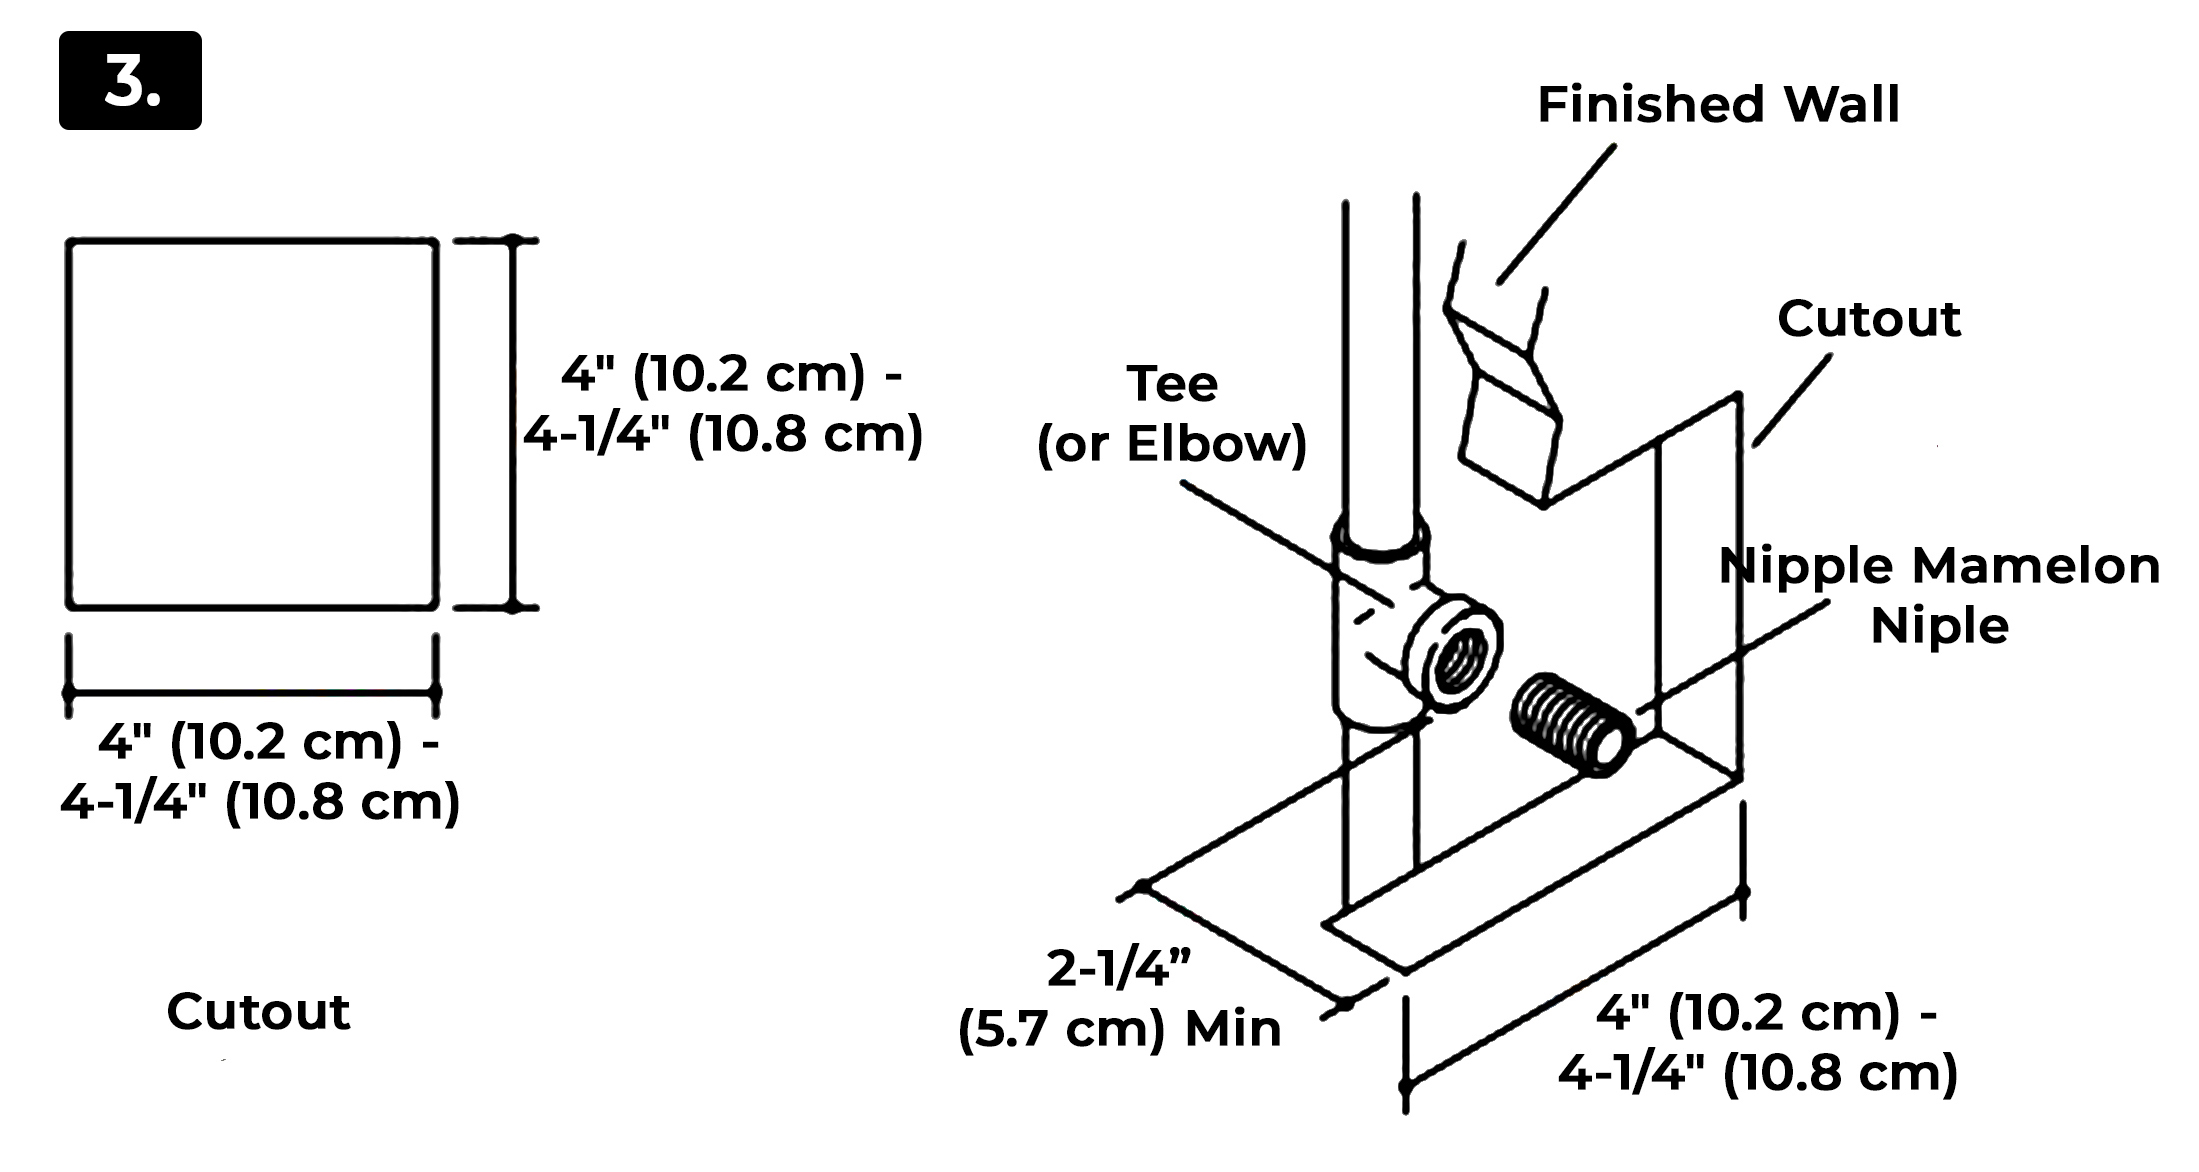 1. Install the water-resistant wall board.
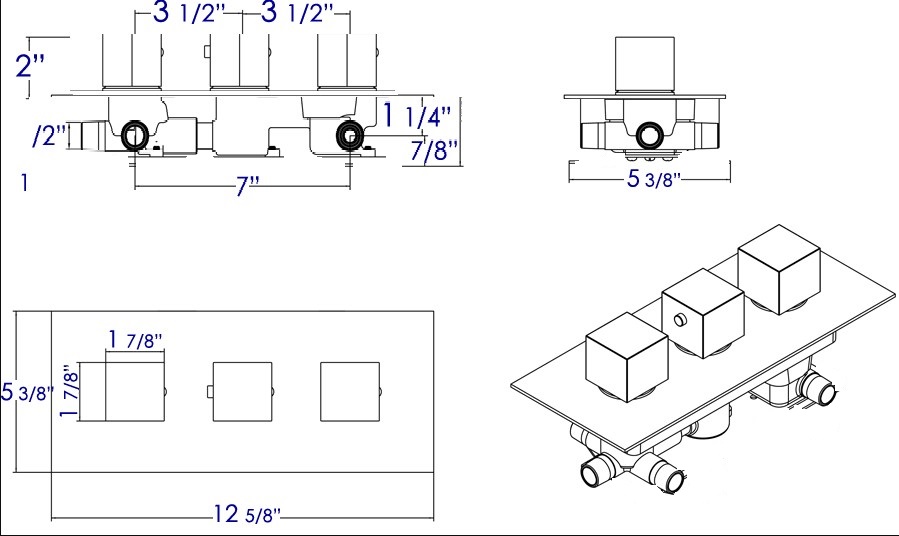
2. Cut out a 4" (10.2 cm) to 4-1/4" (10.8 cm) square at each the installation location.
3. Install the finished wall material.
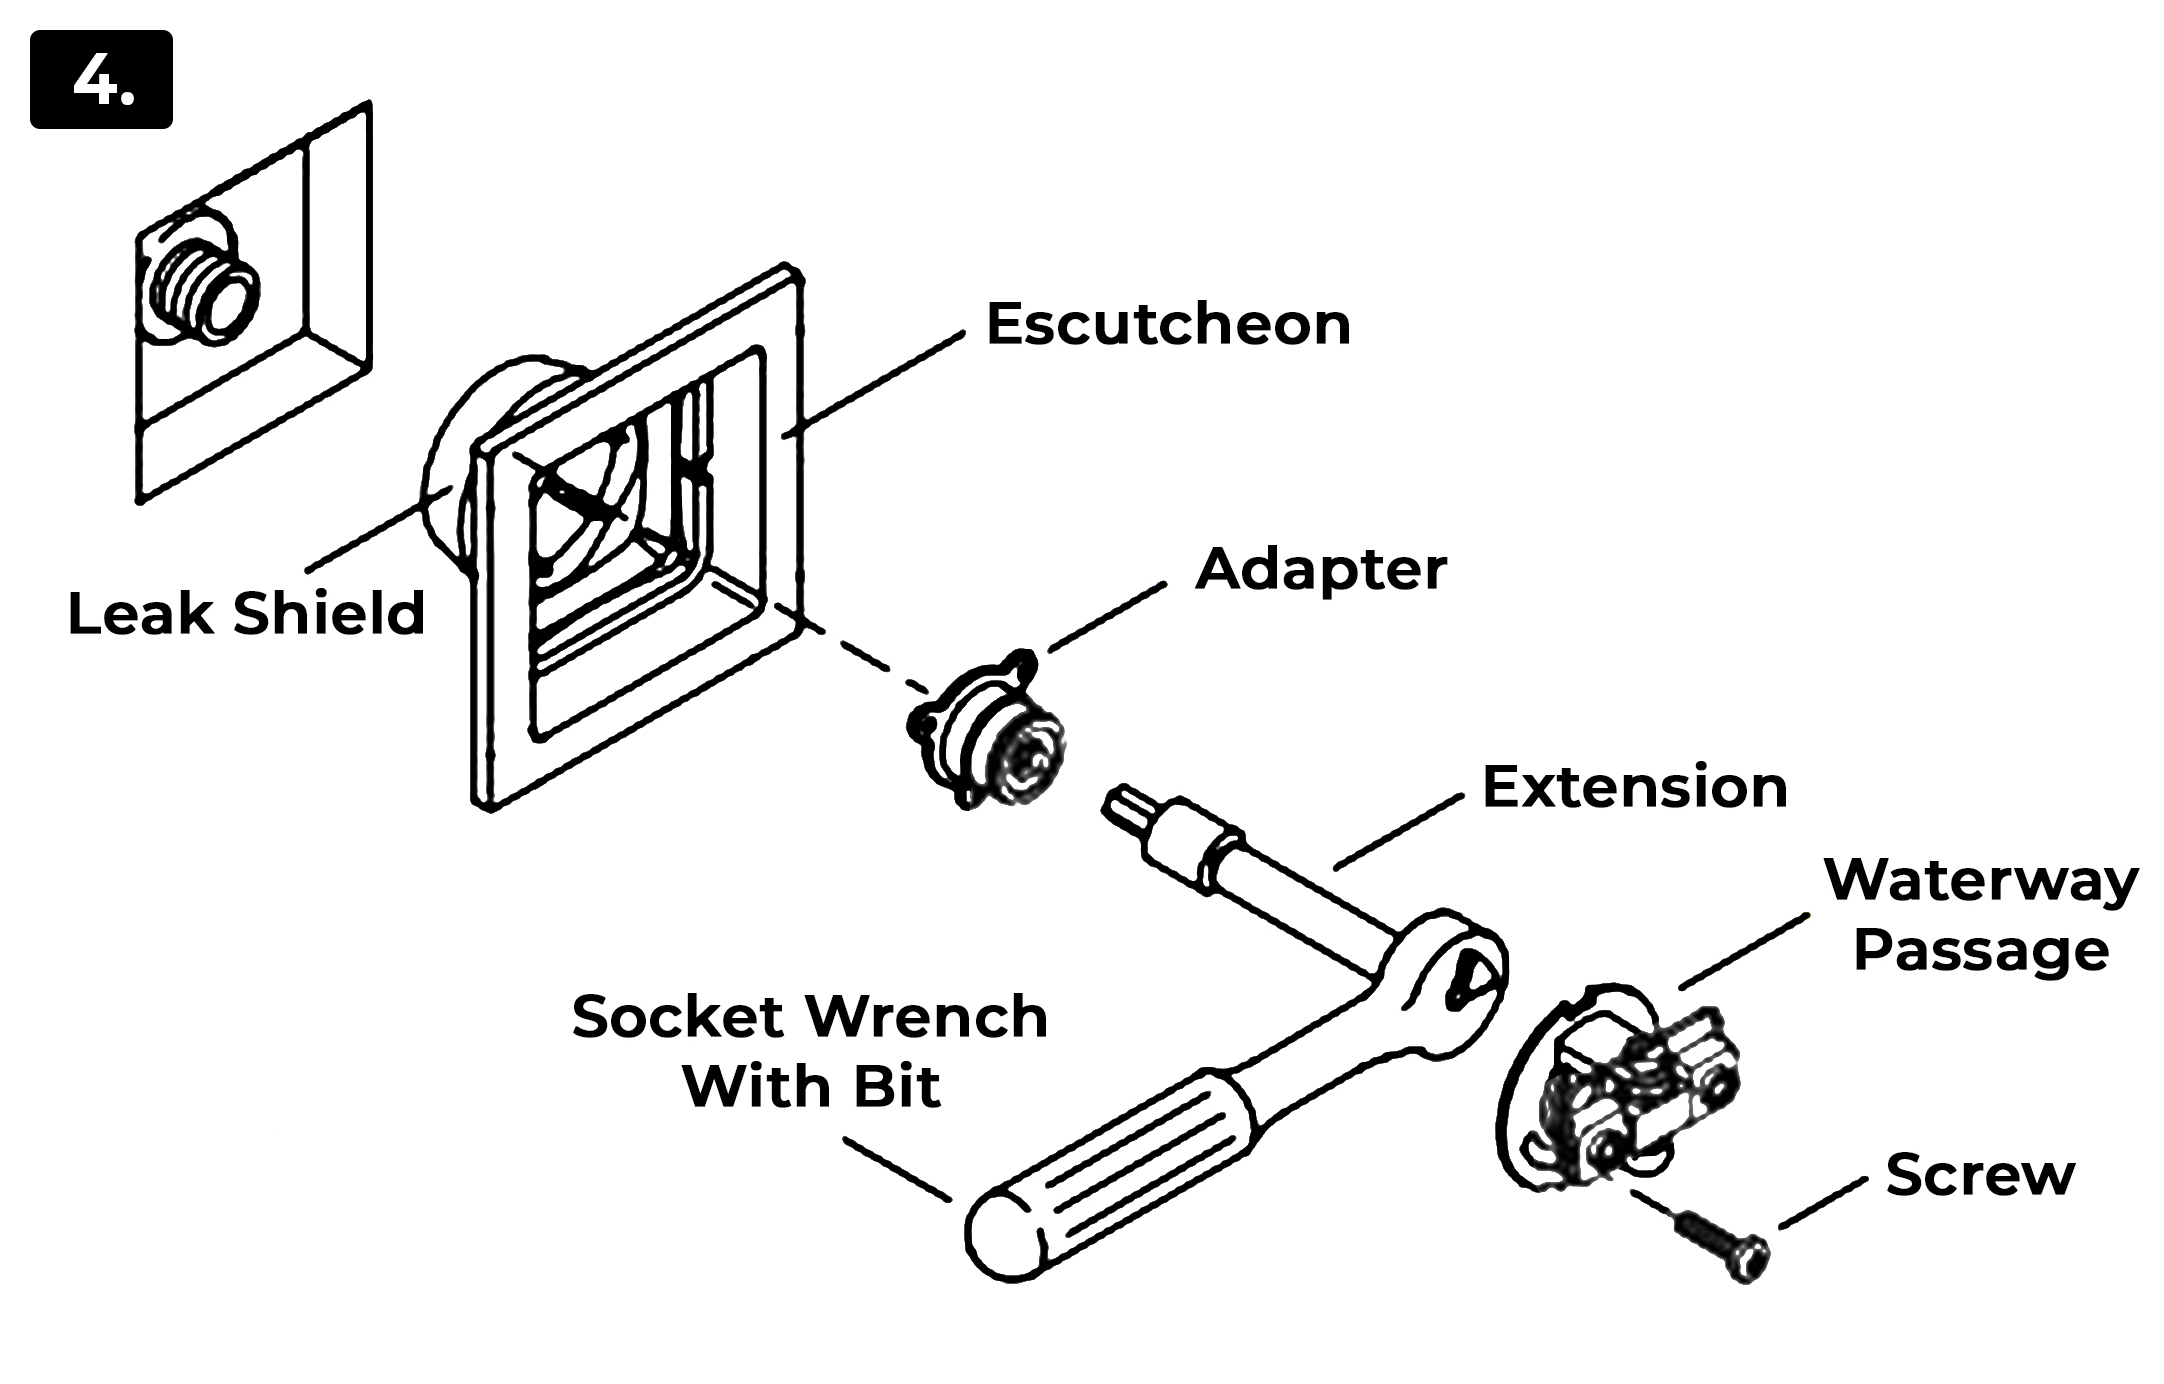 Escutcheon
Leak Shield
Adapter
Extension
Socket Wrench With Bit
Screw
Waterway Passage
1. Insert the escutcheon into the rough opening. The double ribs of the leak shield should be facing up.
2. If the leak shield makes contact with the elbow: Enlarge the hole in the back of the leak shield to 1-1/4" (3.2 cm).
3. Thread the adapter onto the nipple using the provided 11 mm bit, 11 mm or 7/16" socket, extension and socket wrench. Use masking tape to hold the bit in place, as the bit could fall off and cause damage.
IMPORTANT! The escutcheon should sit loosely at this point. If it is tight against the wall, use a longer pipe nipple.
4. Align the groove in the waterway with the double ribs on the leak shield.
5. Press the waterway into place over the adapter. Secure the waterway to the adapter with the screw provided.
6. Verify that the escutcheon does not turn or shift.
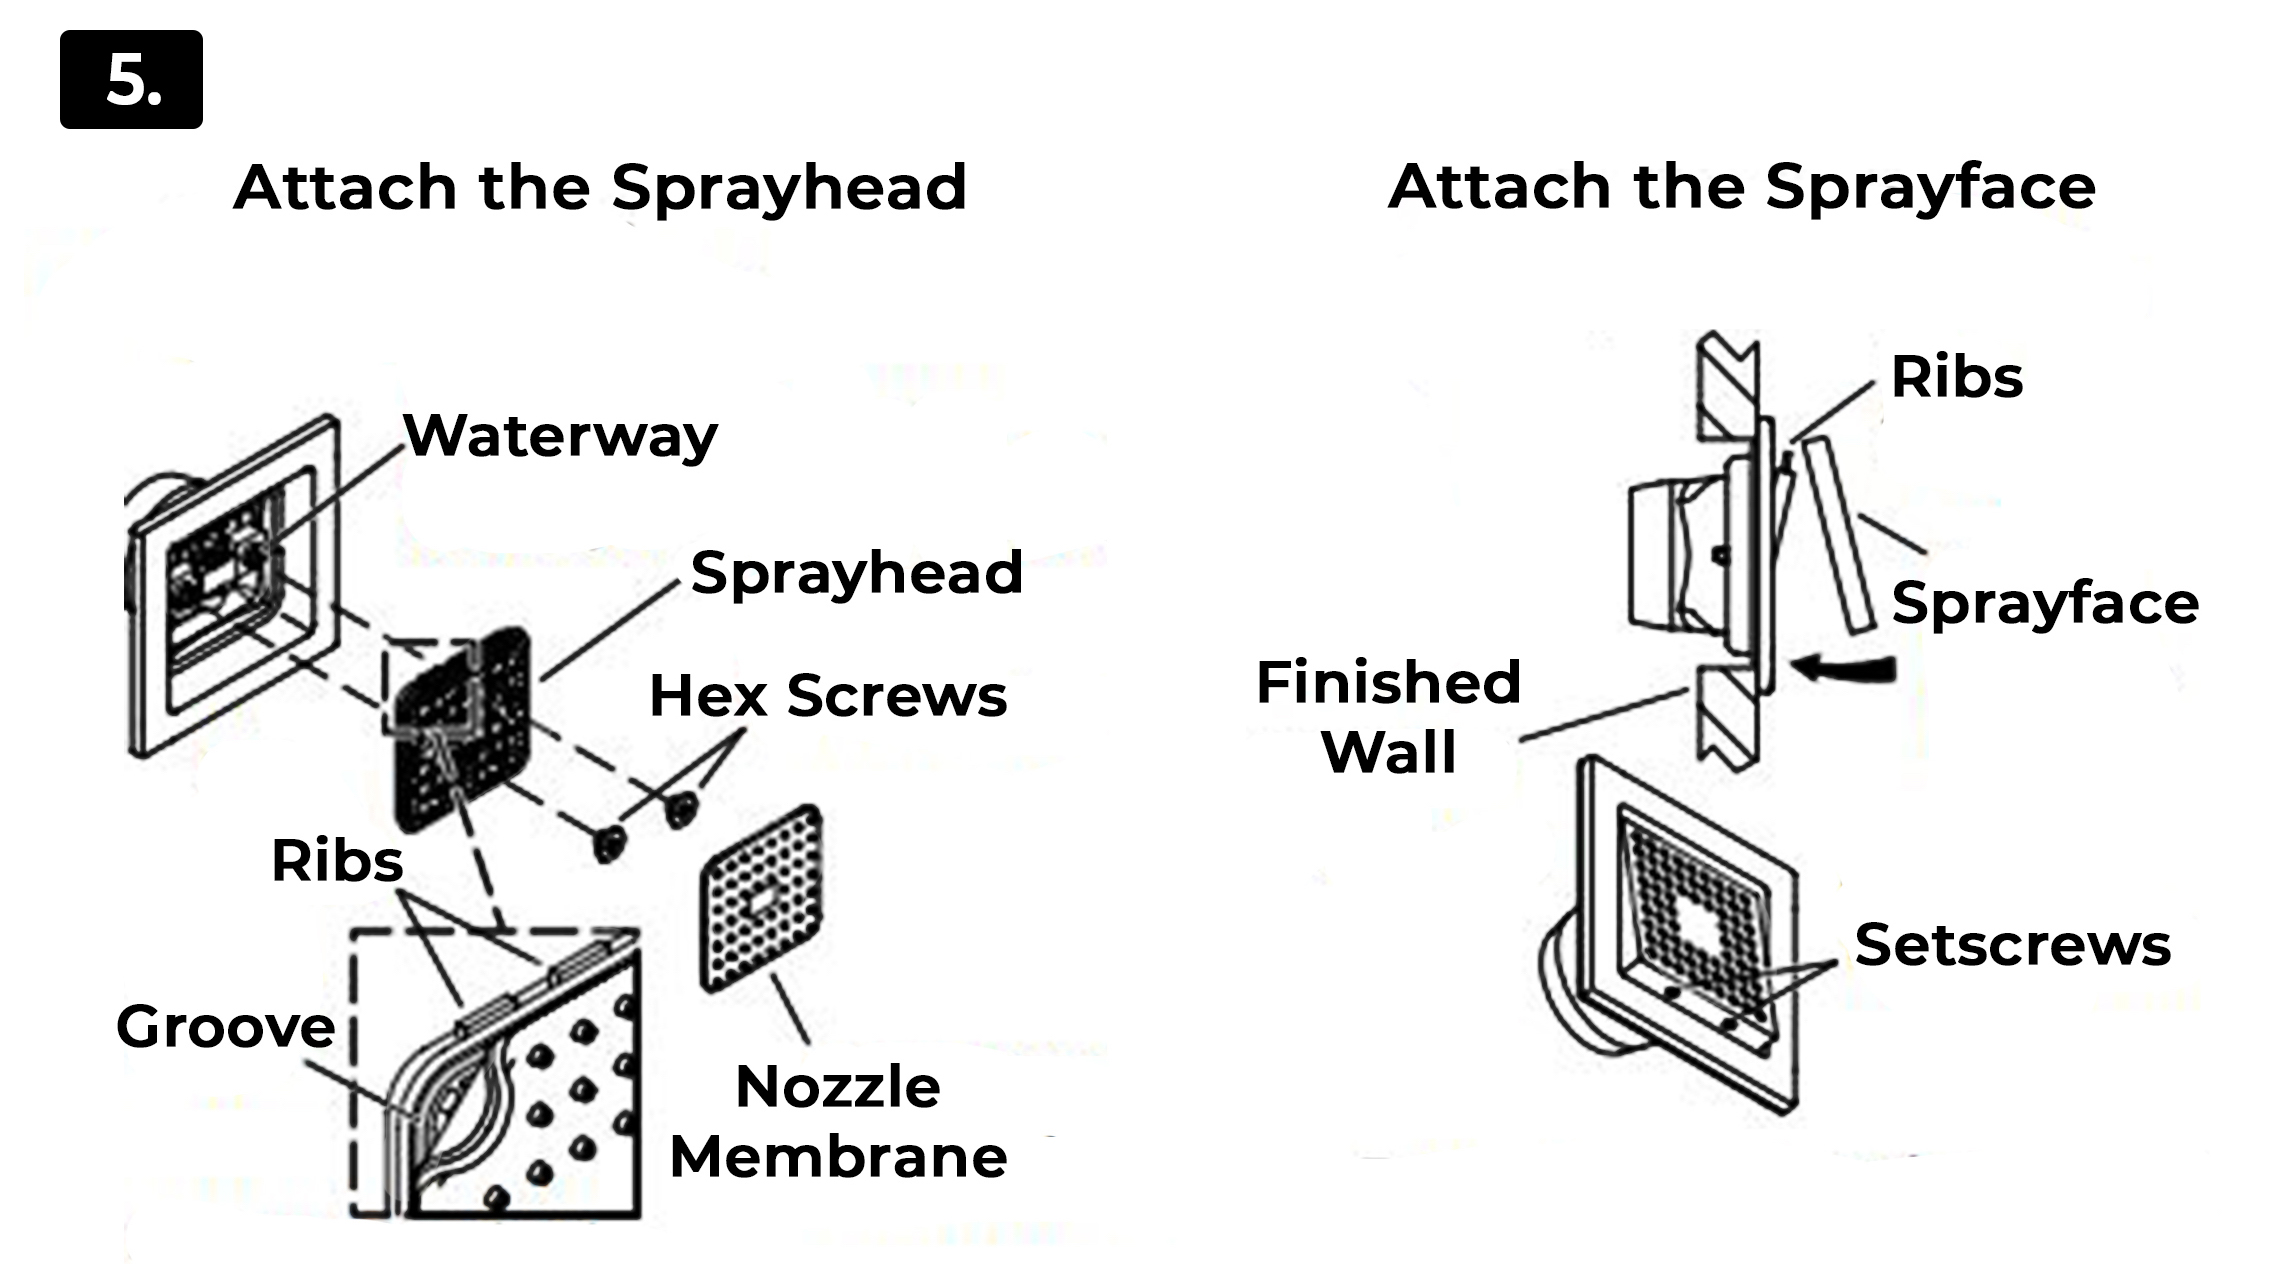
With the ribs of the sprayhead facing up, install the sprayhead to the waterway.
With the ribs of the sprayhead facing up, install the sprayhead to the waterway.
|
|
BathSelect provides an extensive range of premium showers that perfectly enhance any architecturally designed bathroom.
We offer a wide variety of unique designs and high-quality bathroom fixtures, perfectly suited for your architecturally inspired bathrooms!
The material used for shower jets plays a crucial role in their durability and longevity. We offer stainless steel and brass shower jets, which are significantly more durable than plastic options. The design of our shower jets also influences their performance. Some of our showerheads are crafted to create a soothing rainfall effect, while others provide a more concentrated stream of water. Ultimately, the best shower jet for you will depend on your personal preferences and needs. We encourage you to explore our variety of showerheads to find the perfect fit for your bathroom!
Read More
BathSelect designer shower sets combine innovative technology with sleek designs. These
designer shower systems feature rainfall shower heads, body jets, and hand showers for a luxurious experience. Built with premium materials, they ensure durability and style, offering multifunctional residential and commercial application options. Our Best Shower systems provide an all-encompassing experience with multifunctional features, including rainfall heads, body jets, and handheld sprayers. These systems deliver efficient water use, ergonomic design, and customizable options, making them ideal for high-end bathrooms seeking luxury and performance. BathSelect multifunctional shower systems include body jets, rainfall heads, and handheld sprayers. They offer users the flexibility to customize their shower experience with various spray settings and water flow options that ensure relaxation, rejuvenation, and efficient water usage.
Our body massage showers feature strategically placed jets that provide a deep, therapeutic water massage. With adjustable settings, these showers offer full-body relaxation, combining luxury and wellness, ideal for relieving tension and enhancing the showering experience. Digital shower systems offer precise temperature and flow control through advanced digital interfaces. These systems enhance user convenience with programmable settings, water-saving options, and sleek modern designs, which are ideal for contemporary bathrooms seeking innovation and ease of use.BathSelect showers see all are available in different finishes. A timeless and versatile finish that blends well with modern or traditional bathroom designs. The Brushed Nickel features water-efficient technology and corrosion resistance, ensuring long-lasting performance and aesthetic appeal. Delivering a sleek, high-gloss Chrome finish, ideal for modern bathrooms. These showers are resistant to tarnish and easy to clean, providing durability and a stylish look with excellent water flow and temperature control.
Don't have all your product information? Browse all support topics below.
Read More
A warm, rustic finish that adds an elegant touch to any bathroom is the
Oil Rubbed Bronze Showers; they are durable and feature advanced water-saving technology, making them perfect for both traditional and transitional spaces. With a luxurious, eye-catching gold finish, such showers are crafted for durability and high-end performance, featuring water-saving capabilities and corrosion resistance, perfect for opulent bathroom designs. The Brushed Gold combines modern elegance with timeless luxury; the matte finish adds sophistication, while the showers are engineered for water efficiency and durability, ideal for high-end bathroom aesthetics.
BathSelect offers a bold, contemporary look of
Matte Black, ideal for modern, minimalist bathroom designs with multifunctional features. With a unique, warm finish. Rose Gold Showers are built with premium materials and offer advanced water-saving features, perfect for bathrooms seeking a soft, luxurious design. Smooth, matte finish that resists tarnishing and fingerprints are Satin Nickel Showers. They blend well with contemporary and traditional bathroom designs, offering durability, easy maintenance, and water-saving technology. , corrosion resistance, durability, and sleek design. Stainless Steel Shower that are perfect for modern bathrooms, offering excellent water flow, easy maintenance, and a long-lasting performance. The Brushed Nickel Shower System, has a smooth, tarnish-resistant finish, ideal for various bathroom styles. Rainfall heads and multifunctional settings ensure durability, water efficiency, and timeless appeal in residential and commercial settings. BathSelect Chrome Shower System combines a high-gloss finish with advanced water-saving technology. Easy to clean and corrosion-resistant, this system provides durability and sleek aesthetics, suitable for contemporary bathroom designs.
Join Us
Find Out First
Get BathSelect emails of inspiration, new product releases, and more!
Read More
BathSelect offers a rich, dark finish
Oil Rubbed Bronze that complements traditional and transitional styles. It is engineered for longevity and water efficiency and adds warmth and character to luxury bathrooms. , Our luxurious finish Gold Shower System with water-saving technology. Perfect for opulent designs, this system offers durability, corrosion resistance, and high-end aesthetics for both residential and commercial use. A matte, elegant finish, ideal for high-end bathroom designs, is the Brushed Gold Shower System. With advanced water flow control and durability, it offers a stylish, long-lasting solution for luxury bathrooms. For modern sophistication to bathrooms with its non-reflective, scratch-resistant finish is the Matte Black Shower System. This system is engineered for durability and water efficiency, and it is ideal for minimalist, contemporary designs.
Browse all the Chrome showers on sale, including the Chrome shower faucet and the Chrome shower system, which is a combination of a showerhead, faucet, and handheld components. The Chrome Shower Arm, the Chrome LED Shower System, for the LED lighting is incorporated into the showerhead, often changing color based on water temperature. These systems enhance the showering experience by providing visual cues for temperature and adding a vibrant, modern touch to bathroom decor. The Chrome LED Showers On Sale. While known for its large, drenching water spray, the Chrome Rain Shower System emulates the feel of natural rainfall. Integrating body jets into the shower system for a full-body hydrotherapy experience is the Rain Shower and Body Sprays Chrome, or Chrome Shower Systems with Body Jets. The Multi Jet Chrome finish Shower System features several jets strategically positioned to deliver water from multiple angles. This type of Rain Shower System with handheld Chrome provides thorough water coverage and offers a luxurious experience by integrating massage jets along with the chromes sleek, polished look. The Bathtub & Shower Systems in Chrome combine a chrome shower and faucet system with a bathtub fixture, allowing a seamless transition between the two. These systems are ideal for bathrooms with both a tub and shower, with the chrome finish tying the aesthetic elements together for a cohesive, modern design. Chrome Color Changing Shower System: these systems utilize LEDs. The chrome finish complements the high-tech look, enhancing the overall appeal of a futuristic shower experience while maintaining durability and resistance to tarnishing.
Rose Gold Shower System offers a unique blend of luxury and warmth. Its premium construction, water-saving features, and soft finish make it an excellent choice for elegant, upscale bathroom environments. The Satin Nickel Shower System from BathSelect combines a matte, fingerprint-resistant finish with advanced water-saving features. It's durable, easy to maintain, and suits both contemporary and traditional bathroom designs. BathSelect Stainless Steel Shower System offers high durability and a sleek, modern aesthetic. Resistant to rust and corrosion, this system ensures efficient water usage and long-lasting performance, perfect for contemporary bathrooms.
|
|
|


.jpg)


.png)