 |
 |
 |
|
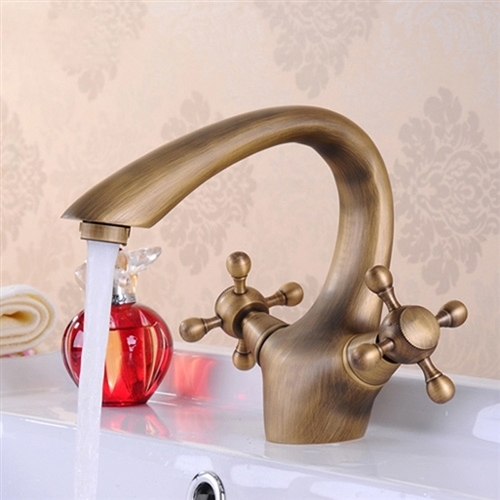
Rubeno Antique Brass Sink Faucet
Our Rubeno antique brass
sink faucet is perfectly suitable for any bathroom or lavatory where you want to recreate an old style atmosphere. The valve is made of brass and valve core material is ceramic for long lasting life.  It is deck mount, single hole, with two handles. Easy to install, with standard US connections, Comes complete with all necessary accessories and detailed installation instructions. It is deck mount, single hole, with two handles. Easy to install, with standard US connections, Comes complete with all necessary accessories and detailed installation instructions.
Rubeno Antique Brass:
- Type: Basin Faucets
- Brand Name: Fontana
- Style: Classic
- Hot & Cold Water: Yes
- Number of Handle: Single Handle
- Surface Treatment: Polished
- Style: Dual Holder Single Hole
- Faucet Mount: Single Hole
- Type: Ceramic Plate Spool
- Valve Core Material: Ceramic
- Feature: Thermostatic Faucets
- Installation Type: Deck Mount
- Model Number: F8286
- Material: Antique brass
- Fitting thread: Standard G1/2''
- Suitable Place: Bathroom/Lavatory
- Flow Rate: 1.3 GPM
- Total Height: 16cm (6.29")
- Spout Height: 10cm (3.93")
- Suitable Place: Bathroom/Lavatory
- What's in the box: 1X Faucet, 2X Flexible Hose & accessories
|
|
Faucet Care and Maintenance
IMPORTANT FAUCET INSTALLATION NOTICE
Before using a newly installed faucet, remove the aerator, if applicable. Turn on the water to the faucet and let it flow for 15 seconds. This flushes out sediment in the water line, preventing it from becoming lodged in the faucet valves, which can affect performance and cause damage to the faucet.
FLUSHING WATER LINES
If your faucet has an uneven flow or is dripping, it may be due to a buildup of sediment. Follow these steps to restore normal water flow. If your faucet does not have an aerator, proceed to step 4.
What You'll Need: Open-ended wrench, large bucket, pliers, towel, rag
- If a lock nut is included and attached to the faucet body, unthread to remove. If there is no lock nut or it is separate from the faucet, move on to the next step.
- Attach the flexible water feed tubes to the tail-piece. Hot water is always on the left and cold water is always on the right. If the water feed tubes are already connected, move on to the next step.
- If included, place the metal mounting washer, or clip, and rubber sealing gasket over the mounting hole. If there is no top mounting washer or gasket, move on to the next step.
- If a decorative mounting plate, or escutcheon, is included, place it over the mounting hole. If there is no decorative plate, move on to the next step.
- If your faucet includes a separate mounting rod, remove the mounting nut and screw the rod into the faucet body. Thread the rod, and water feed tubes through the mounting hole. Thread the mounting nut onto the rod from underneath the sink. Make sure that faucet is properly aligned, and tighten the nut with your adjustable wrench. If your faucet does not include a mounting rod, thread the faucet tail-piece and water feed tubes through the mounting hole and mounting hardware. Thread the washer (if included) and lock nut onto the tail-piece from underneath the sink. Make sure that faucet is properly aligned, and tighten the nut with your adjustable wrench.
- Hand tighten to attach the water feed tubes to the main water supply, being careful not to cross the two during installation. Give a ¼ turn with pliers or wrench, but do not over tighten. Curve tubes as necessary to ensure there are no kinks or knots. Note: If needed, you can connect 1/2" water feed tubes to a 3/8" water supply with faucet connectors available at your local hardware store. If there is a nut at the end of the water feed tubes, connect with a 1/2" pipe nipple.
- To install the new pop-up drain, apply a bead of silicone sealant to the underside of the drain flange and place it in the mounting hole. If there is no pop-up drain, move on to step 11.
- Thread the lock nut onto the drain pipe and tighten with your adjustable wrench.
- Wipe away any excess sealant around the drain using your damp cloth.
- Attach the P trap to the drain pipe and wall drain fitting, and tighten the lock nuts.
- When your faucet installation is complete, turn on the water supply. Check to make sure that all connections are tight (no water should be leaking) and that the hot and cold supplies are working correctly. Turn the water on and allow the water to flow through the spout for approximately 60 seconds.
Rubeno Antique Brass Sink Faucet
|
|
|
 |
|
 |
|
|
|
 |
|
 |
|
Features
Rubeno Antique Brass Sink Faucet FAQ
Antique Brass Metallurgy, Ceramic Valve Kinematics & Basin Flow Conditioning
This antique brass sink faucet is designed for controlled basin water delivery, smooth handle operation, and long-term wet-area durability through stable brass construction and precision valve engineering.
How does antique brass construction improve faucet durability?
Brass resists corrosion, maintains dimensional stability under water pressure, and supports long-term sealing alignment inside the faucet body.
Why is ceramic valve kinematics important for smooth operation?
Precision ceramic discs slide with low friction, allowing accurate flow adjustment while reducing wear from repeated handle movement.
How does spout geometry improve basin flow control?
The outlet angle directs water toward the basin center, reducing splash-back and improving usable washing clearance.
How does the antique finish resist wet-area aging?
The protective surface helps limit oxidation, moisture staining, mineral spotting, and cleaning-related finish dulling.
|
|
|
|
|
|
|


 nice antique look
