Installation Instructions for Riviera Wall Mount Square Shower Head
Riviera Wall Mount Square Shower Head And Digital 3 Function Mixer Faucet With Handheld Shower In Chrome Finish
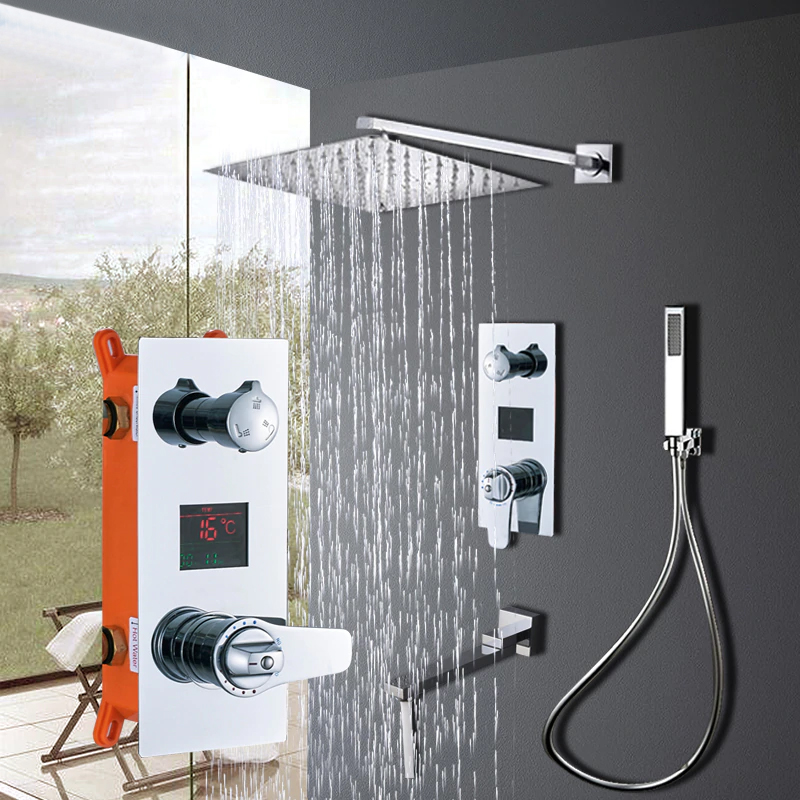
Color your daily shower with this beautiful and luxurious square shower head and digital 3-way function mixer faucet with handheld shower. This high tech rain shower head with touch panel controller and handheld shower you can experience the true feeling of rain, relieving fatigue and stress. It is your best choice, a choice to enjoy life. This is a touch screen digital temperature control valve shower set.
The intelligent thermostatic digital shower valve, digital control technology, personalize your shower function. It saves water and energy, the user can set the water temperature and water flow on the control panel. The system has the memory function, water, the temperature will be the same as that you set last time. Easy installation and maintenance and even easy to adjust the water temperature & flow. Its smart and thermostat keep the outlet water temperature thermostat. Dual power supply system, more safe and reliable. The inlet of hot and cold water adopts special design, which can effectively prevent the water backflow when the hot and cold water has pressure difference. Easy installation With an electronic shower control system. Full digital shower system with electronic shower temperature control. It fits all US plumbing.
Riviera Wall Mount Square Shower Head And Digital 3 Function Mixer Faucet With Handheld Shower In Chrome Finish Features:
- Brand Name: BathSelect
- Model Number: BS9821
- Type: Digital Shower Set
- Surface treatment: Polished
- Style : Contemporary
- Shower Head Type : Fixed Rotary Type Head
- Surface finish: Chrome
- Features: Thermostatic batteries
- Function: Cold and Hot
- Number with handle: Single handle
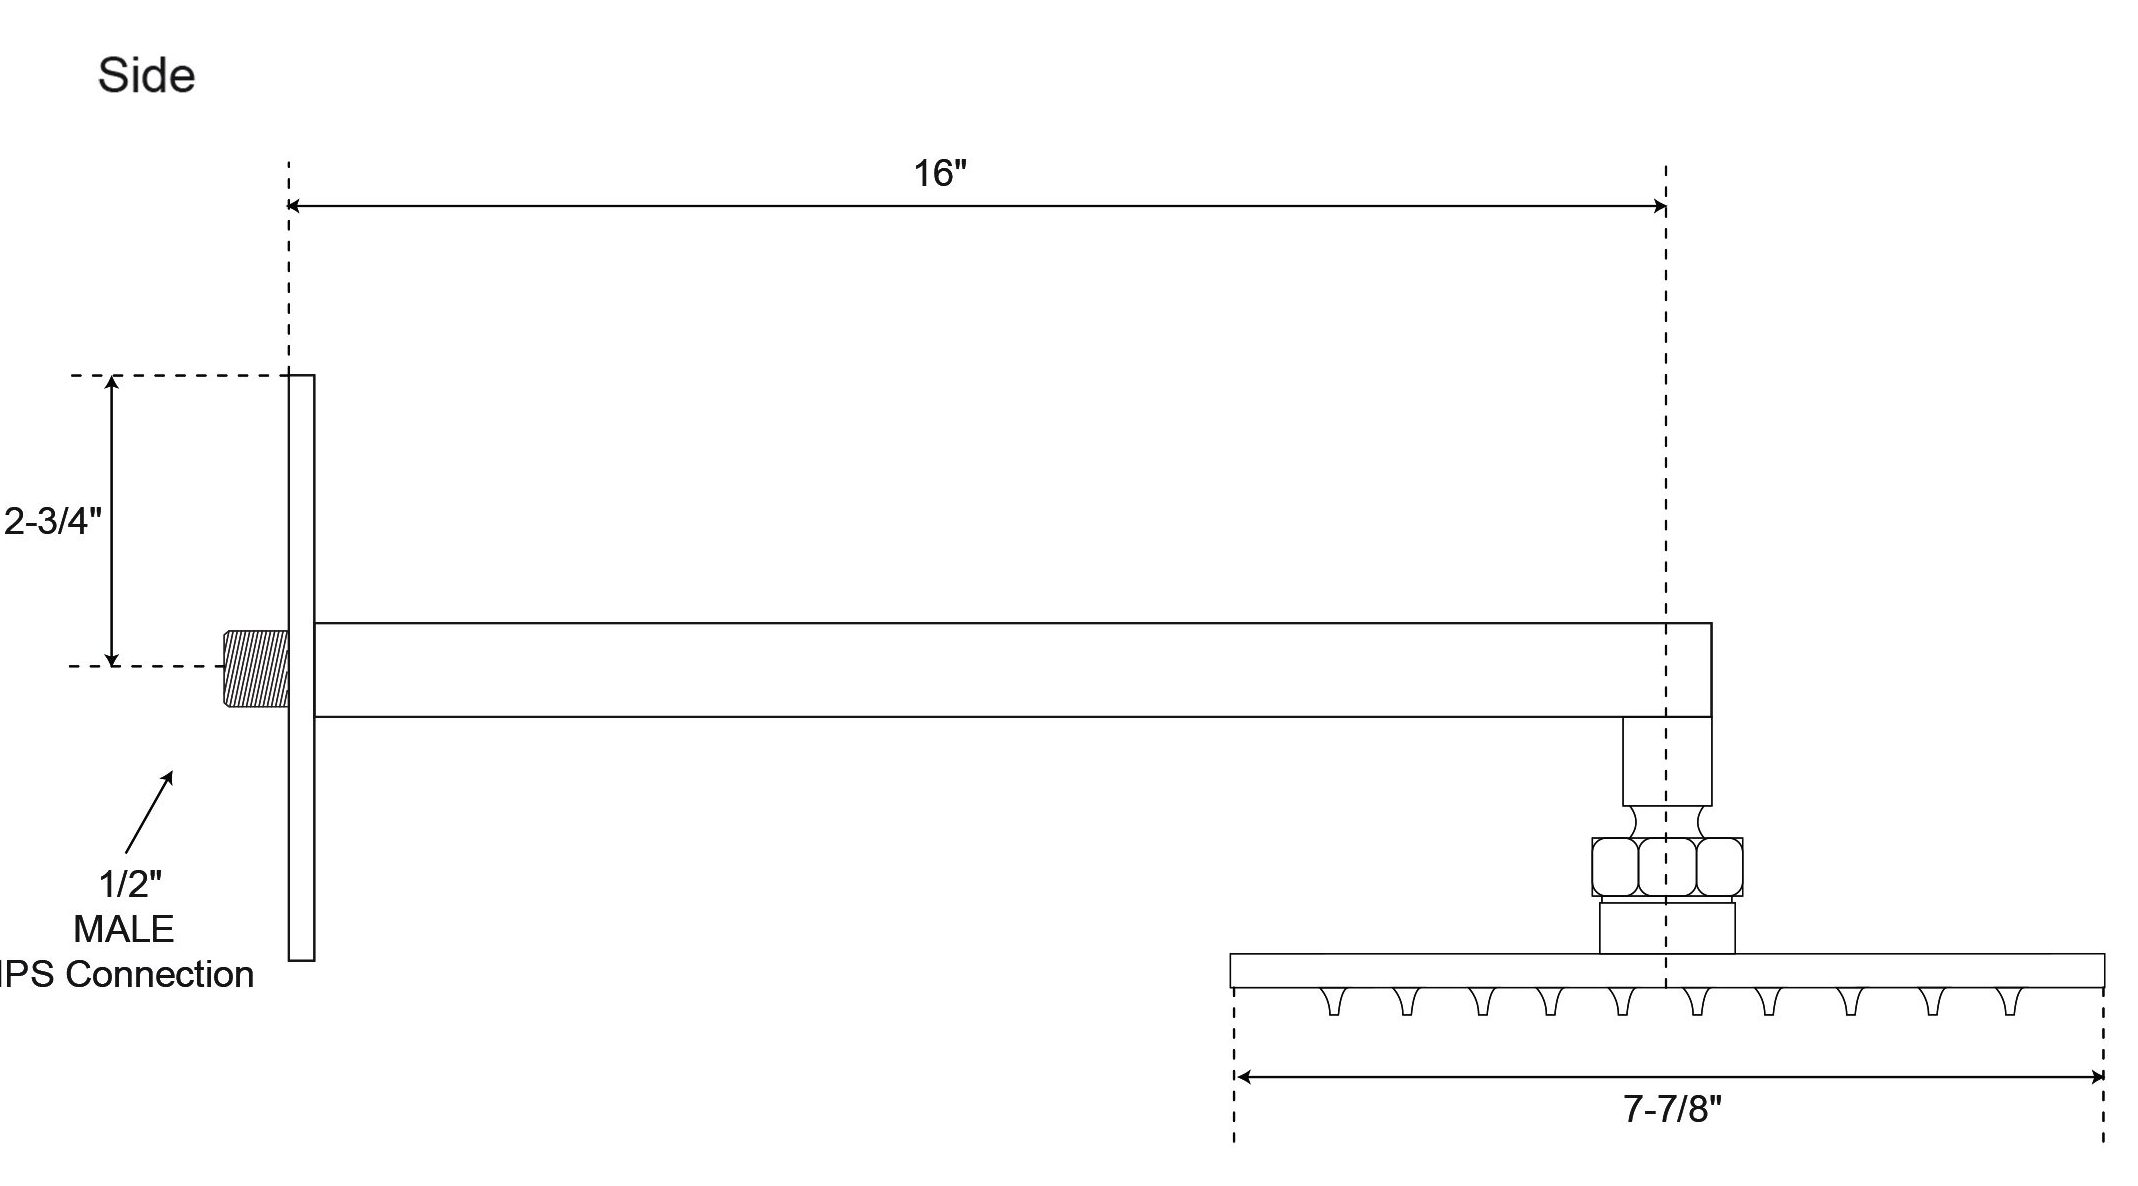
- Size : 8", 10" , 12"
- Valve core material: Ceramic
- Cold / hot water control type: Thermostatic Faucets
- LED Faucet: No
|
|
- Before you begin, please read the installation instructions below. Observe all local building and safety codes.
- Unpack and inspect the product for any shipping damages. If you find damages, do not install.
- Please note all showers must be installed by a professional and certified plumber otherwise warranty might be voided
|
|
Shower Head Installation
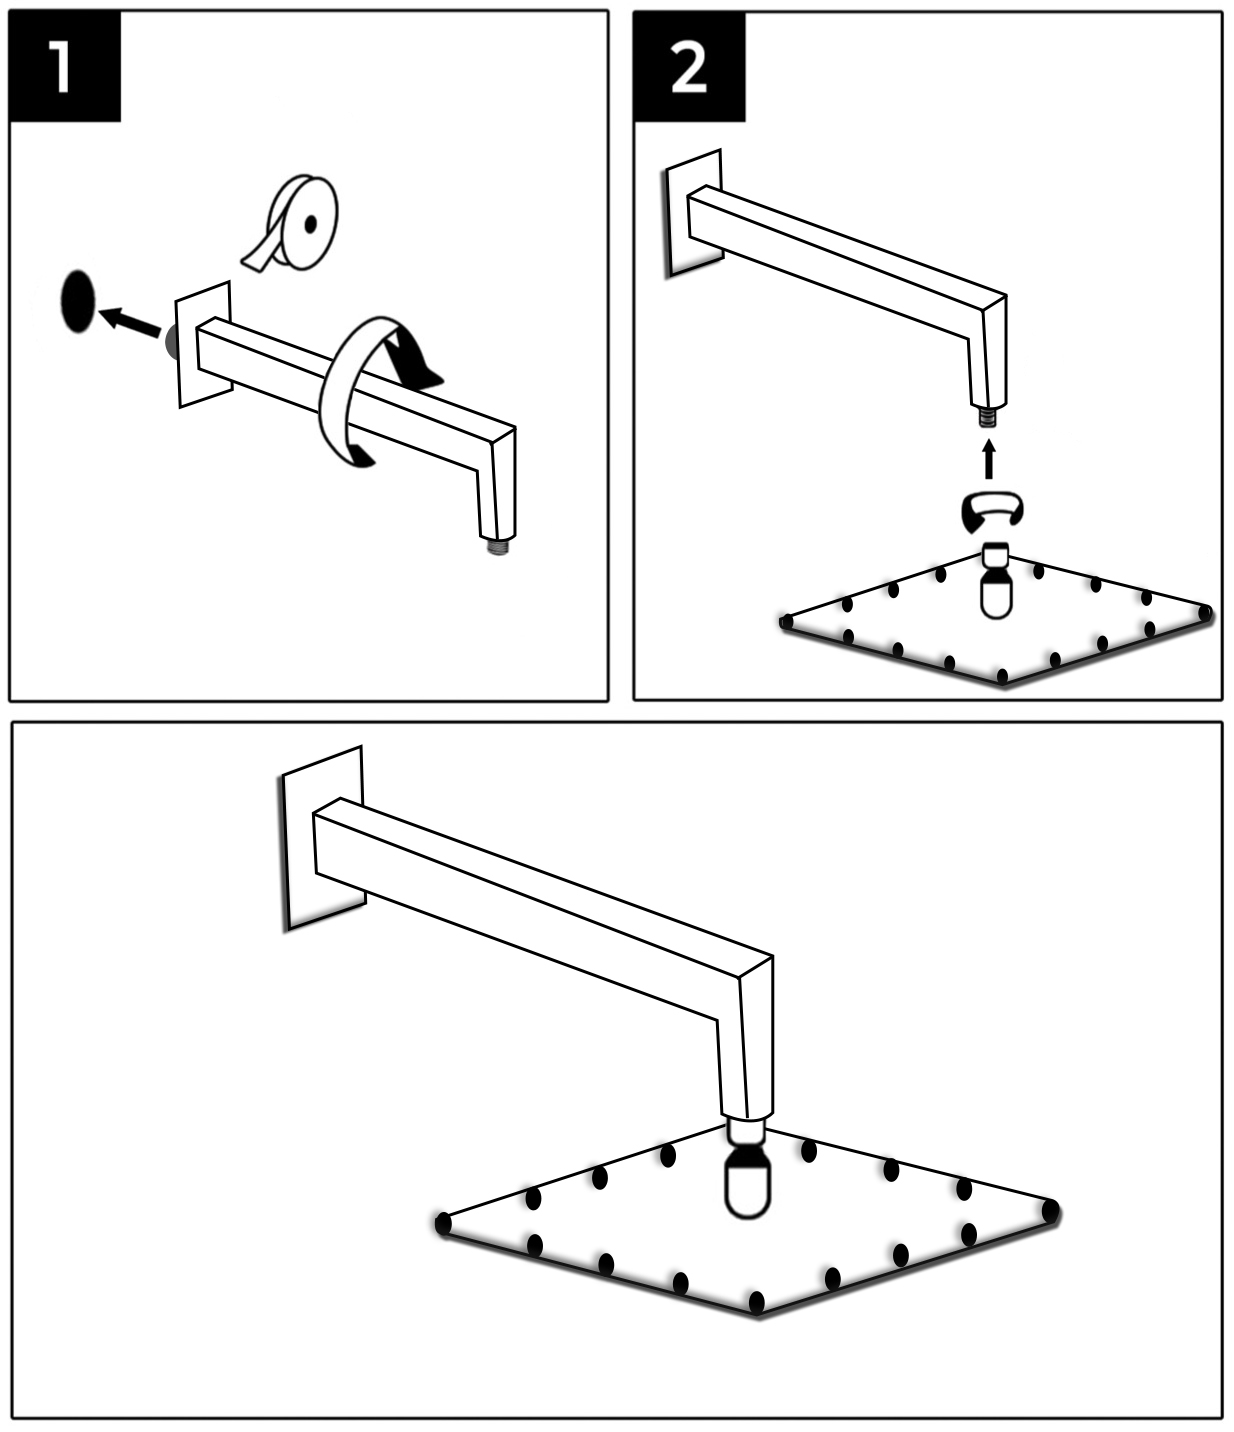
No tools required, ½ connector fits standard sized shower plumbing.
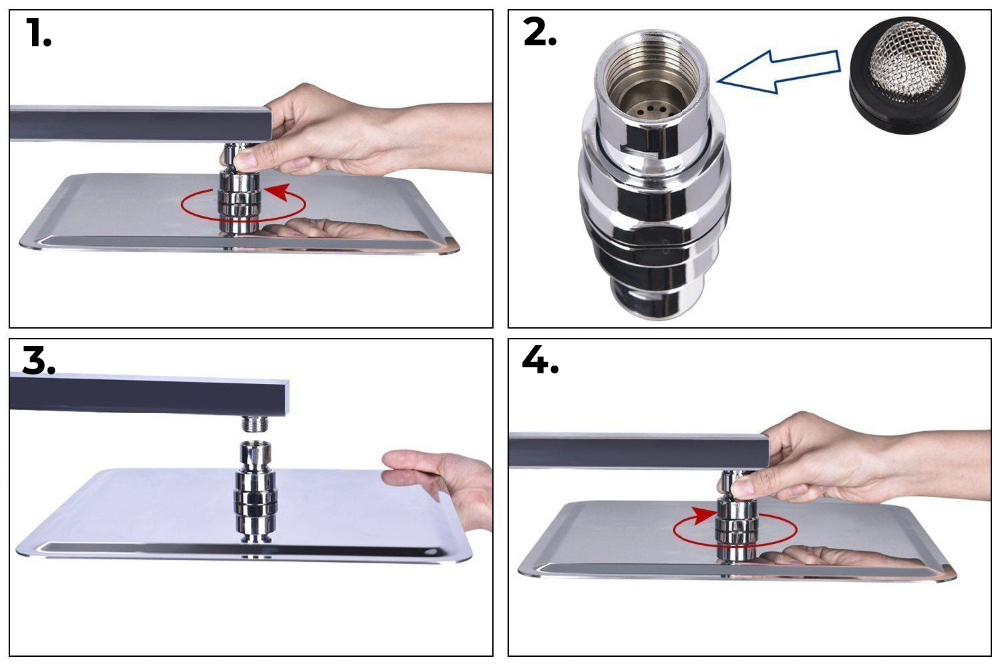
- Use your hands counter clockwise to unscrew the old showerhead and removed it.
- Take out the showerhead, make sure the shower filter is placed in the connector.
- Ensure the showerhead full horizontal alignment wall mounted shower arm thread.
- Use your hands clockwise to tighten showerhead.
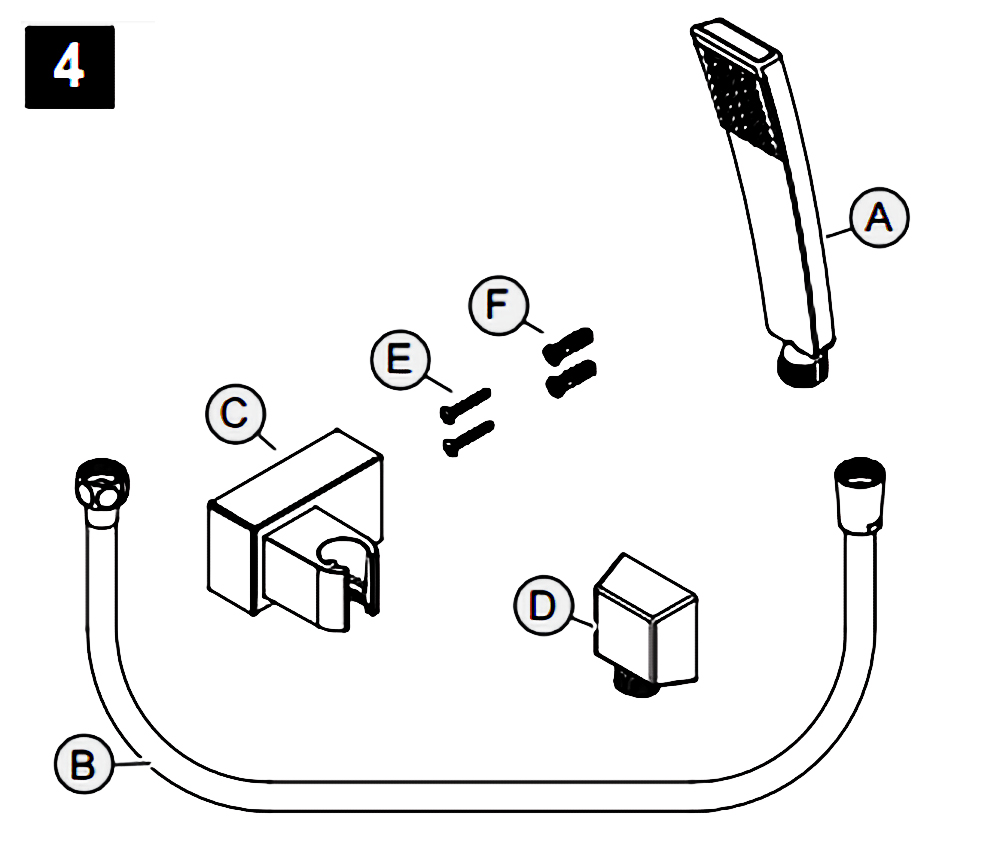
Hand-Held Shower Instructions
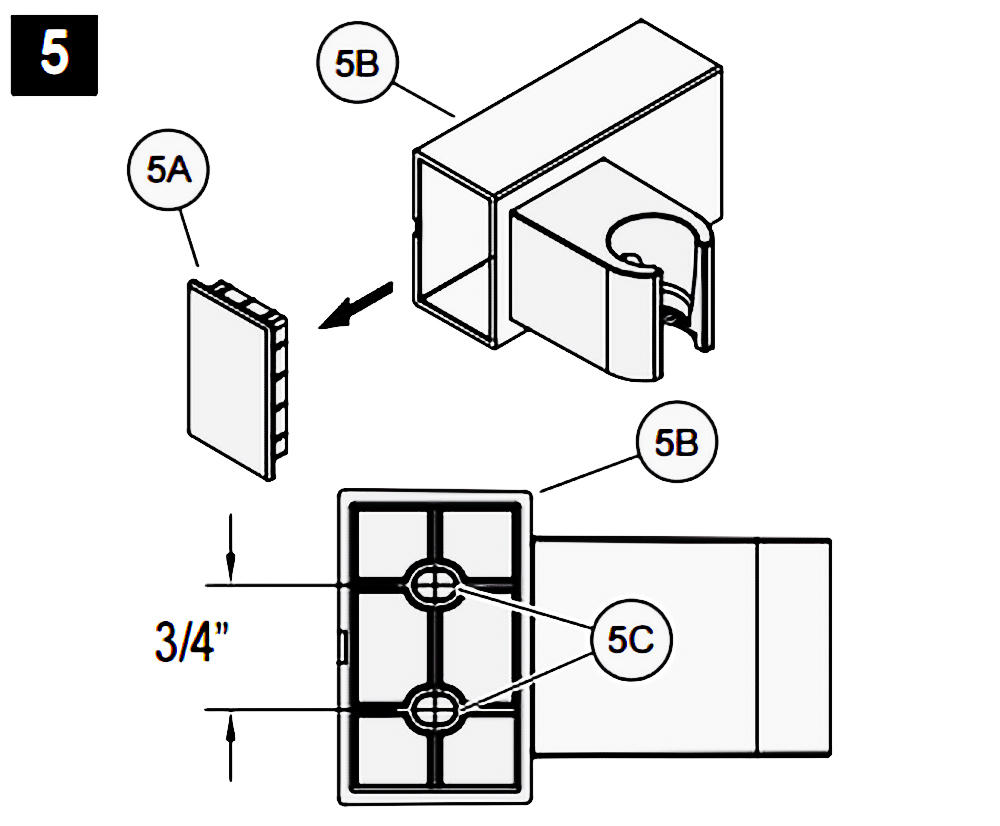
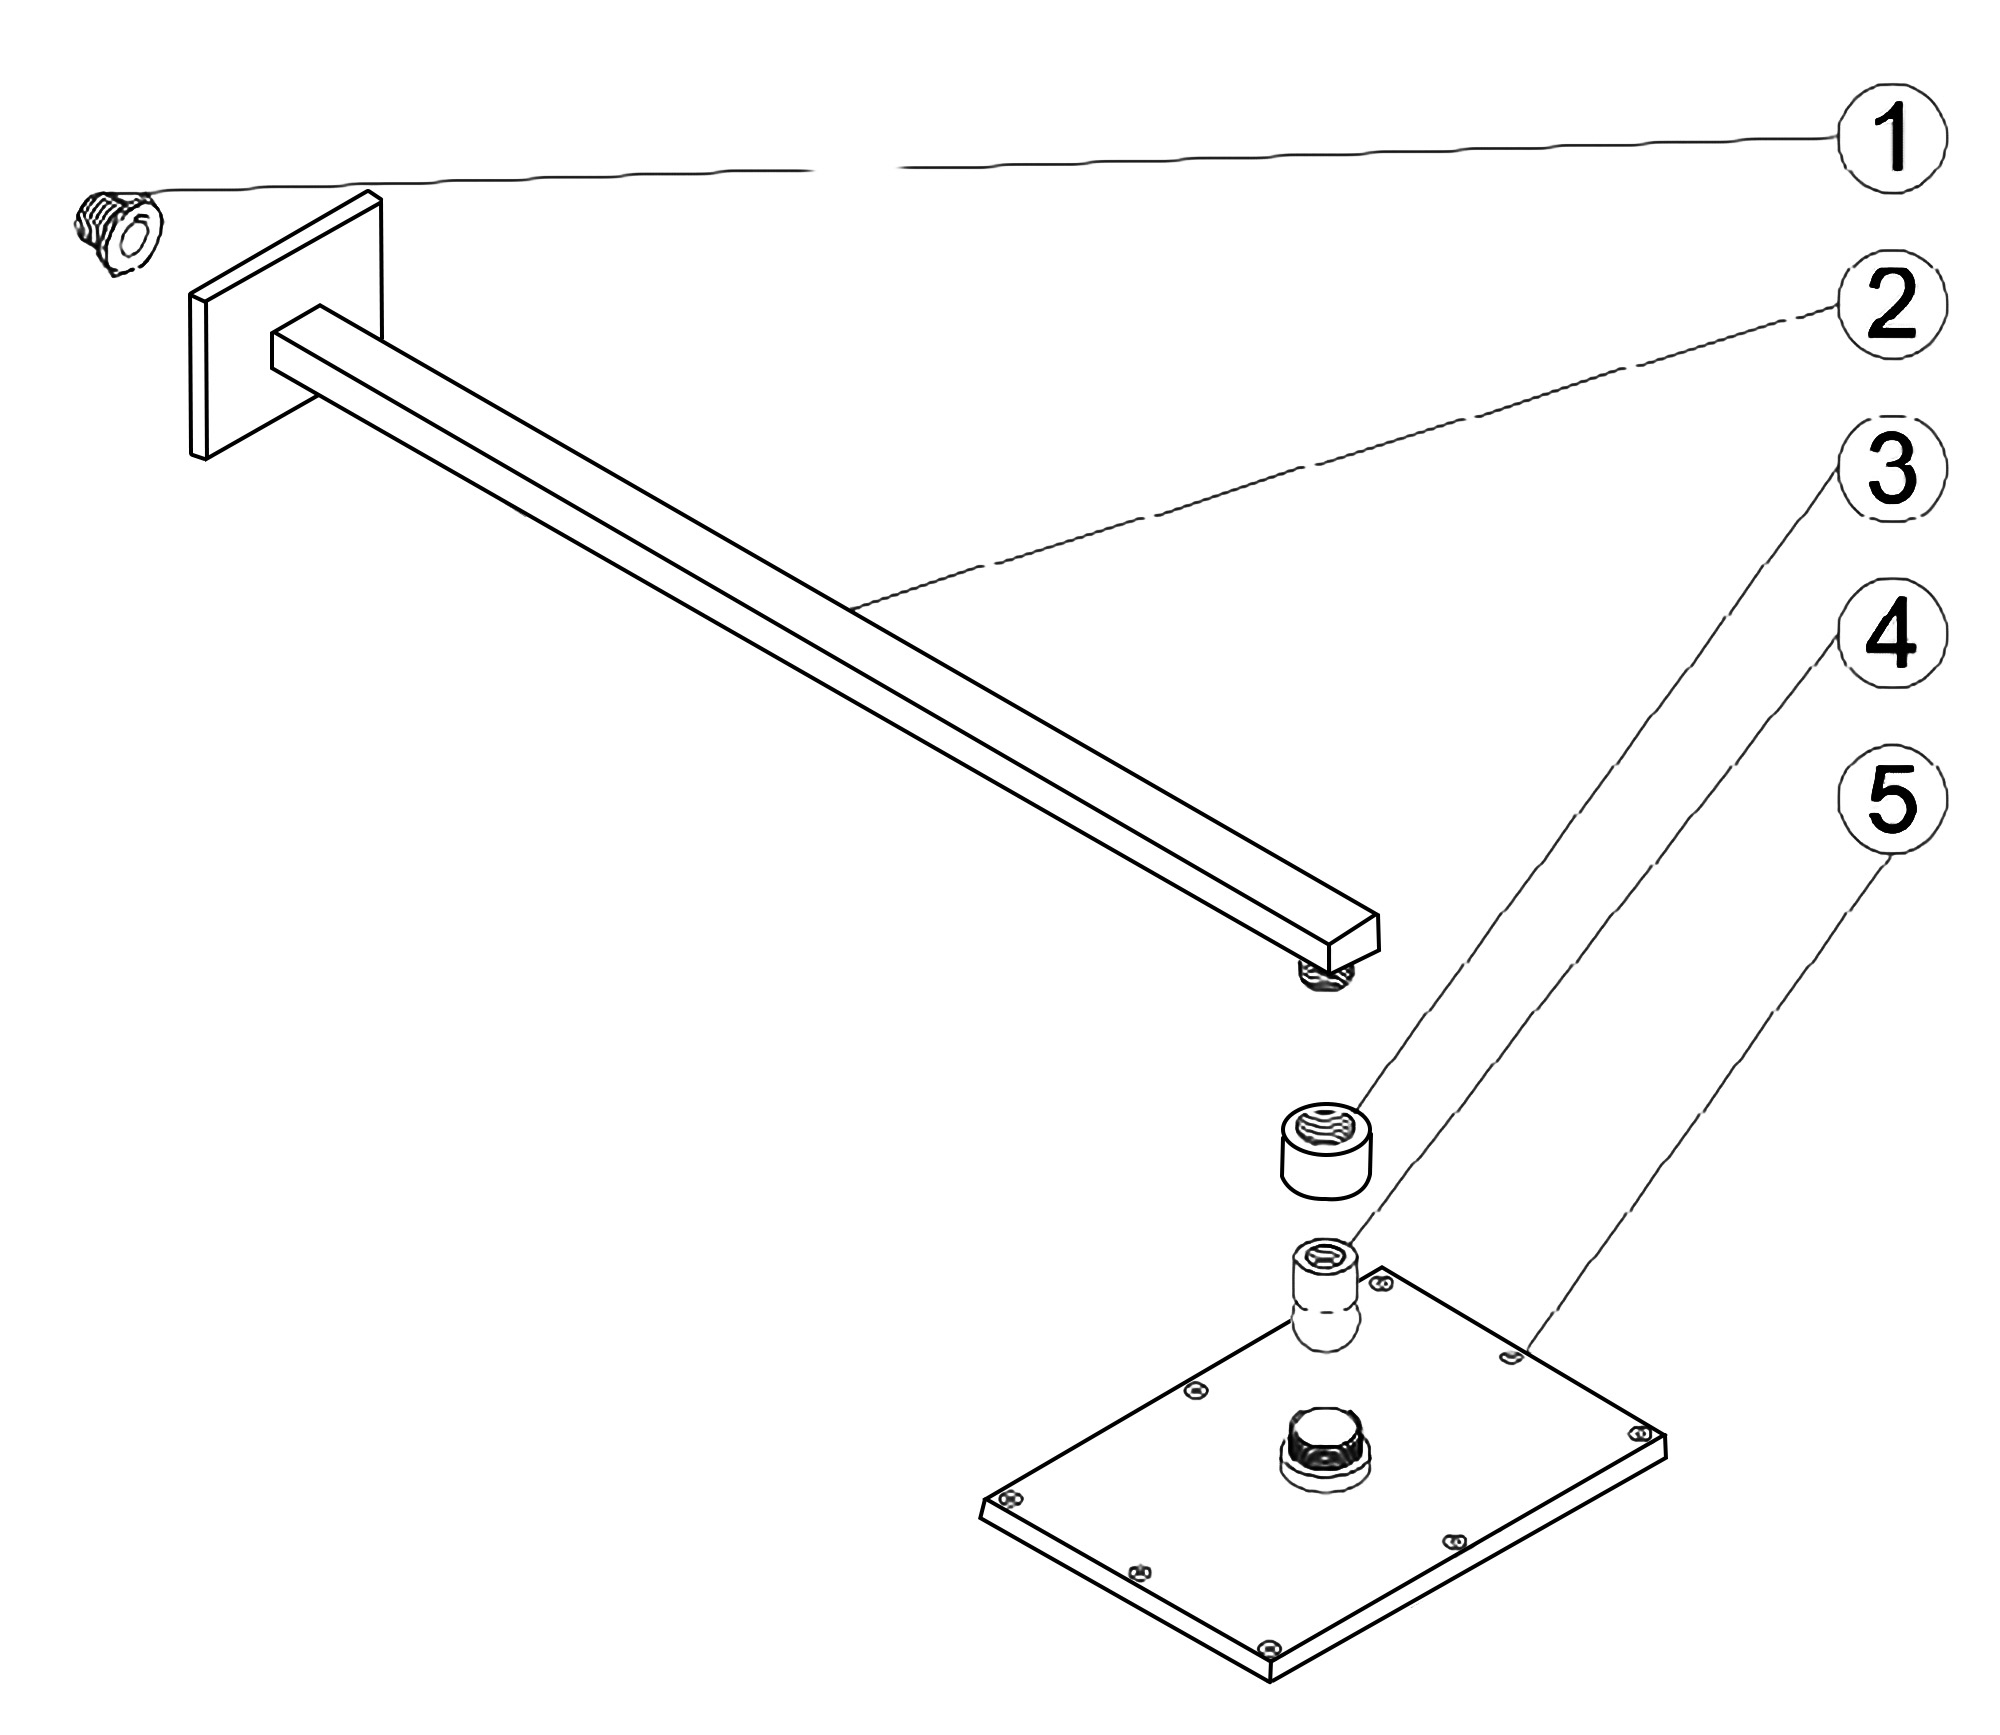
5. Hole Locations For Wall Mount
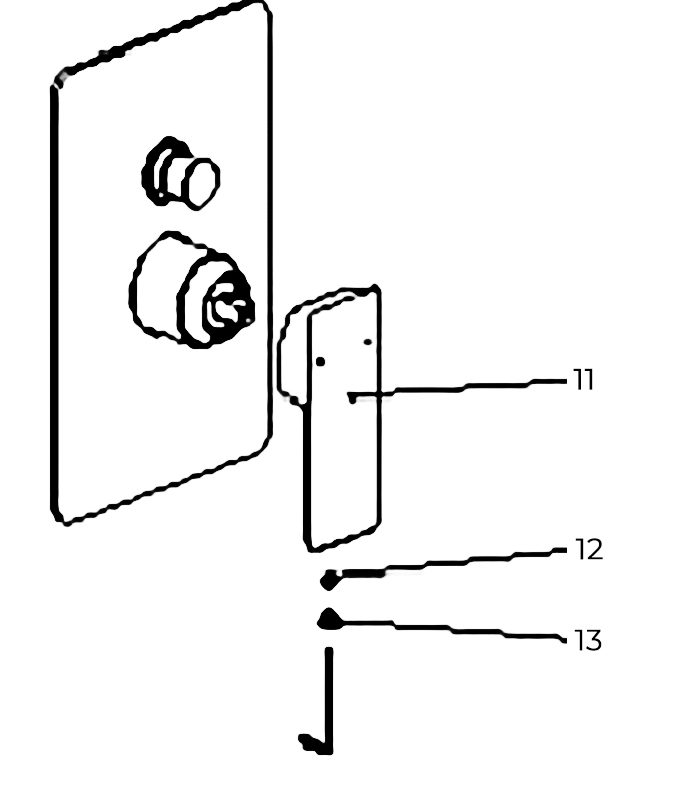
Remove Front Cover (5A) from Wall Mount (5B). Use Wall Mount Screw Holes (5C) to place the desired location. Using a punch or awl, tap the screw hole locations. Holes must be vertically aligned.

7. Wall Mount Installation
Place Wall Mount (7A) into wall and inset Mounting Screws (7B) through Wall Mount Holes (7C) and tighten until Wall Mount (7A) is flush with the wall. Do Not Over Tighten! Insert Front Cover (7D) into Wall Mount (7A).
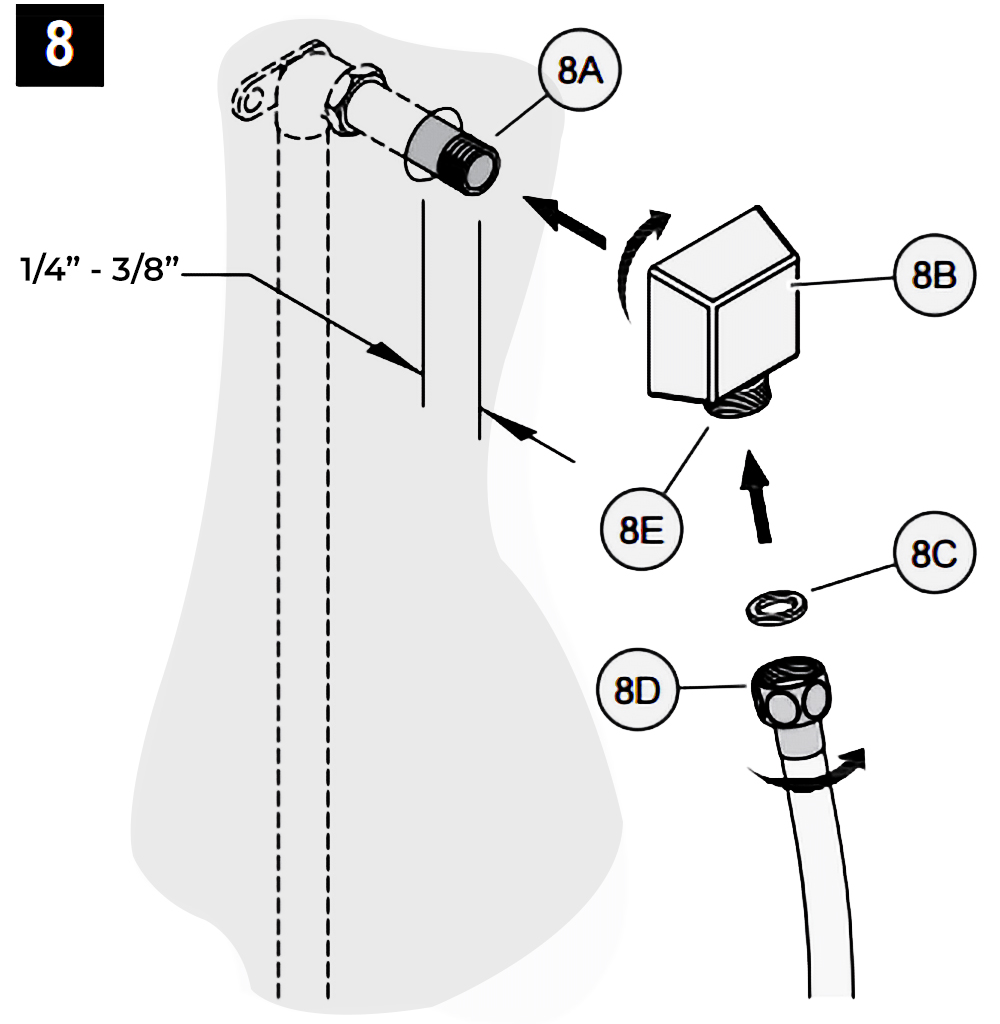 8. Drop Elbow & Hose Installation 8. Drop Elbow & Hose Installation
Apply PTFE plumbers tape on both ends of Pipe Nipple (8A) (not included). Screw Pipe Nipple (8A) into the elbow inside the wall. The Pipe Nipple (8A) is to project 1/4 3/4 from the finished wall. Screw Drop Elbow (8B) onto Pipe Nipple (8A) and tighten until Drop Elbow (8B) is property positioned and flush to the finished wall.
Place Rubber Seal (8C) inside Hex Hose Fitting (8D). Connect Hex Hose Fitting (8D) into Drop Elbow Outlet (8E) by turning Hex Hose Fitting (8D).
9. Unit Start-Up
Turn on hot and cold water supplies, and check all connections for leaks.
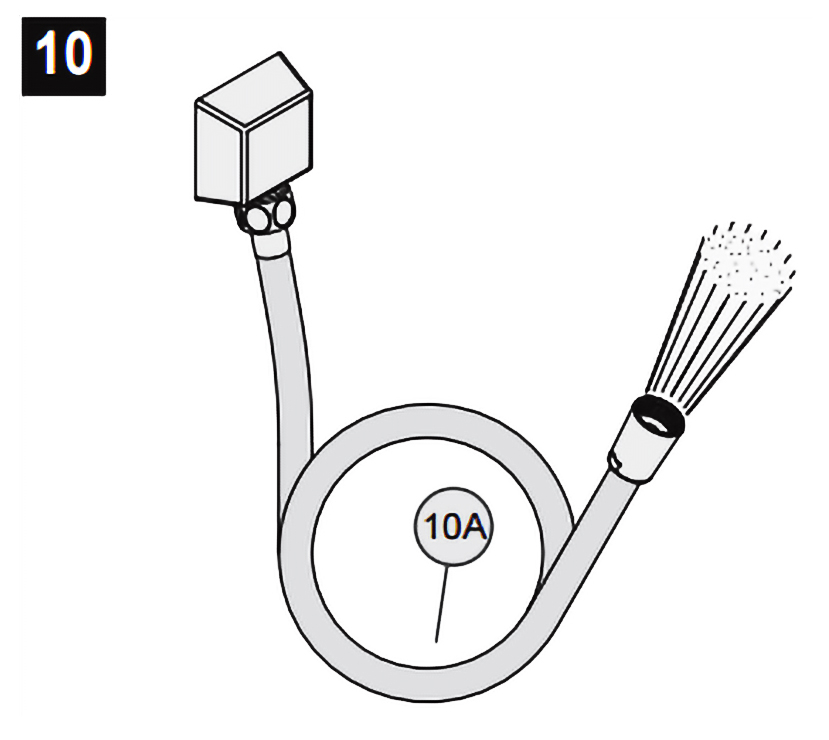 10. Final Flushing 10. Final Flushing
For final flushing, turn the valve on and allow water to run through the Hose (10A) for several minutes. Allow water to run for several minutes until all foreign matter clears the line.
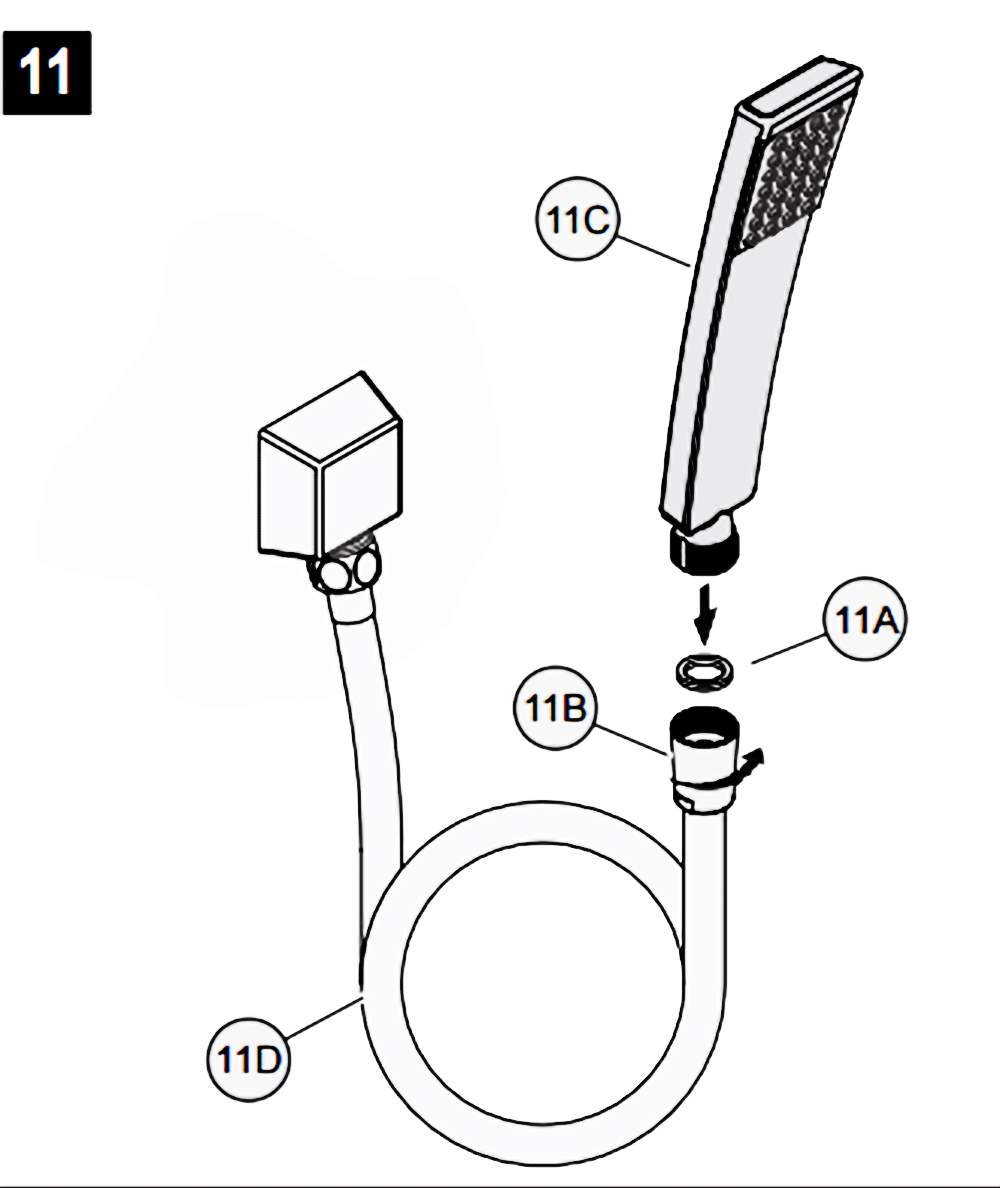
11. Shower Arm Installation
Place Rubber Seal (11A) inside Tapered Hose Fitting (11B). Conned Hand Shower (11C) to Hose (11D) by turning Tapered Hose Fitting (118) clockwise.
Warning: Make sure Hand Shower (11C) is securely tightened to Hose (11D)

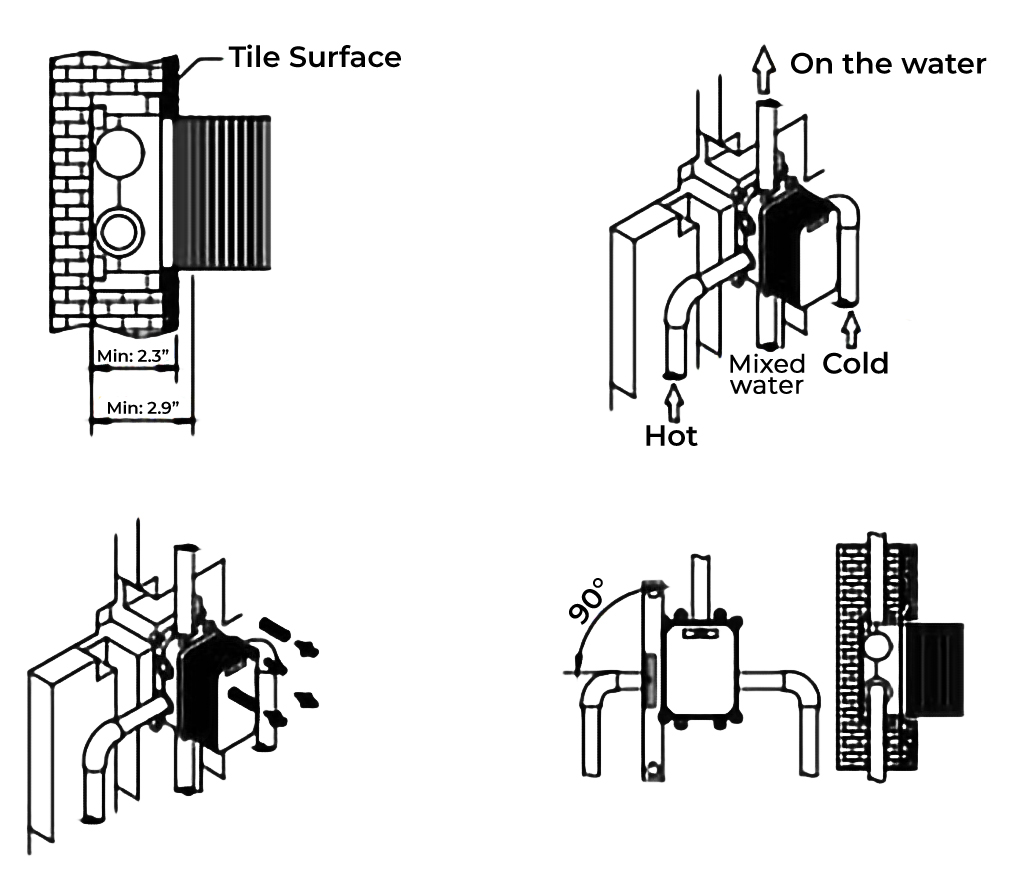
- Basic-size, according to the embedded box to open the hole on solid wall, should consider installing the metope of the distance between 60-75mm, for example, after blank wall in the shop, the ceramic tile surface to increase the thickness of the 20 mm, so PiQiang in the depth of the hole should be chosen 40 to 55 mm.
- Hole bottom should remain flat so that subsequent adjustment embedded box of vertical and horizontal convenient installation for the principle
- Pay attention to the direction of the up and down or so embedded box, on the left by hot water pipes, right after the cold water pipes, pick up and down the mixed water pipes.
- After the pipe connection, according to the pipeline arrangement, and open the corresponding channel slot tube in the blank wall.
- Embedded box fixed before, to embed box and trial test and pipe water clean connection pipe, and test before mixing water channels should be open.
- Test before opening the switch valve core, open the water to test around inlet pipe is connected closely with no leakage and the water pipe test after dosing open state, weather to test on the mixed water pipe connection without leakage. At the same time clean tube foreign bodies in case of influencing water control valve function.
- It will be embedded in a box into the solid wall with a self-tapping screw that is fixed on the wall.
- With parallel ruler for correction of embedded box of horizontal and vertical direction to embed box into a level with the ground, and metope as 90°. In the absence of good correction will influence the control panel installation effect.
|
|

Artistic Elements ...
FAQ Shower System
Customization
What distinguishes a designer shower set from a standard shower set?
Designer shower sets are crafted with a focus on high-end materials, aesthetic appeal, and innovative features. They often include luxury elements like rain shower heads, body jets, and sophisticated controls, offering both style and superior functionality.
What are the components of a typical designer shower set?
A typical designer shower set may include a rain shower head, a handheld shower, multiple body jets, a thermostatic valve, and stylish control panels. Some sets also feature integrated lighting and digital controls for a fully customizable experience.
How do thermostatic valves in designer shower sets enhance safety and comfort?
Thermostatic valves maintain a consistent water temperature by automatically adjusting the mix of hot and cold water. This prevents sudden temperature changes, enhancing safety and comfort during your shower.
Can I customize the spray patterns in a designer shower set?
Yes, many designer shower sets offer customizable spray patterns. This allows you to switch between different modes, such as rain, massage, mist, or a combination, to suit your preferences and needs.
Are designer shower sets compatible with smart home systems?
Many modern designer shower sets are compatible with smart home systems. They can be controlled via mobile apps or voice commands, allowing you to set your preferred water temperature, flow, and even schedule showers.
Our Distinguished Clientele
Valued
We're proud of our extensive clientele, a testament to our quality products and service
|
|
|


.png)