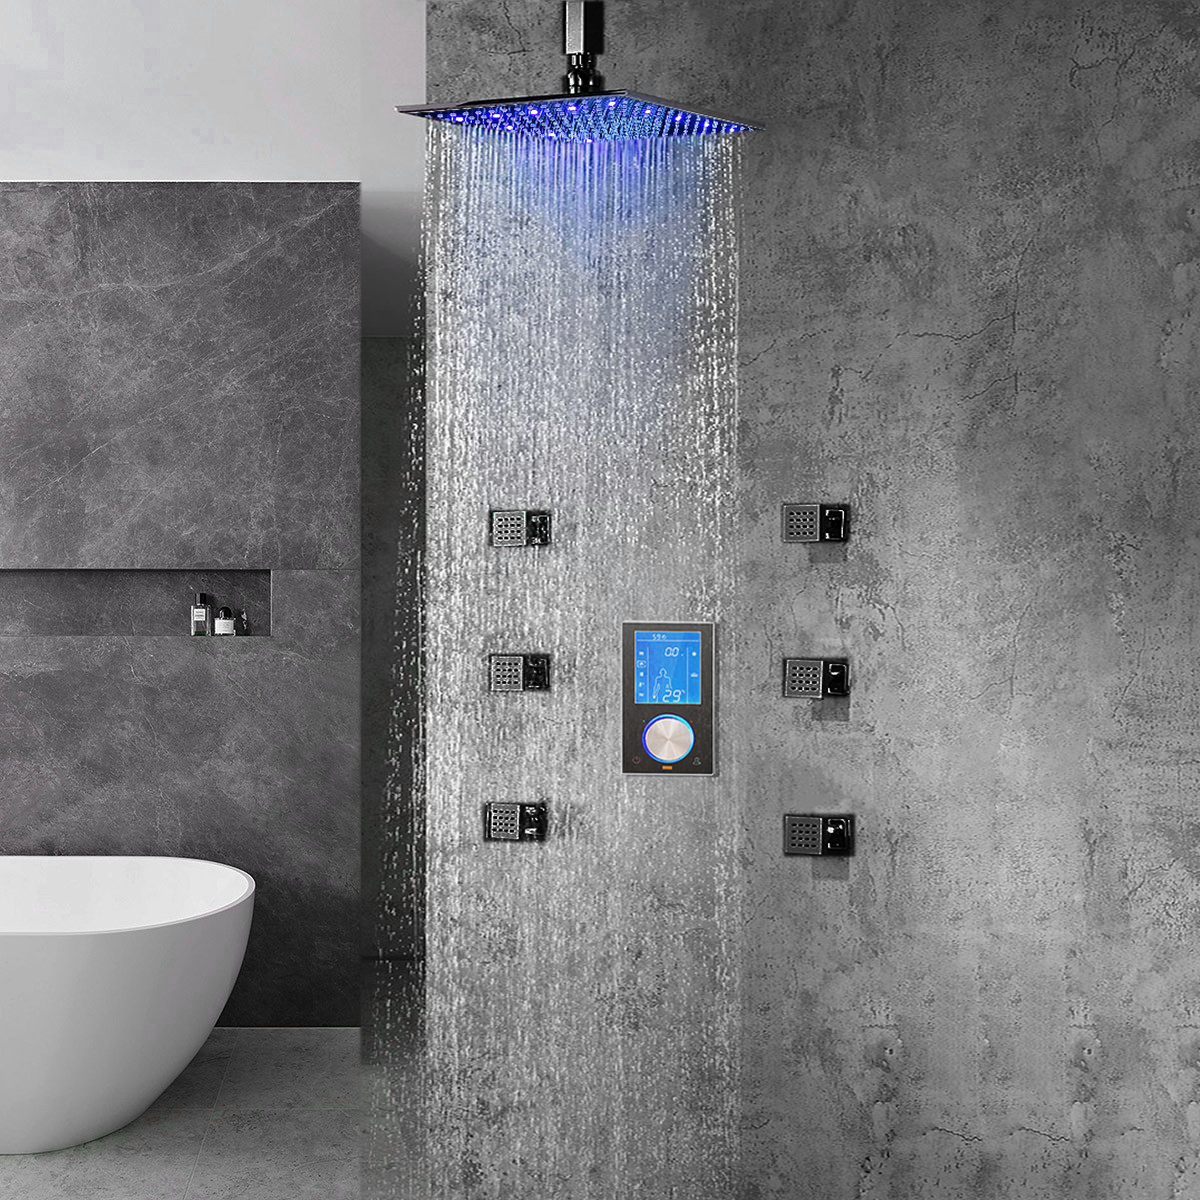
Milano Multi Color LED Rain Shower Head With Digital Mixer And 360° Adjustable Body Jets
The Milano Solid Brass wall Mount Led shower system can experience the true feeling of rain, as well as spa body massage spray, relieving fatigue and stress. It is your best choice, a choice to enjoy life. Just turn on the fun in your shower by simply turning on the water, the led lights will automatically light up and set the mood. They will even change colors automatically based on the water temperature. All this with no batteries, everything is self-powered by a built in dynamo that takes advantage of the water pressure to create the energy to light the bulbs. This is a touch screen digital temperature control valve led shower set. When the temperature exceeds 50 degrees will automatically stop working, preventing burns. LED lights can change color with different temperatures automatically. The thermostatic shower system is high flow shower valve, new technological coating layers electroplating to anti-rust, never get rust.
Milano Multi Color LED Rain Shower Head With Digital Mixer And 360° Adjustable Body Jets Features:
- Brand Name: BathSelect
- Model Number: BST9857
- Type: Digital LED Shower Set
- Material: Solid Brass
- Style: Contemporary Rain Shower head
- Body Sprays: Comes in set of 6 body sprays
- Control Digital Control Thermostatic Mixer: Available in Matching Finish
- LED Power Source: Water Flow
- LED Color: Blue, Green, Red
- Shower head Size: Available in 10", 12", 16"
- Mount Method: Ceiling Mount
- Connection: 1/2" US standard
- Body Jets: Comes with solid brass 360° Adjustable
- LED light rain shower head powered: Hidden dynamo
- LED light features: dim and brighten when adjusting the pressure
- Finish: Dark Oil Rubbed Bronze
- Mixer Material: Solid Brass
- Anti-scald
- Threading Fitting: Fit in any standard shower head
- Inclusion: Shower arm
- Shower head Material: Stainless Steel
- Flow rate: 2.5 GPM
- Digital Installation Instructions
|
|
BathSelect® Manufacturer Warranty Information
Installation Instruction For Milano Multi Color LED Rain Shower Head With Digital Mixer
|
|
- Before you begin, please read the installation instructions below. Observe all local building and safety codes.
- Unpack and inspect the product for any shipping damages. If you find damages, do not install.
- Please note all showers must be installed by a professional and certified plumber otherwise warranty might be voided
|
|
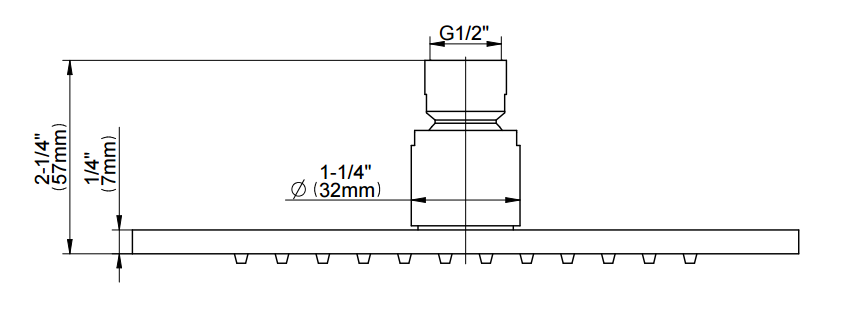
Shower Head Installation
- Use your hands counter clockwise to unscrew the old showerhead and removed it.
- Take out the showerhead, make sure the shower filter is placed in the connector.
- Ensure the showerhead full horizontal alignment wall mounted shower arm thread.
- Use your hands clockwise to tighten showerhead.
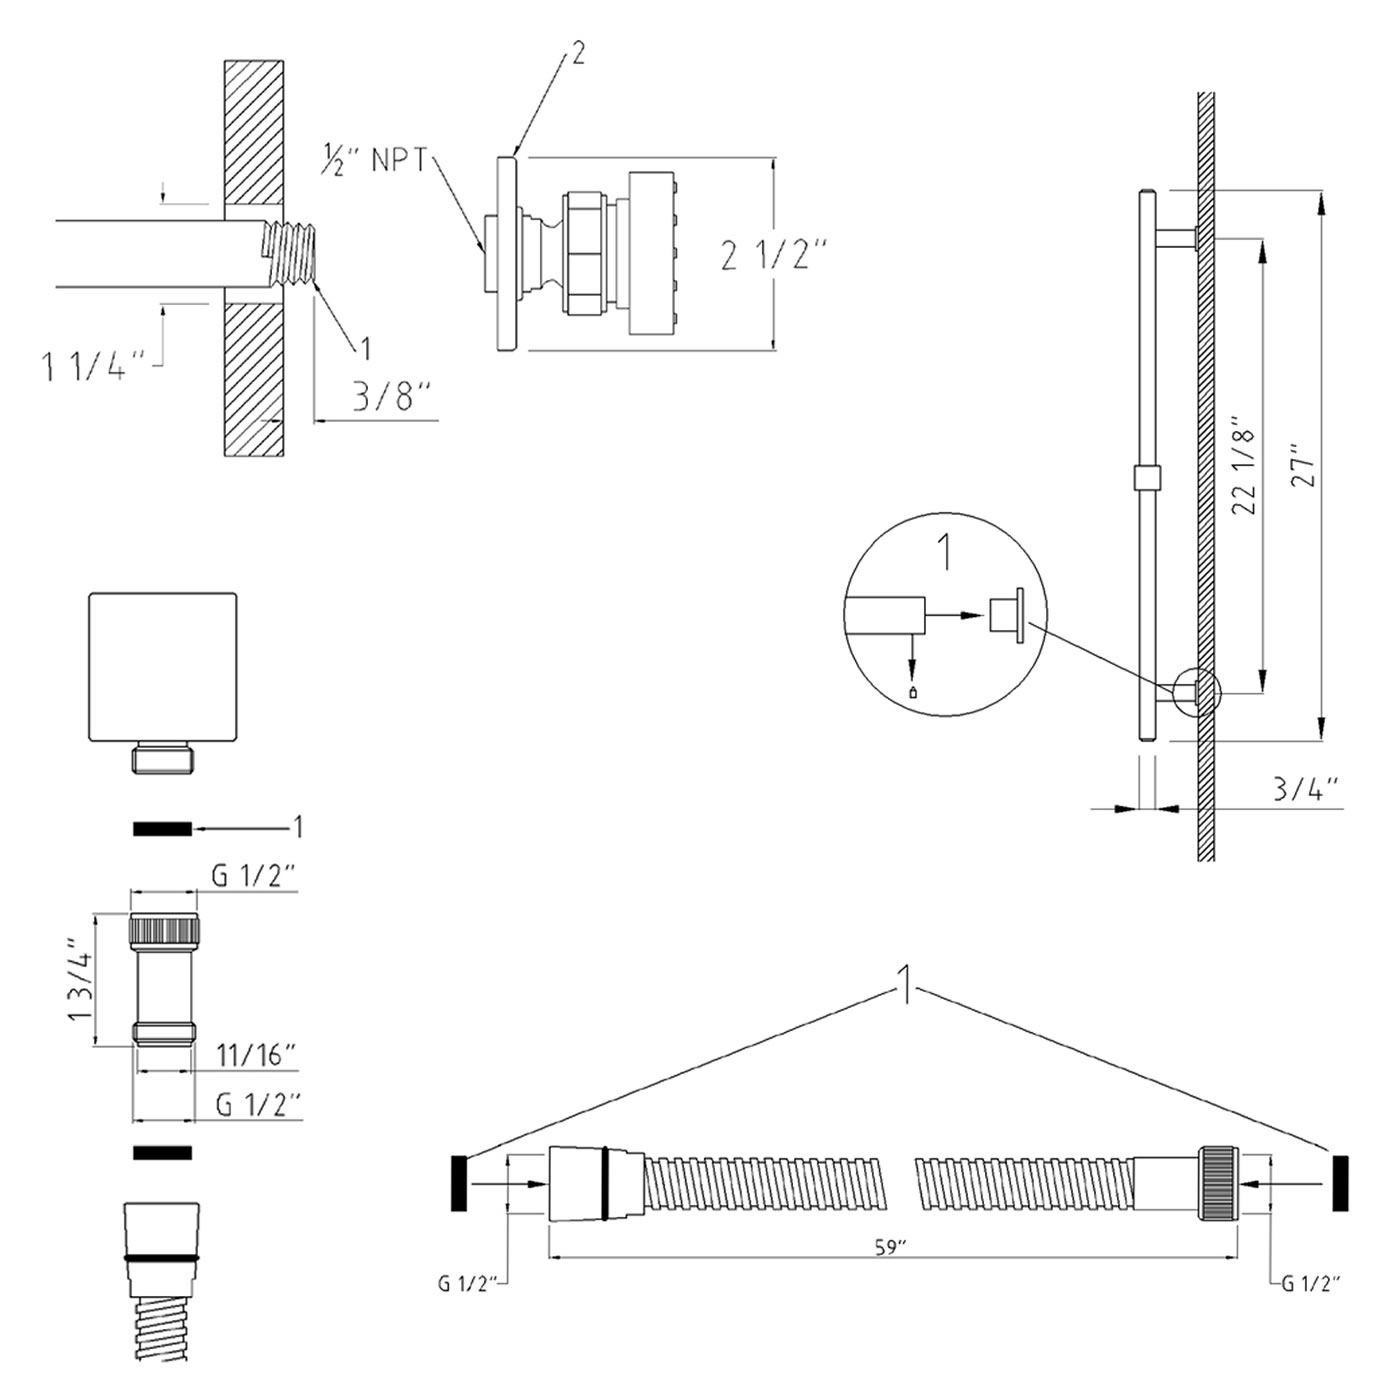
Body-Jet Installation
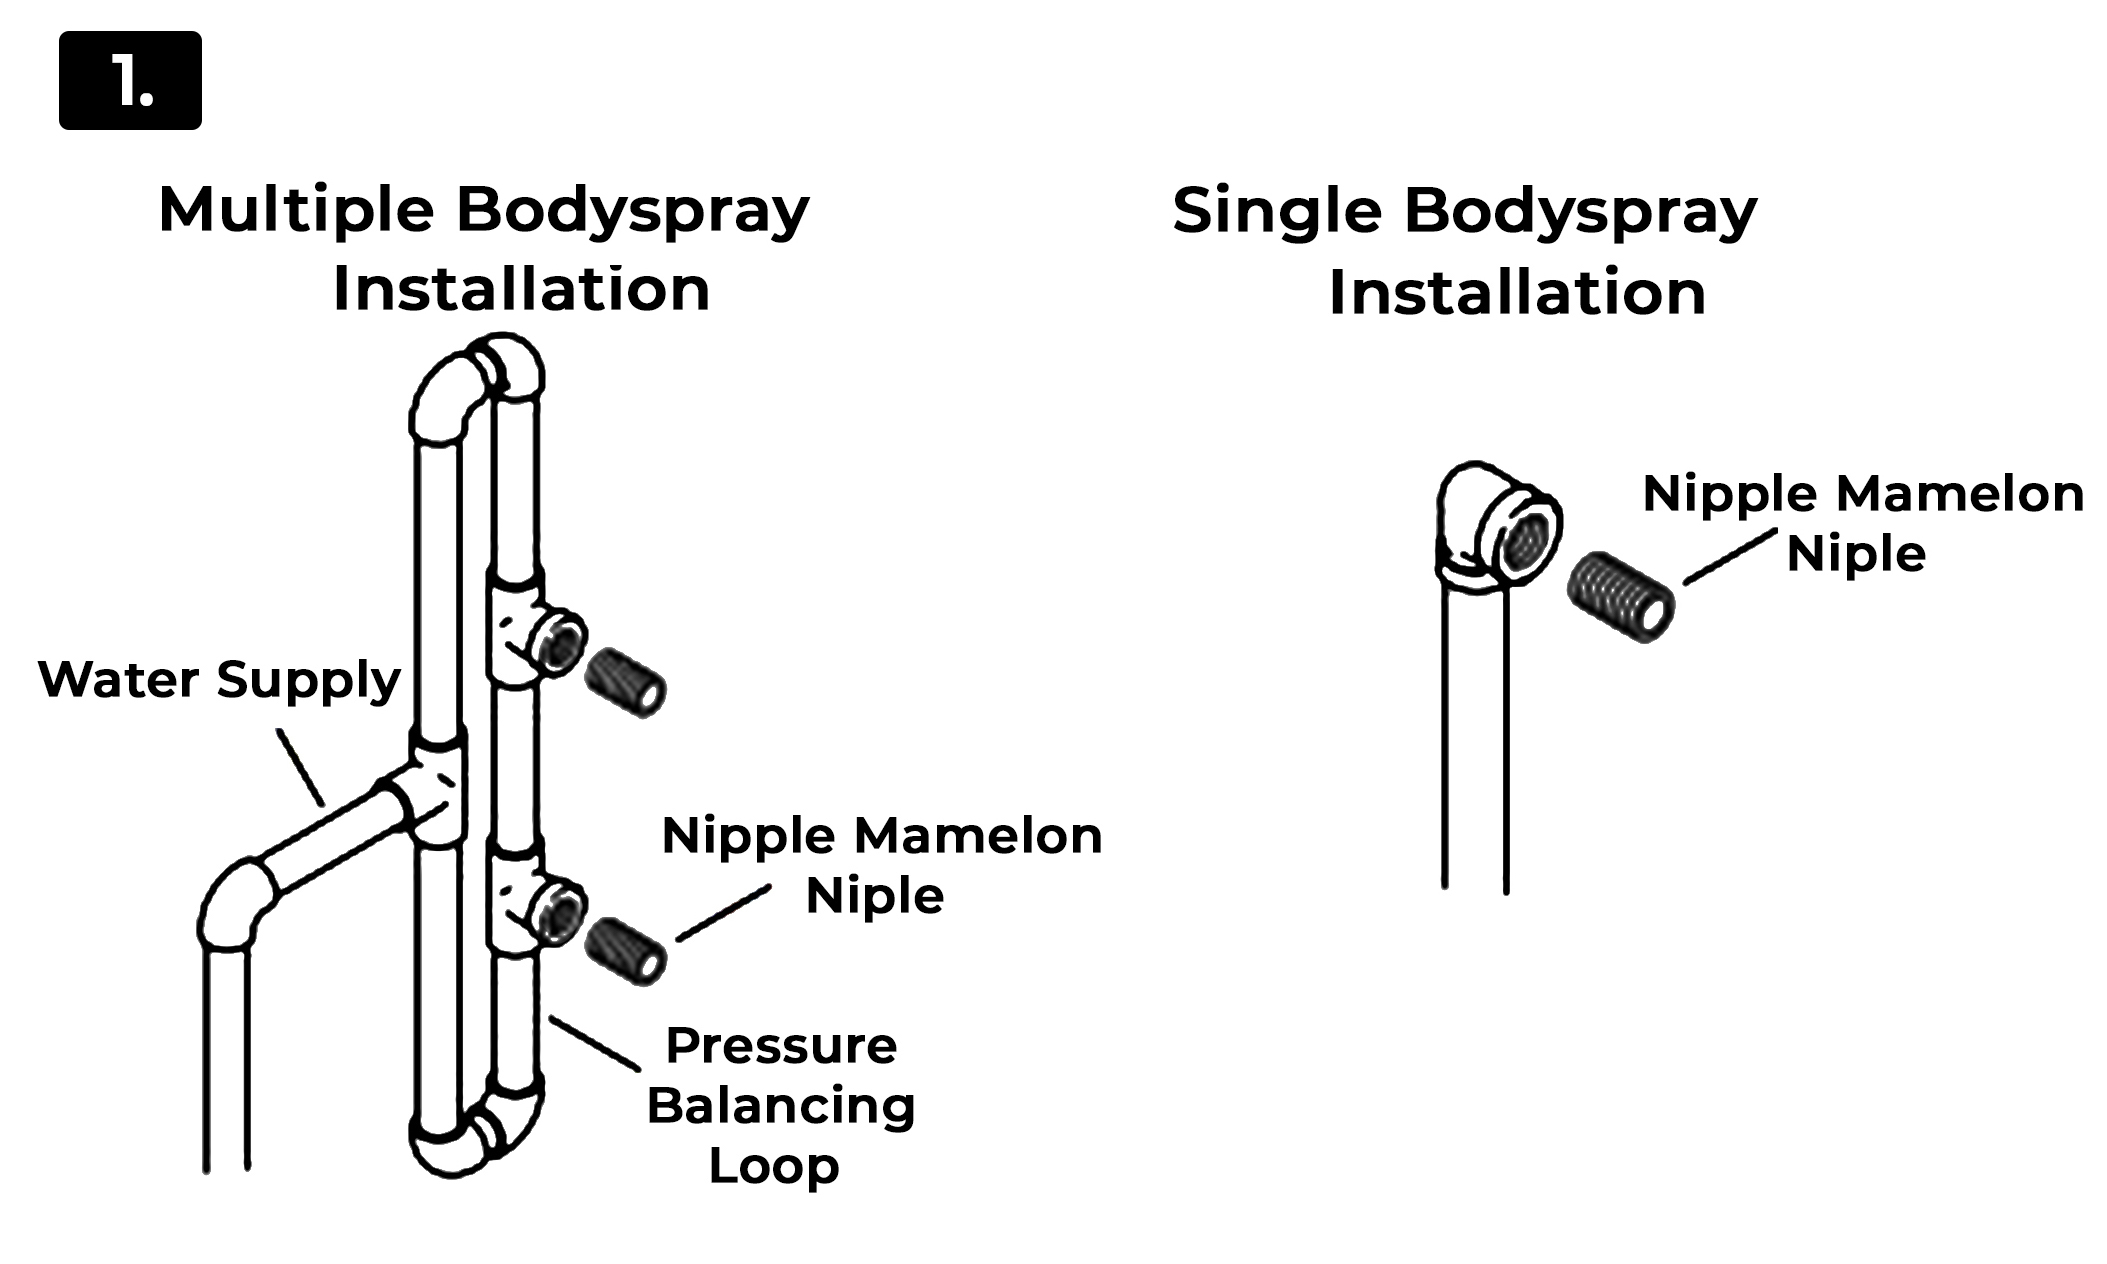
Multiple Bodyspray Installation
Water Supply
Nipple Mamelon Nipple
Pressure Balancing Loop
1. Route the water supply lines.
2. If installing more than one bodyspray off the same supply line, construct a pressure balancing loop. Locate a tee along the loop at each bodyspray installation location.
3. Do not strap the pipes at this time.
Single Bodyspray Installation
Nipple Mamelon Nipple
1. Route the water supply line.
2. Install an elbow to the end of the supply pipe at the bodyspray installation location.
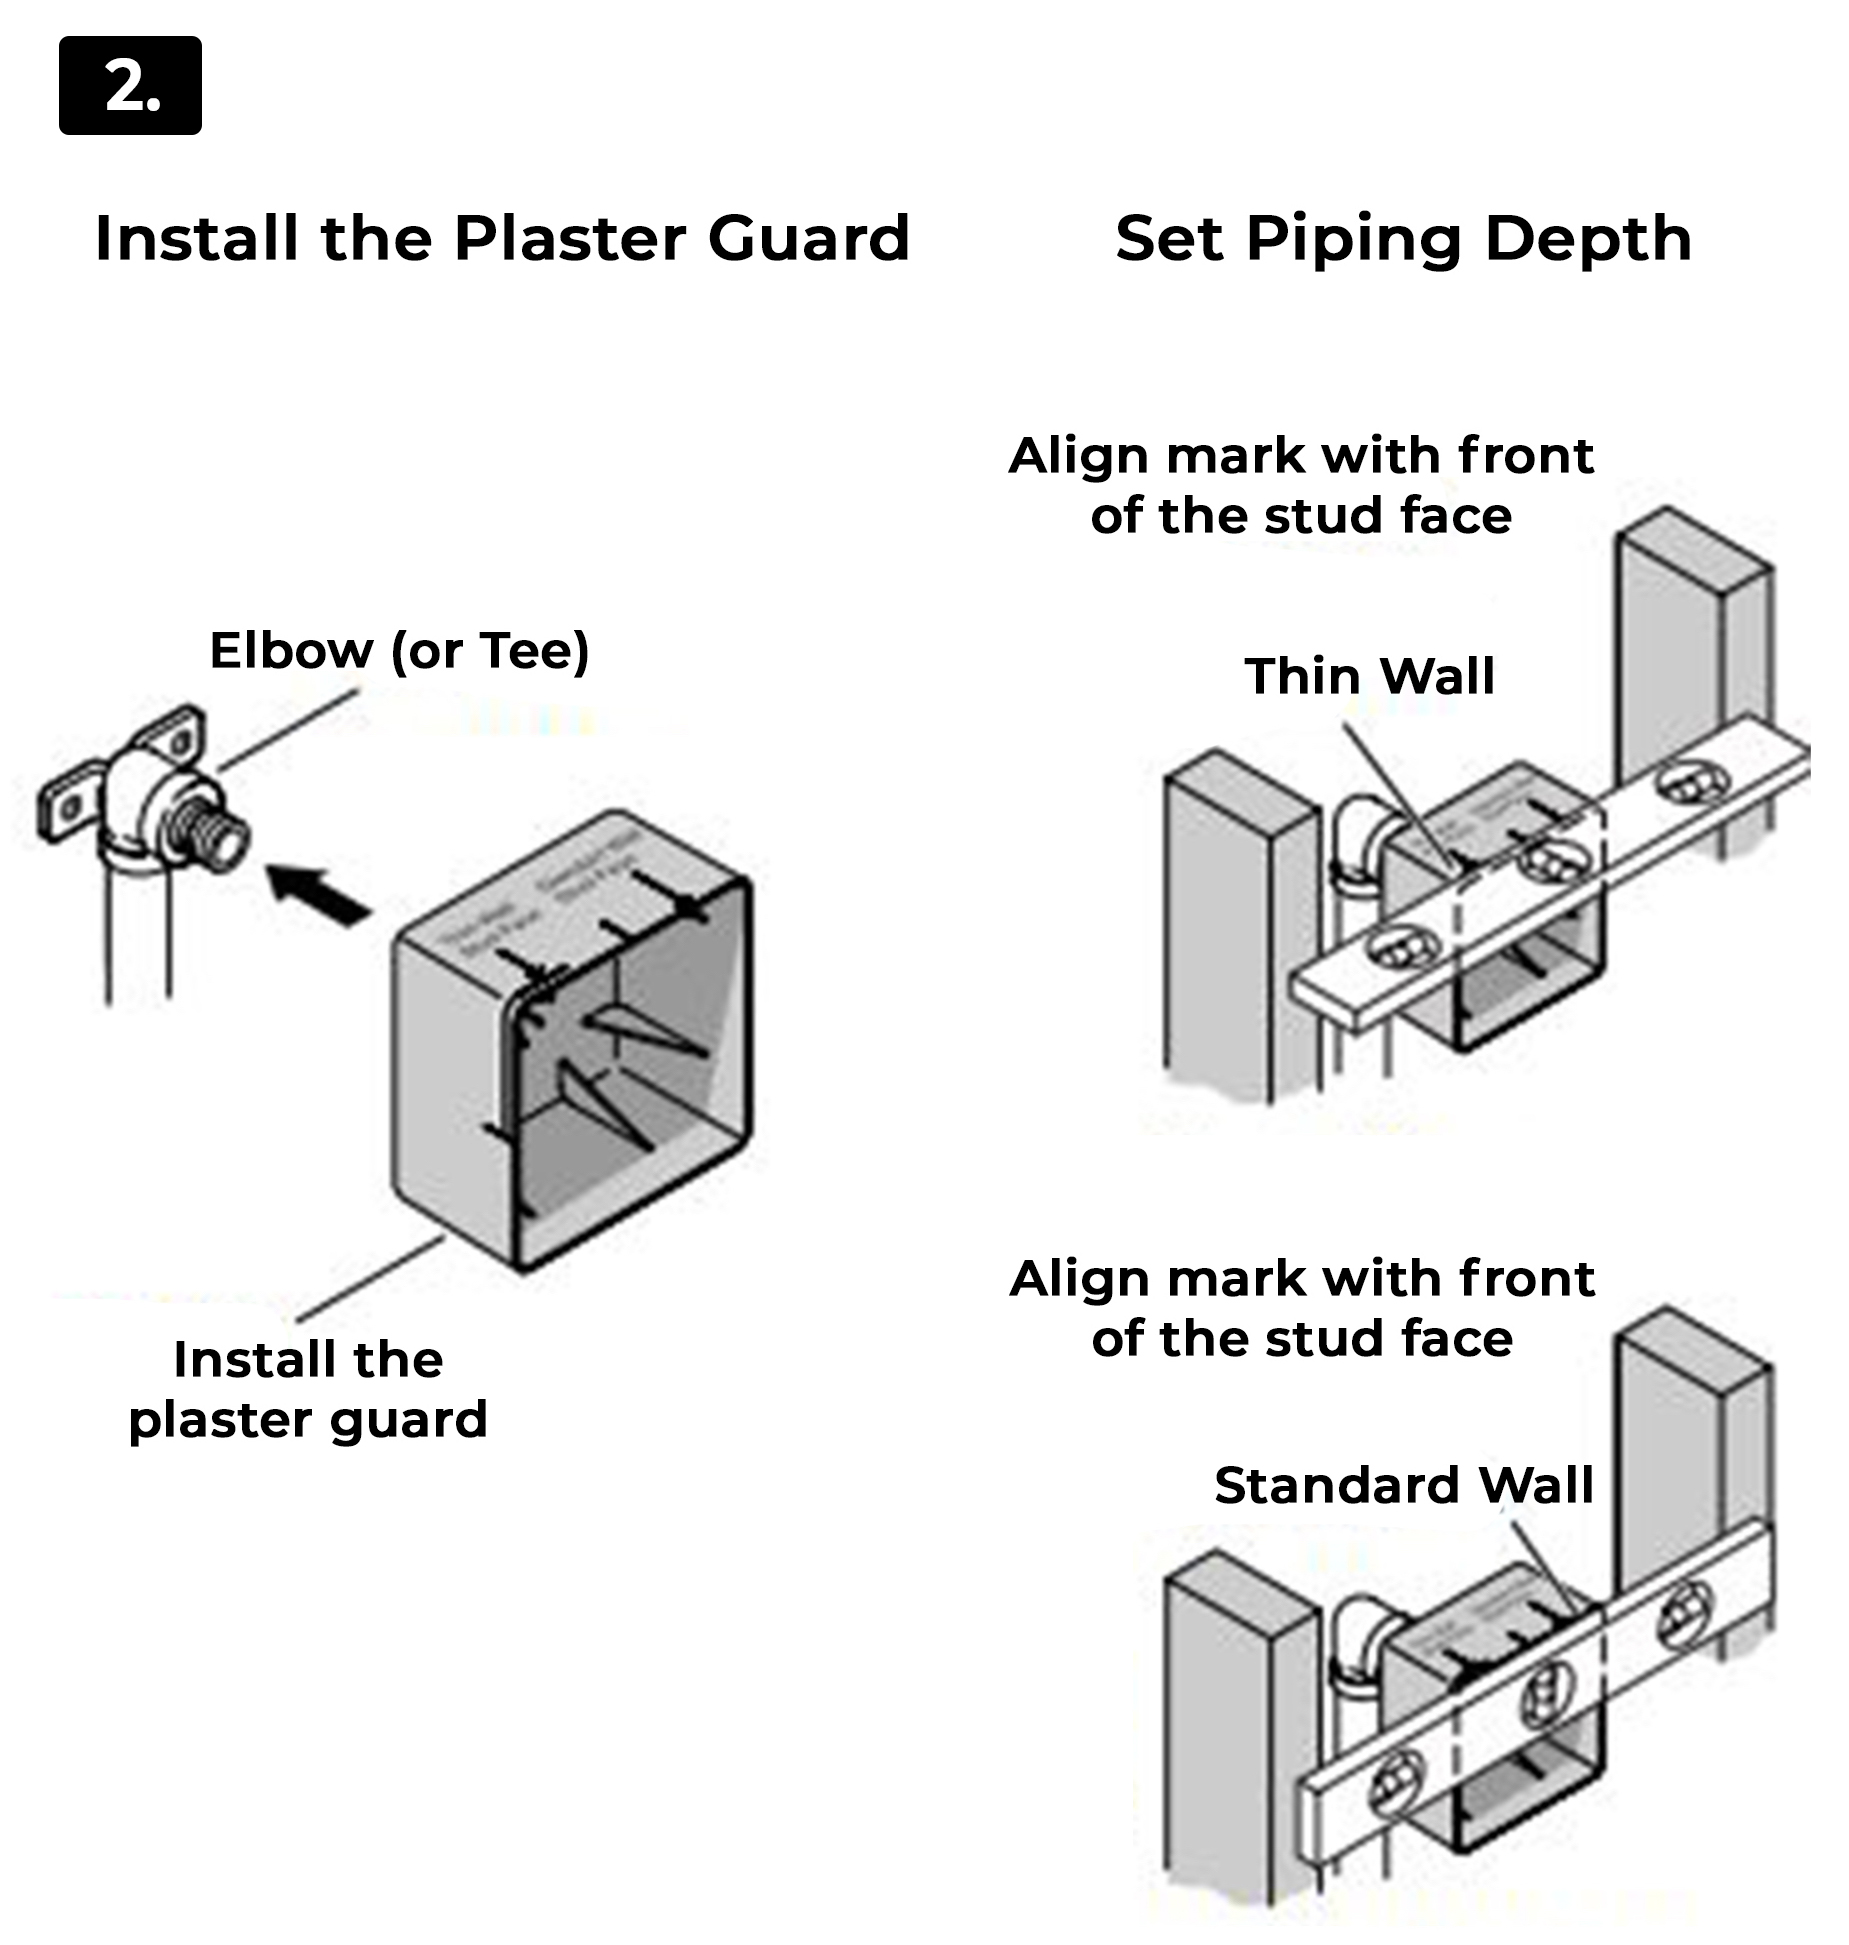 Install the Plaster Guard Install the Plaster Guard
Elbow (or Tee)
Install the plaster guard
Set Piping Depth
Align mark with the front of the stud face
Thin Wall
Align mark with the front of the stud face
Standard Wall
Install the plaster guard. Push until the plaster guard is snug against the face of the elbow (or tee).
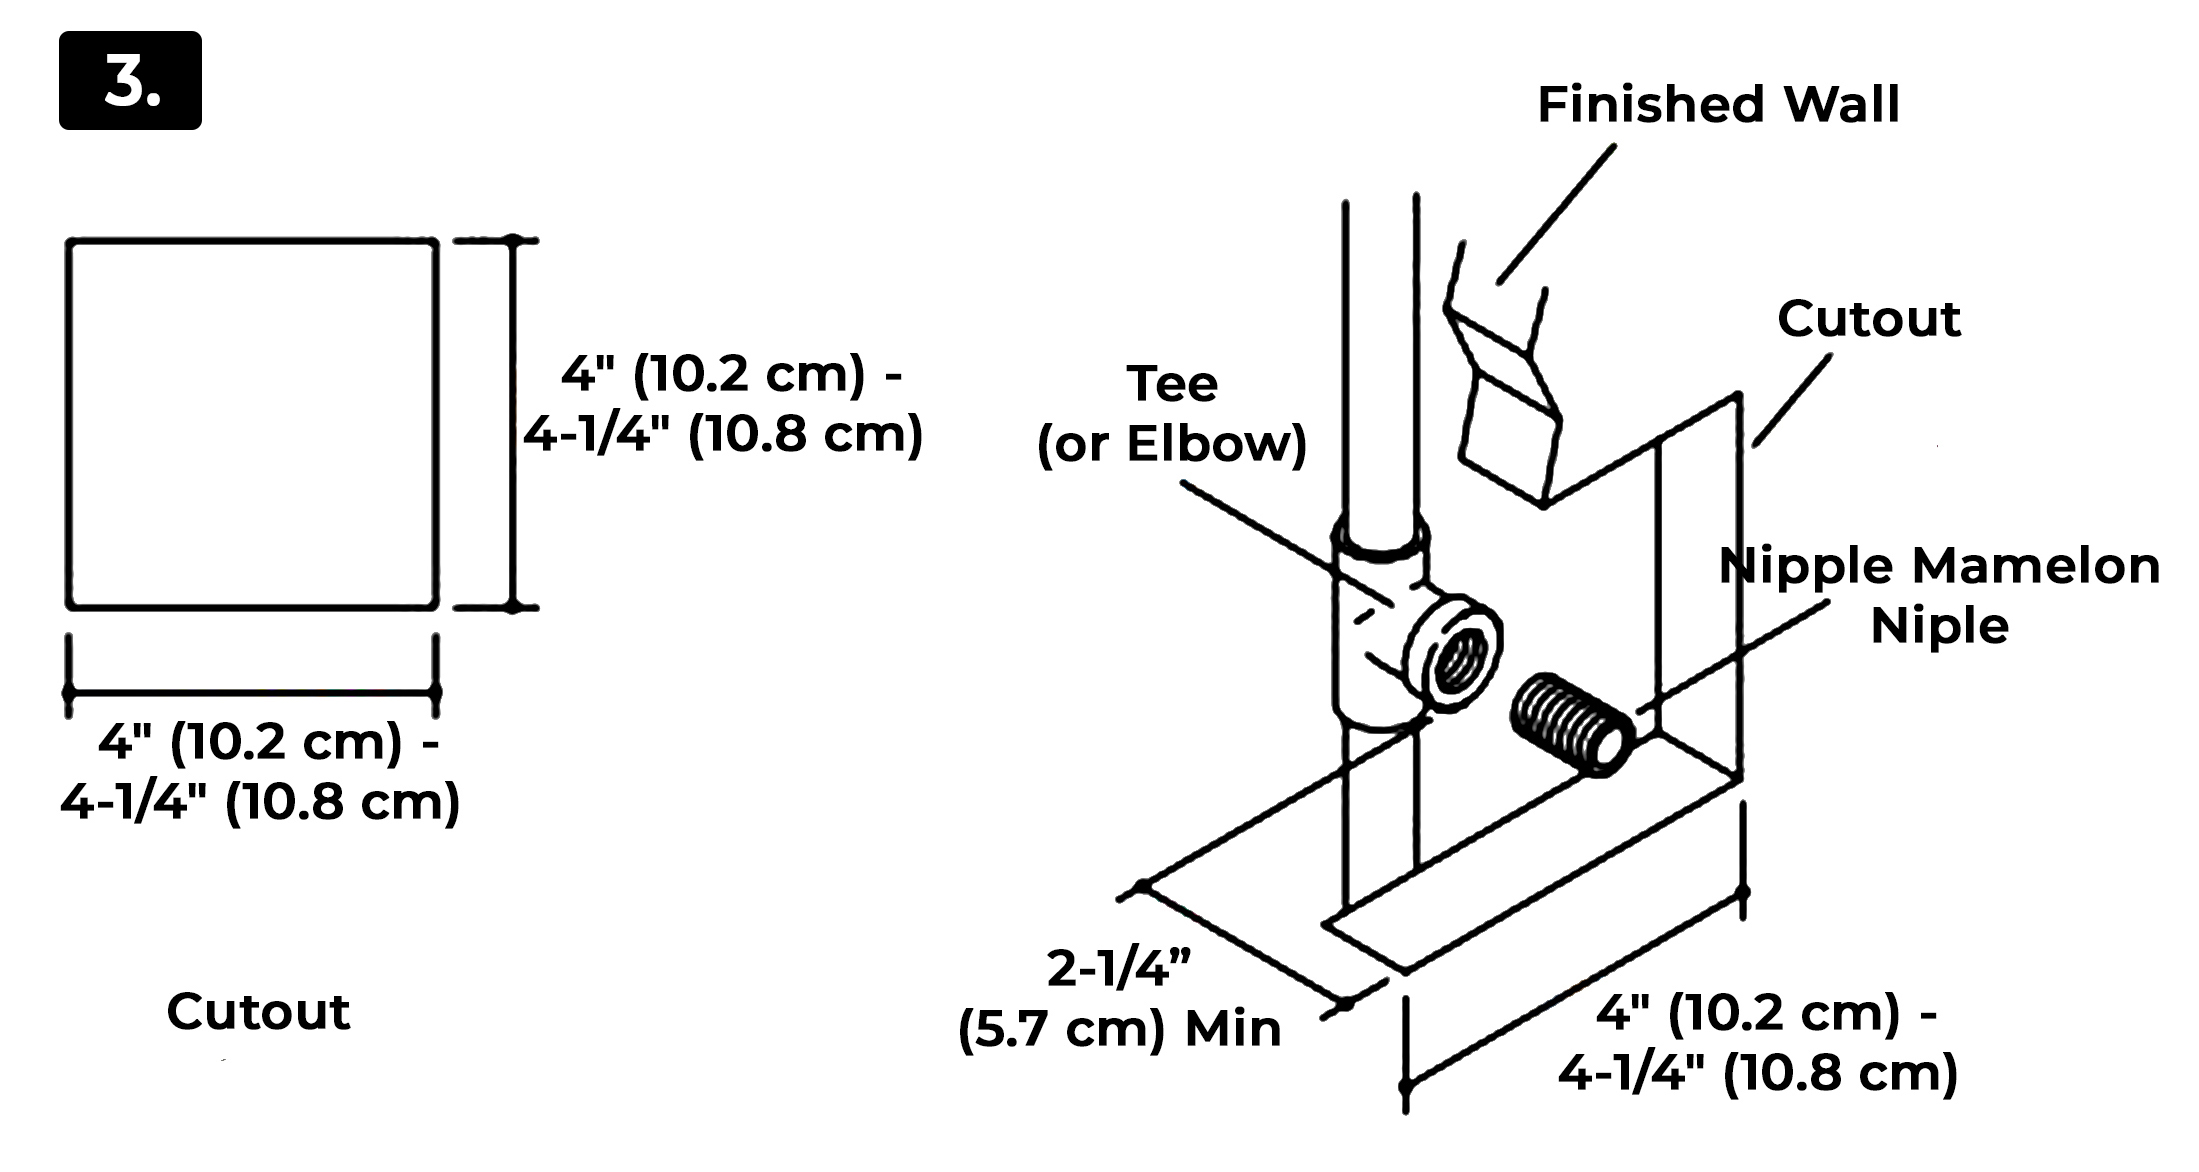 1. Install the water-resistant wallboard. 1. Install the water-resistant wallboard.
2. Cut out a 4" (10.2 cm) to 4-1/4" (10.8 cm) square at each the installation location.
3. Install the finished wall material.
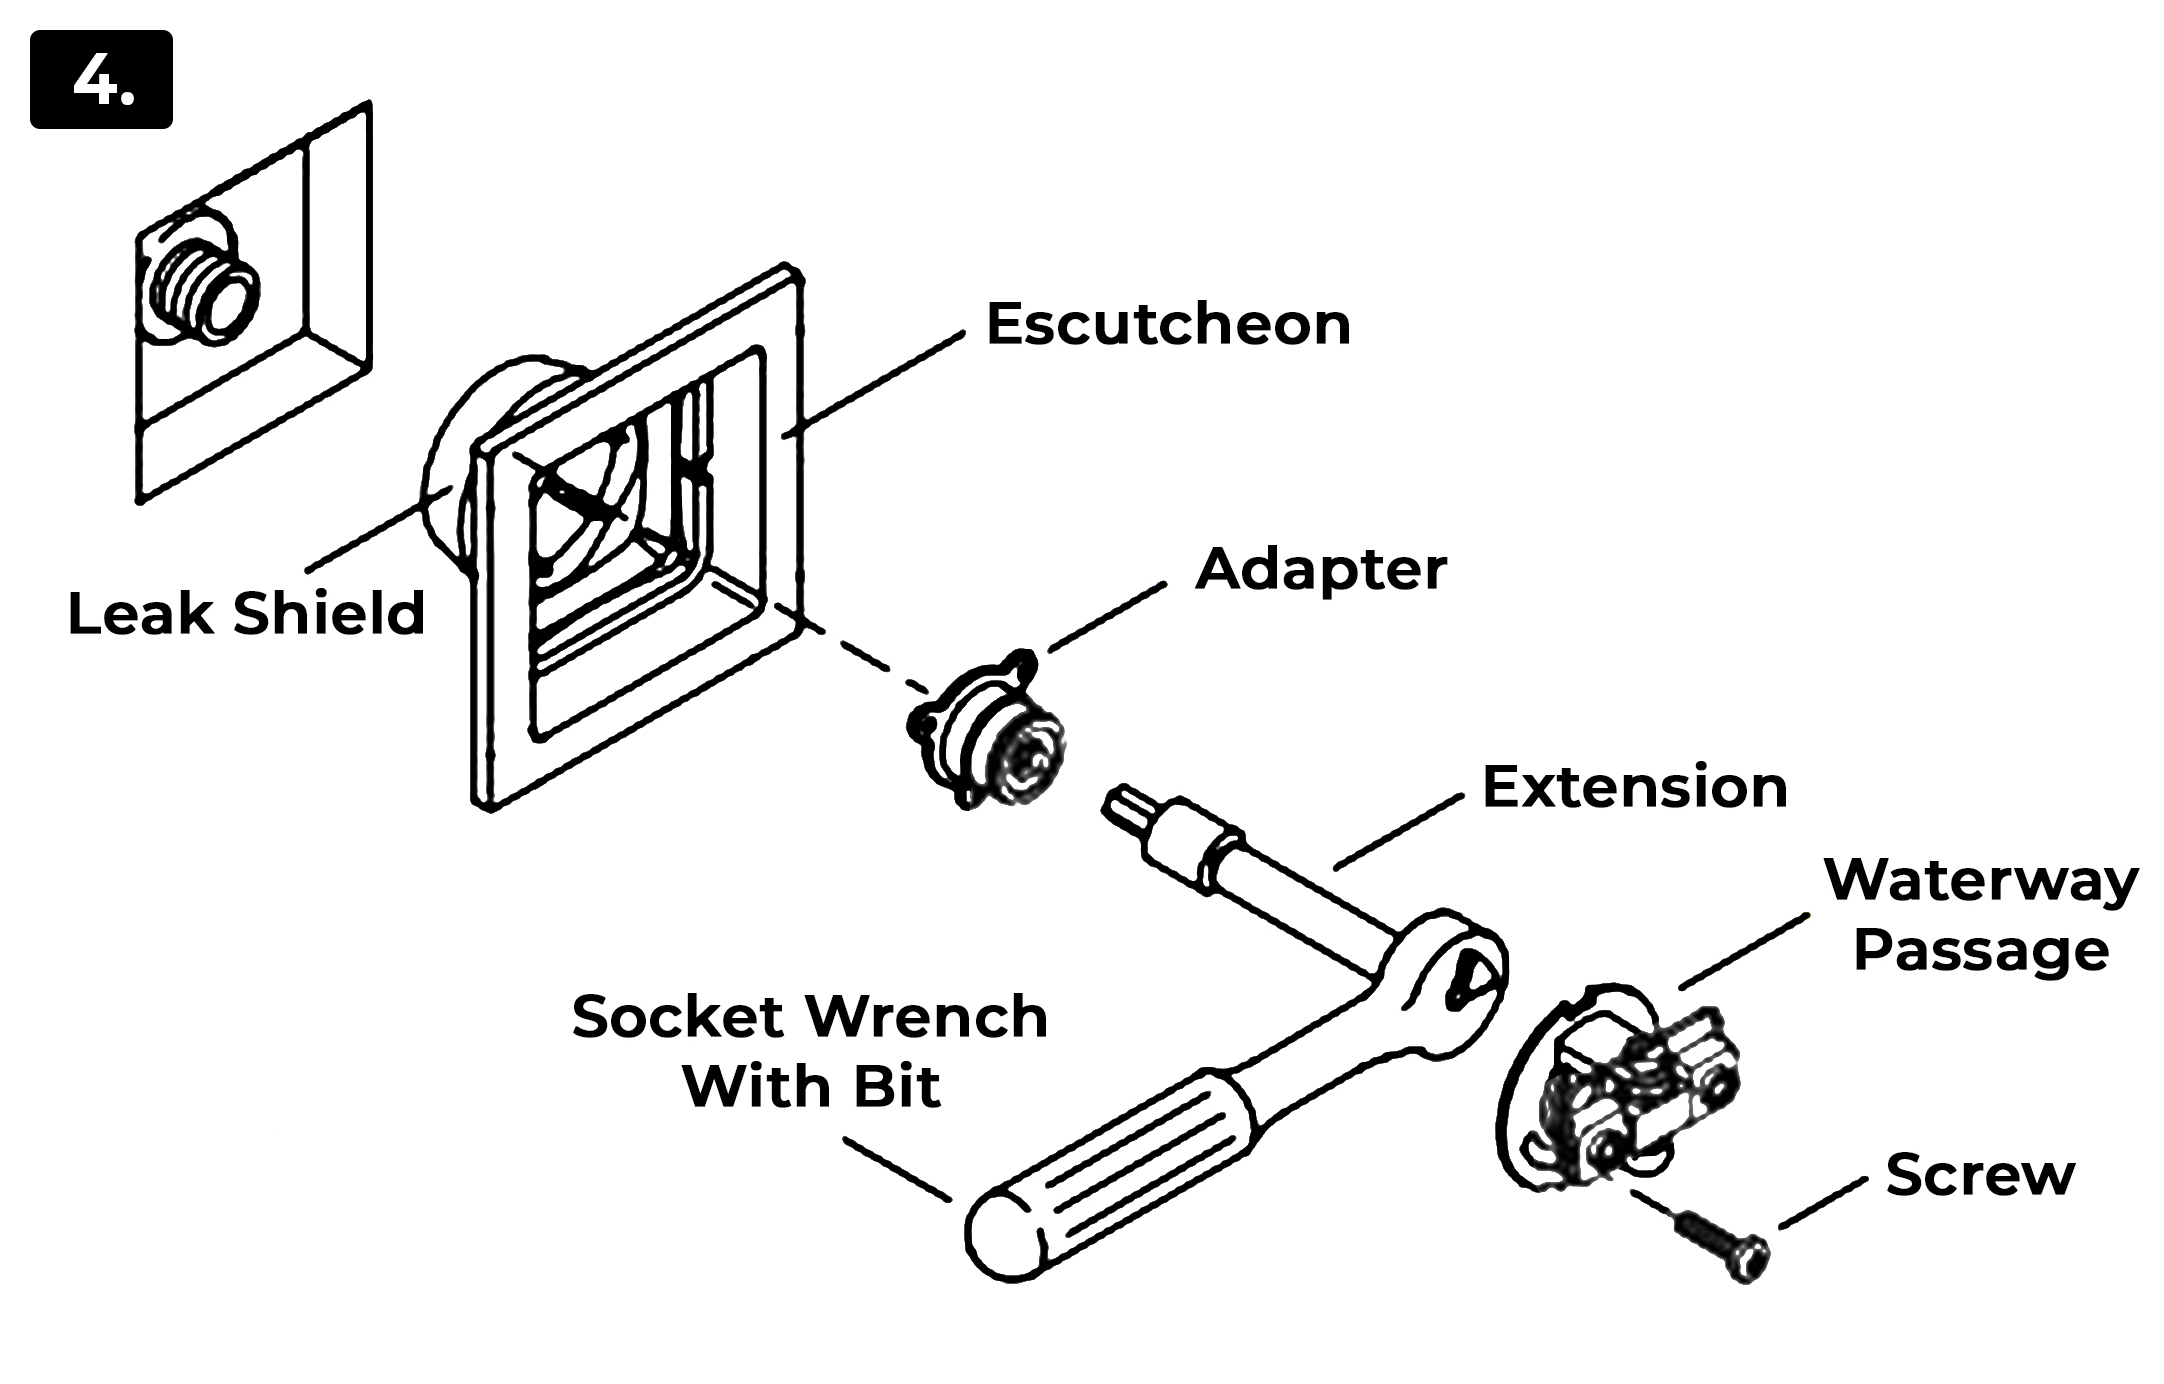 Escutcheon Escutcheon
Leak Shield
Adapter
Extension
Socket Wrench With Bit
Screw
Waterway Passage
1. Insert the escutcheon into the rough opening. The double ribs of the leak shield should be facing up.
2. If the leak shield makes contact with the elbow: Enlarge the hole in the back of the leak shield to 1-1/4" (3.2 cm).
3. Thread the adapter onto the nipple using the provided 0.4" bit, 11 mm or 7/16" socket, extension and socket wrench. Use masking tape to hold the bit in place, as the bit could fall off and cause damage.
IMPORTANT! The escutcheon should sit loosely at this point. If it is tight against the wall, use a longer pipe nipple.
4. Align the groove in the waterway with the double ribs on the leak shield.
5. Press the waterway into place over the adapter. Secure the waterway to the adapter with the screw provided.
6. Verify that the escutcheon does not turn or shift.
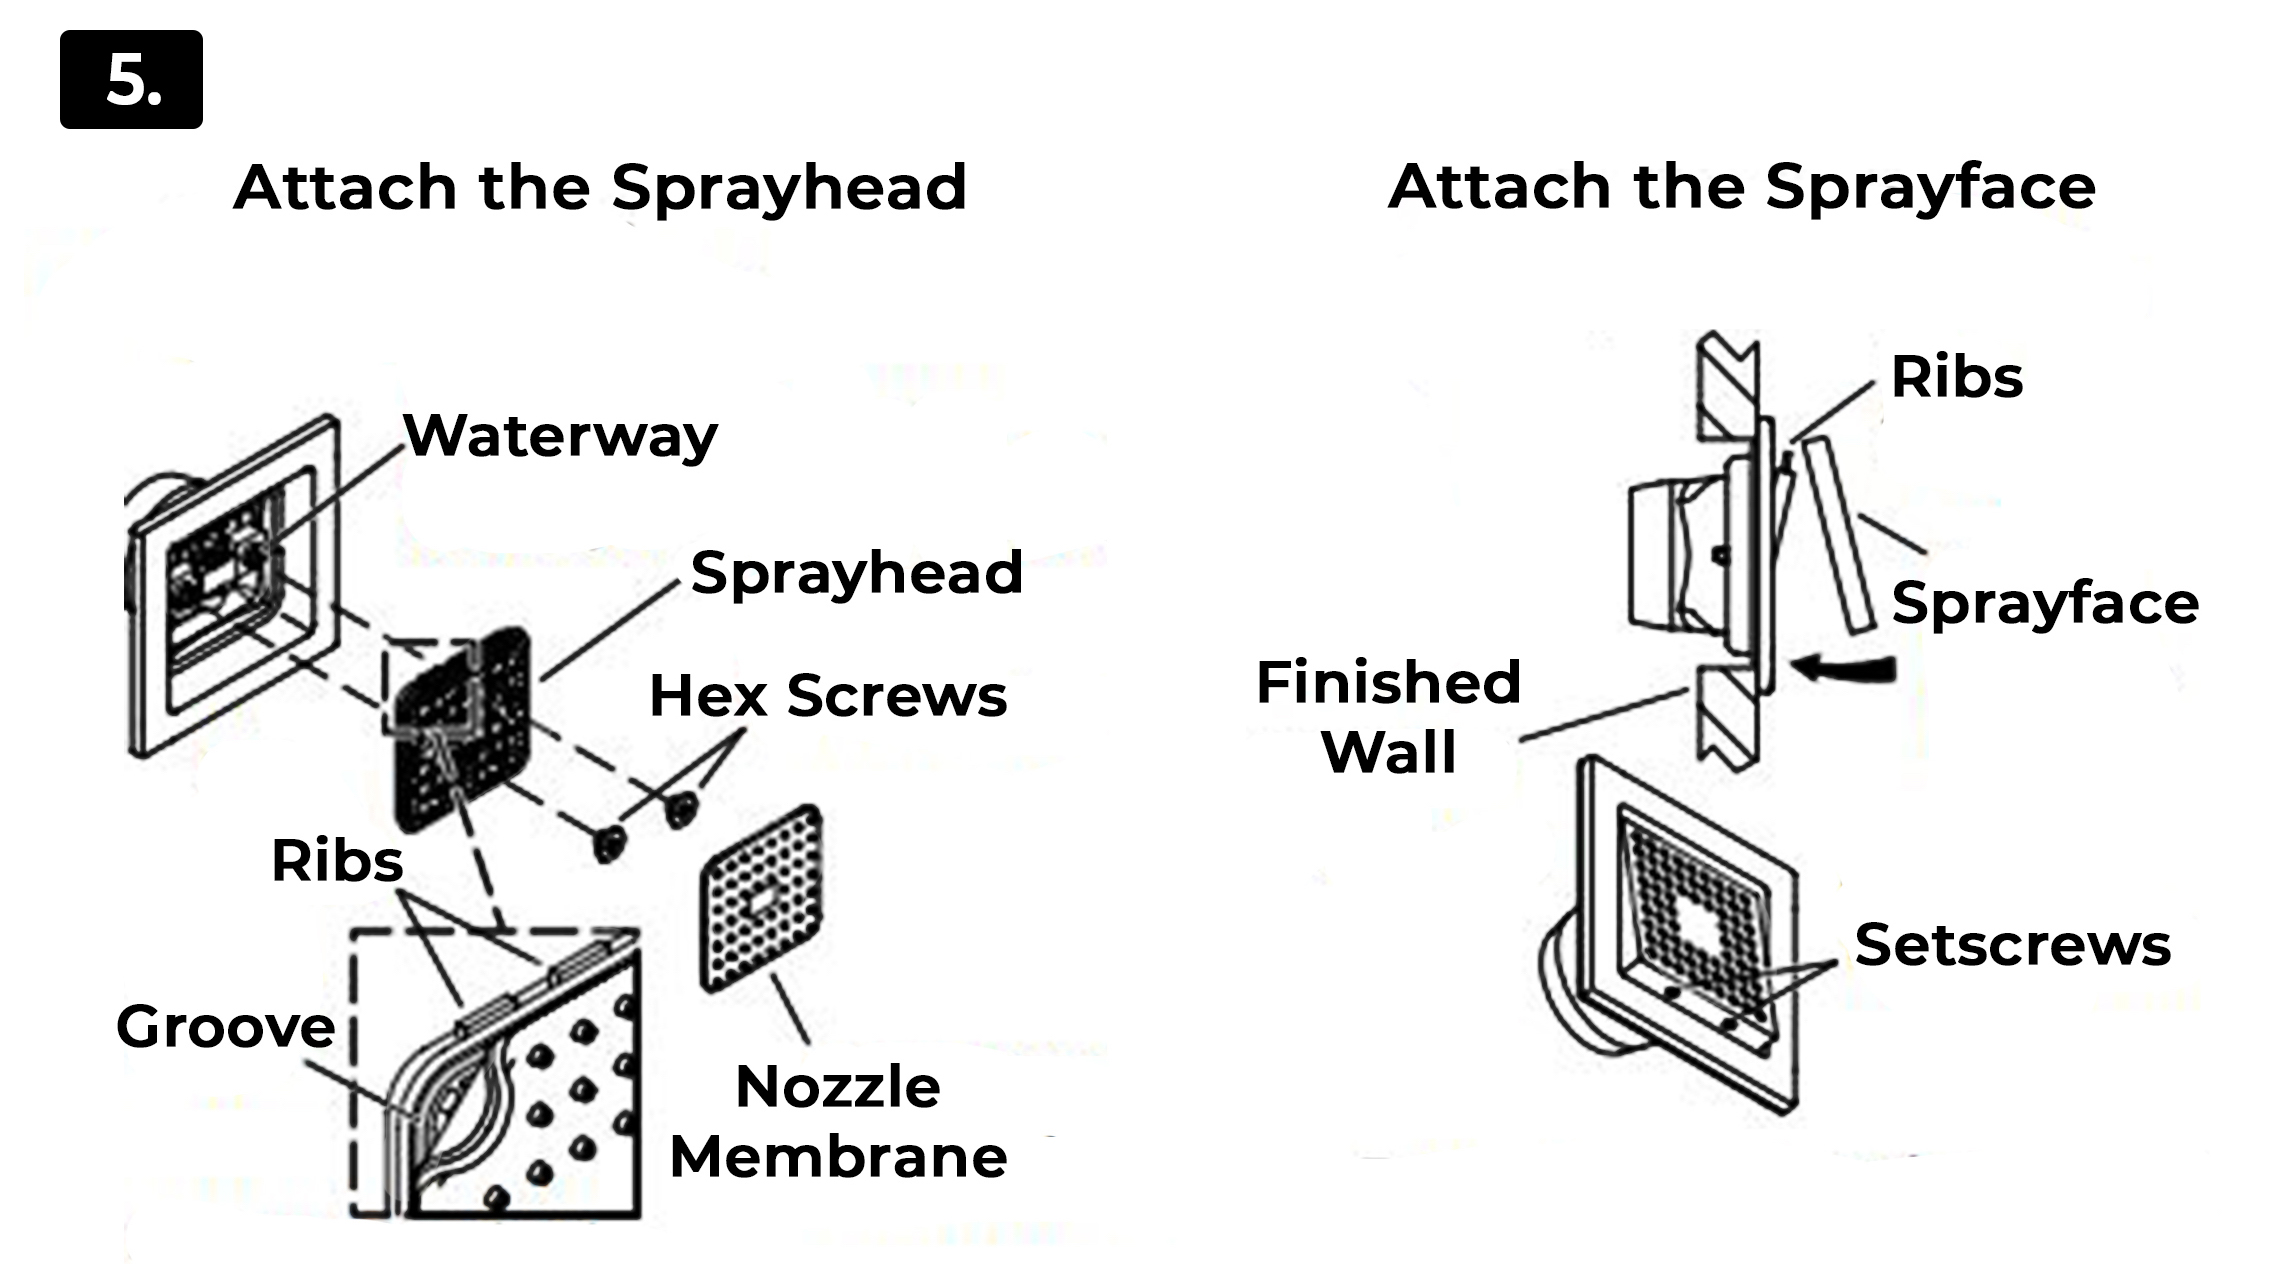 With the ribs of the sprayhead facing up, install the sprayhead to the waterway. 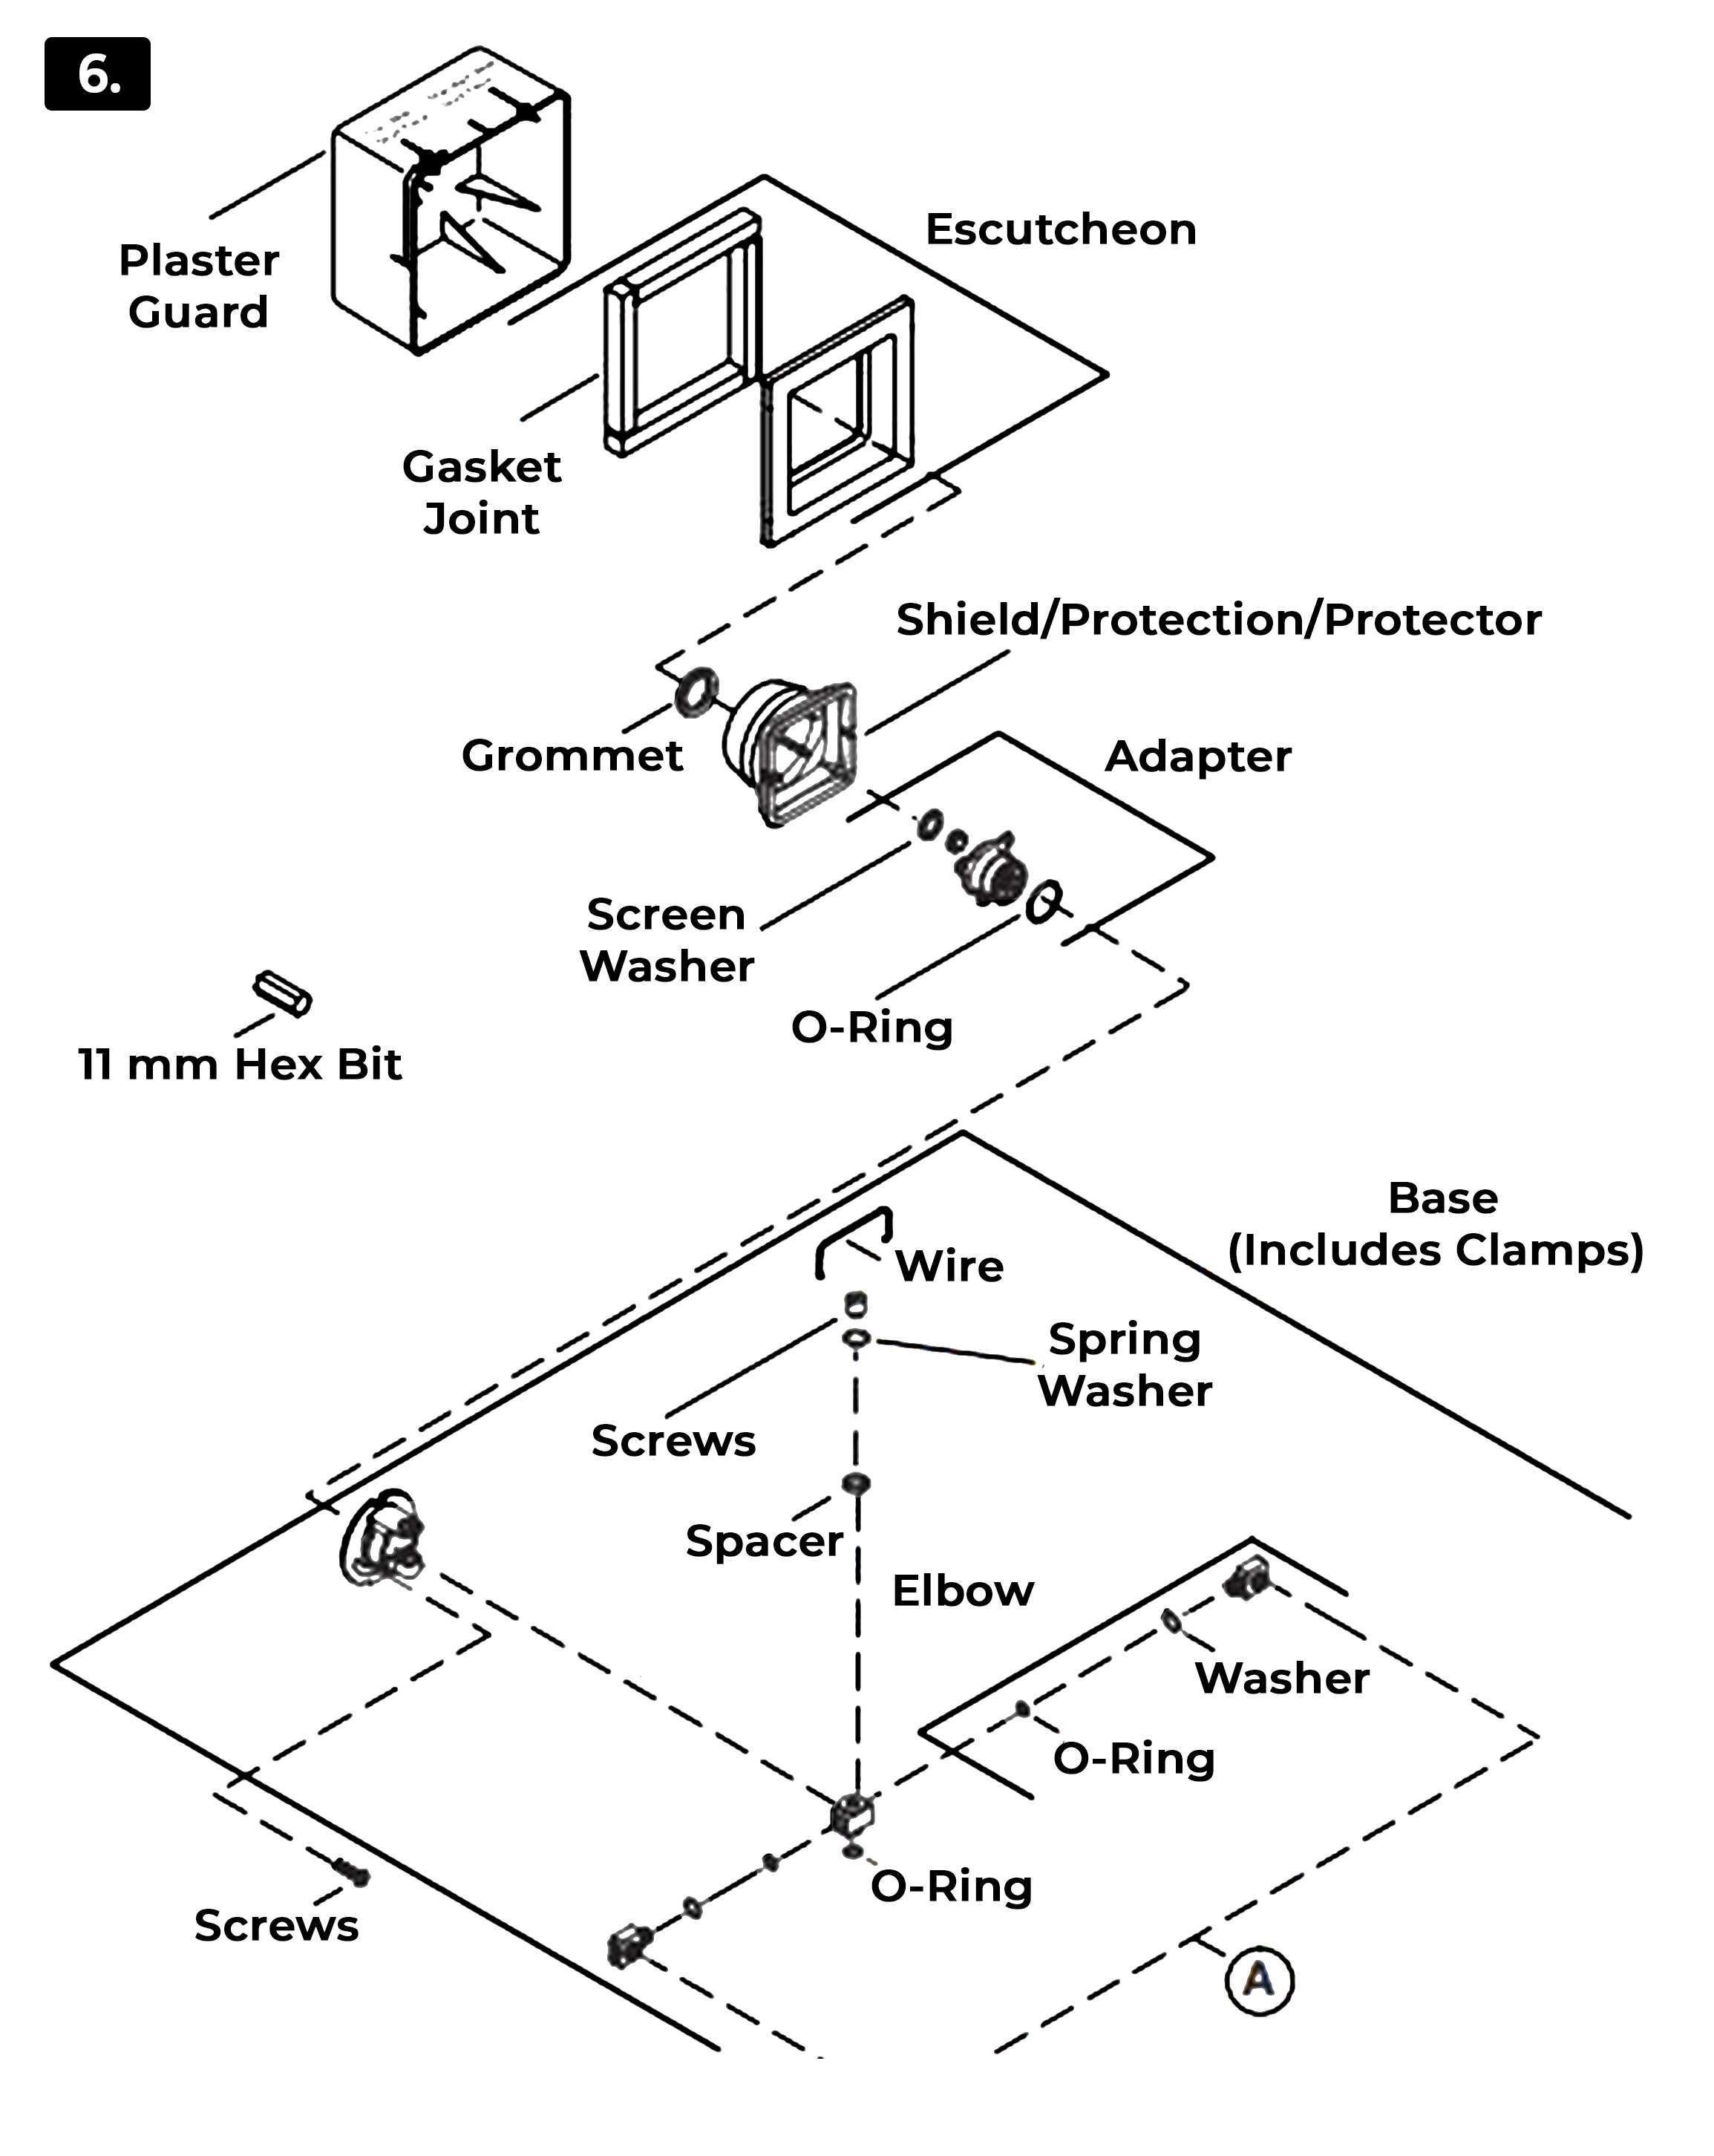 With the ribs of the sprayhead facing up, install the sprayhead to the waterway. 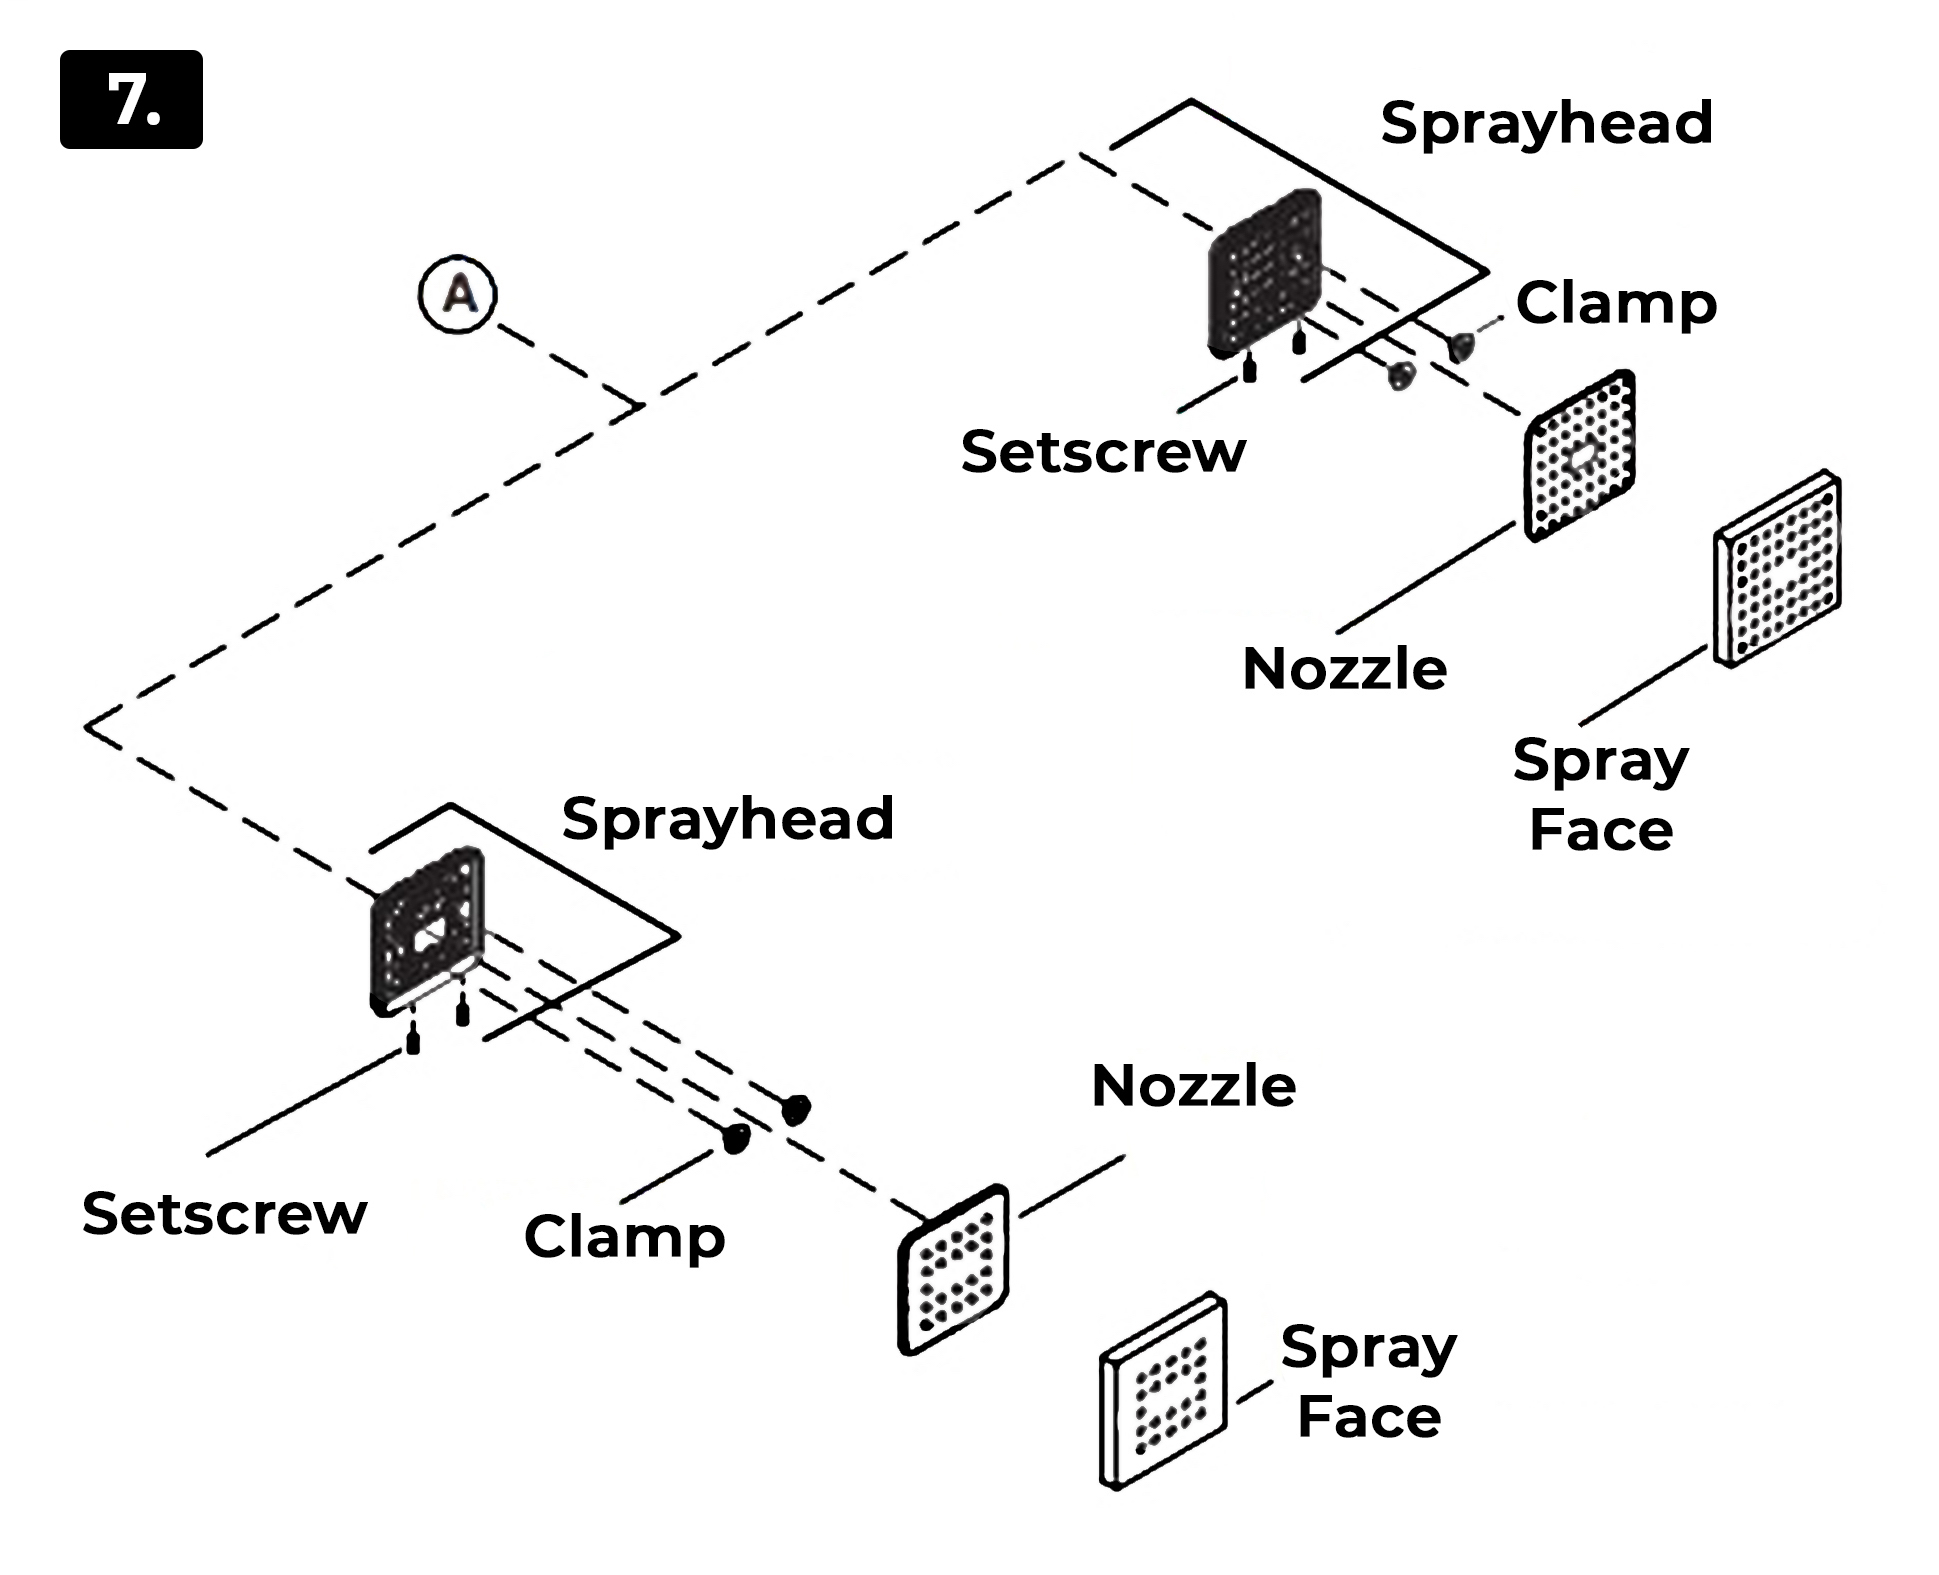
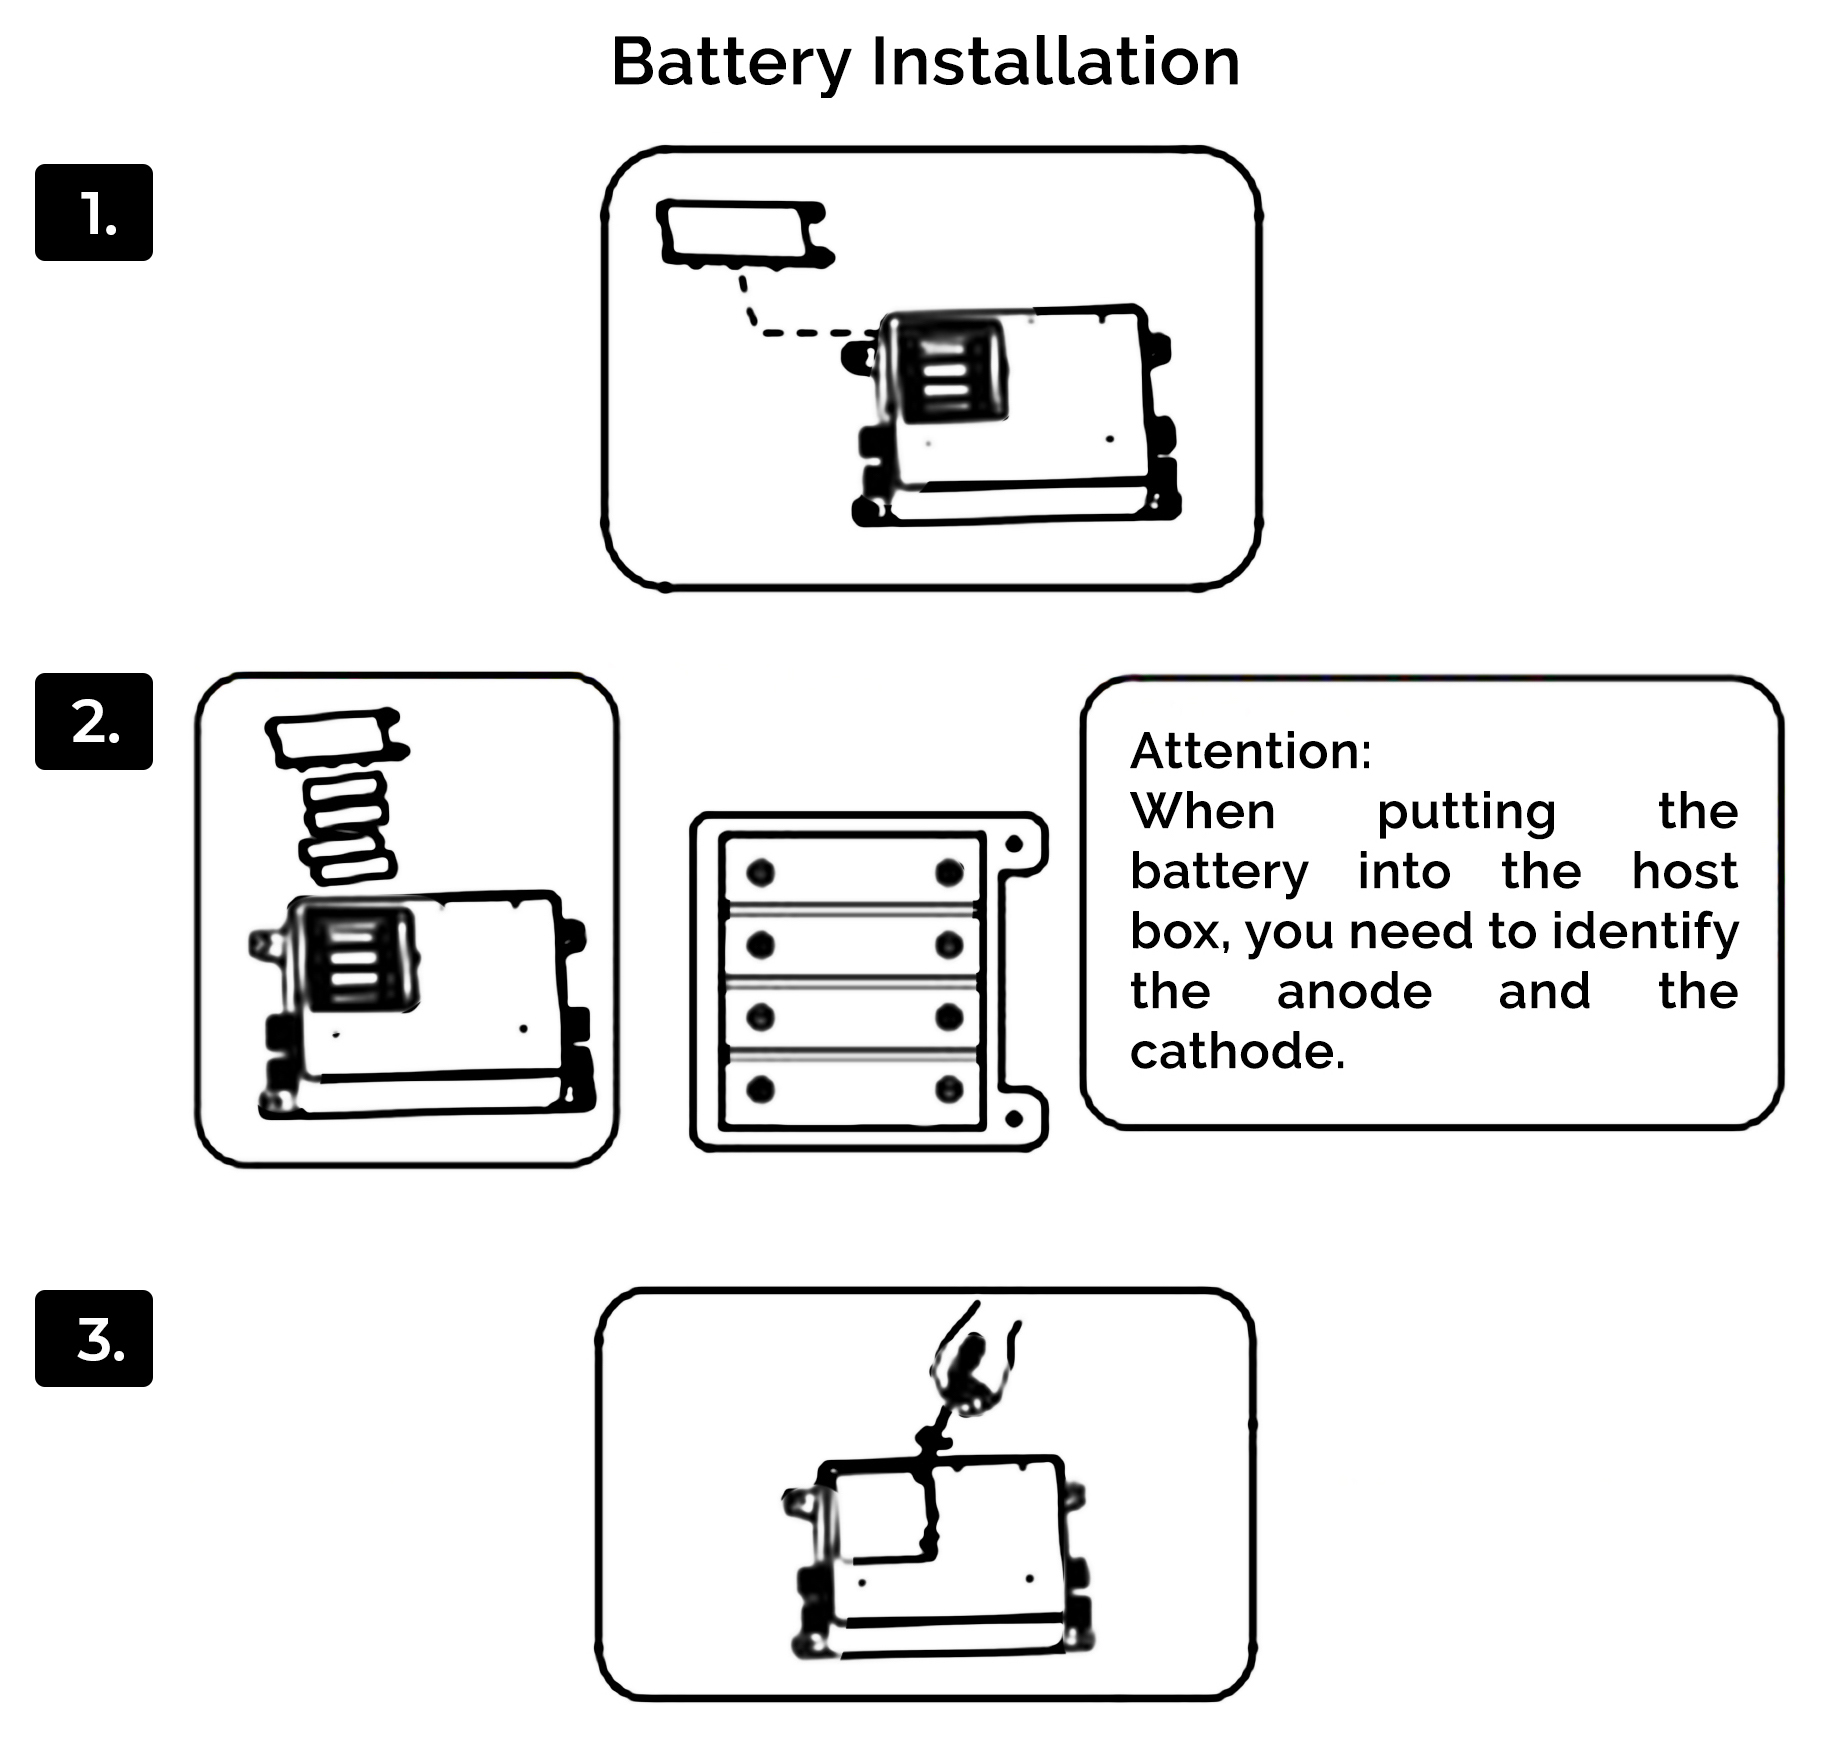
Digital Mixer Installation
|
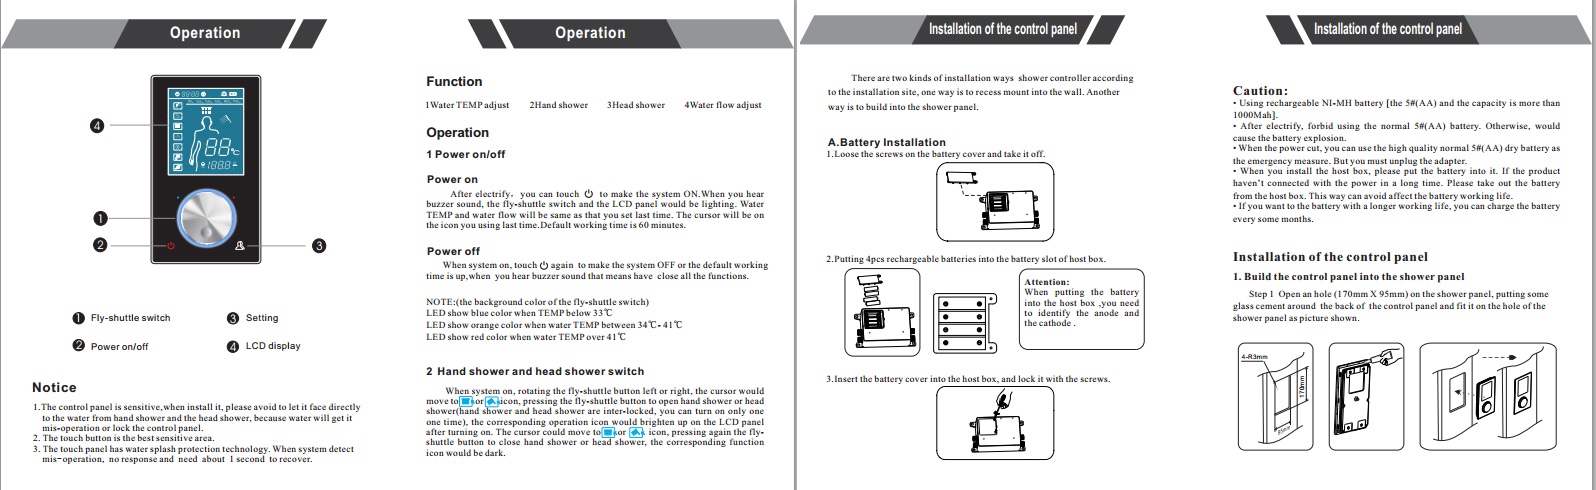
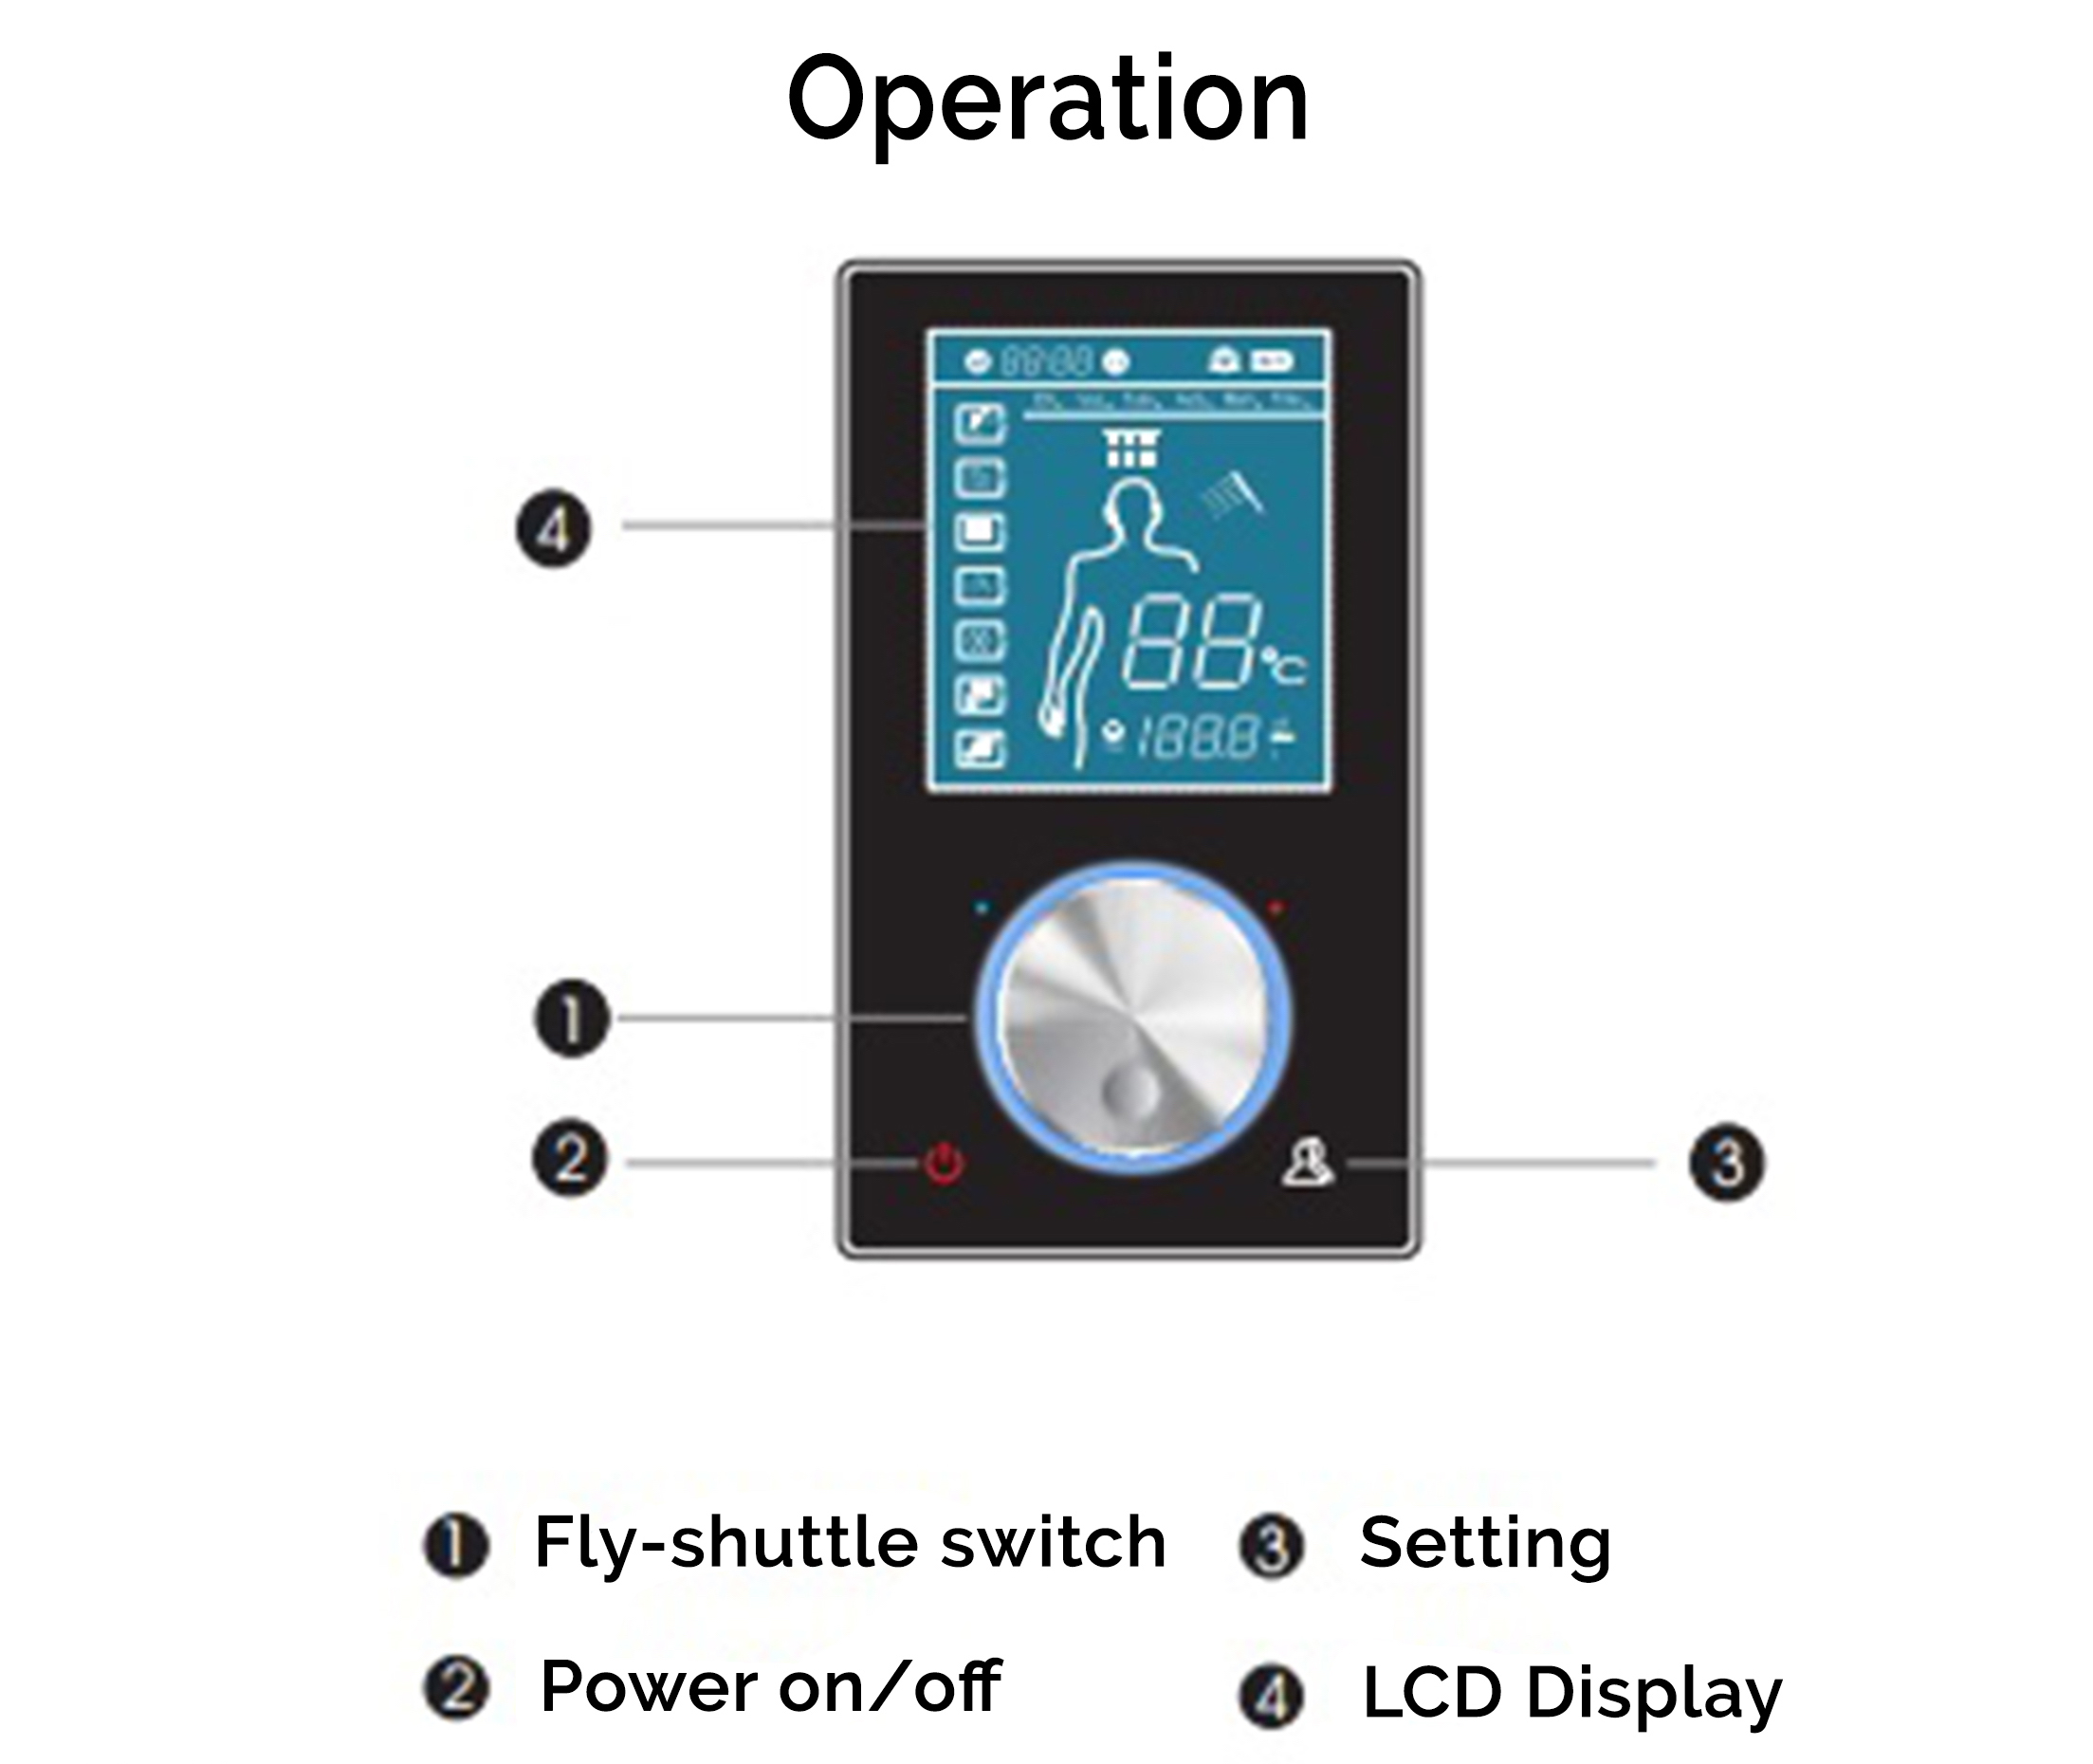
Operation
· Fly-shuttle switch
· Setting
· Power on/off
· LCD Display
Notice
1. The control panel is sensitive, when you install it, please avoid to let it face directly to the water from hand shower and the head shower because water will get it misoperation or lock the control panel.
2. The touch button is the best sensitive area.
3. The touch panel has water splash protection technology. When the system detects misoperation, no response, and need about 1 second to recover.
Function
1. Water TEMP adjust
2. Hand shower
3. Head Shower
4. Water flow adjust
Operation
1. Power on/off
Power on
After electrify, you can touch to make the system ON. When you hear buzzer sound, the fly-shuttle switch and the LCD panel would be lighting. Water TEMP and water flow will be the same as that you set last time. The cursor will be on the icon you using last time. The default working time is 60 minutes.
Power Off
When the system on, touch again to make the system OFF or the default working time is up, when you hear buzzer sound that means have close all the functions.
NOTE: (the background color of the fly-shuttle switch)
LED show blue color when TEMP below 33° C
LED show orange color when water TEMP between 34° C- 41° C
LED show red color when water TEMP over 41° C
2. Hand shower and head shower switch
When system on, rotating the fly-shuttle button left or right. the cursor would move to icon, pressing the fly-shuttle button to open hand shower or head shower (hand shower and head shower are inter-locked, you can turn on only one time), the corresponding operation icon would brighten up on the LCD panel after turning on. The cursor could move to
|
|
|