|
|
The BathSelect Venice Classico Antique Brass Wall Mount Faucet Installation
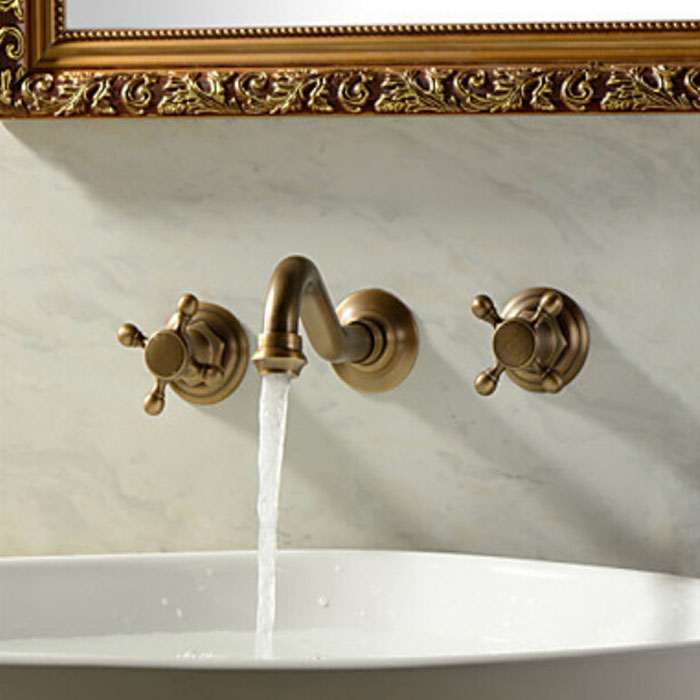
BathSelect Venice Classico Antique Brass Wall Mount Faucet
BathSelect Venice Classico is one of our most popular walls mount antique wall mount faucet. It is ideal both for home and for public locations, such as bars or restaurants, where you want to convey a back in time atmosphere. It is made of brass, with 2 handles for hot & cold water. The valve core material is ceramic for best performance and long-lasting lifetime. It comes with ½ connections, complete with accessories and installation instructions.
BathSelect Venice Classico Antique Brass Wall Mount Faucet Features:
- Brand Name: BathSelect
- Model Number: BS-WAR43
- Type: Wall Mount Faucet
- Brand Name: Venice
- Style: Contemporary
- Hot & Cold Water: Yes
- Number of Handle: Dual Handles
- Surface Treatment: Antique Brass
- Weight Per Package: 2.1-3kg
- Valve Core Material: Ceramic
- Feature: Thermostatic Faucets
- Installation Type: Wall Mount
- Flow Rate: 1.3 GPM
|
|
BathSelect® Manufacturer Warranty Information
|
|
all Mount Faucet Installation Instructions:
Before You Begin
- Shut off the main water supply.
- Observe all local plumbing and building codes.
- If needed, complete the finished wall before beginning this installation.
- Reserve the right to make revisions in the design of faucets without notice, as specified in the Price Book.
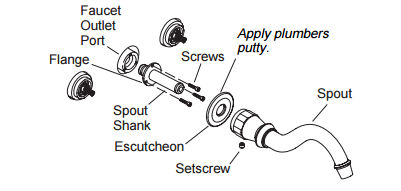
1. Install the Spout
IMPORTANT! Use care when installing the spout to avoid scratching the finish.
- Back the setscrew out of the spout or remove it to prevent damage to the spout shank when installing the spout to the faucet outlet port.
- Insert the inlet end of the spout shank into the faucet outlet port.
- Secure the spout shank using the three provided screws.
- Apply plumbers putty or other sealant to the back surface of the spout escutcheon according to the putty manufacturers instructions. Press the spout escutcheon firmly against the finished wall.
- Slide the spout onto the spout shank, position as desired, and tighten the setscrew to secure the spout in place.
- Remove any excess putty or sealant.
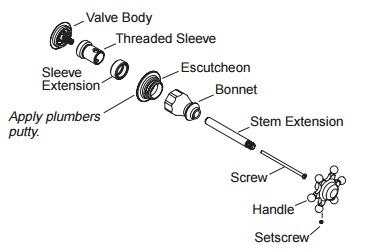
2. Install the Handles
- Determine the thickness of the finished wall.
- If the finished wall is less than 5/8″ (1.6 cm) thick, use the supplied hardware kit numbered 1031092.
- If the finished wall is 5/8″ (1.6 cm) to 1-1/4″ (3.2 cm) thick, use the supplied hardware kit numbered 1031091.
- Place a stem extension on the valve stem. Secure with the screw provided.
- Thread a threaded sleeve onto the valve body.
- Thread a sleeve extension onto the threaded sleeve.
- Apply plumbers putty or other sealant to the back of the escutcheon according to the putty manufacturers instructions.
- Thread an escutcheon onto the threaded sleeve. Remove any excess putty or sealant. Position the handle on the stem extension. Turn the handle to the closed position (Hot = Counterclockwise, Cold = Clockwise). Repeat the procedures with the second handle.
- Complete the Installation
- Ensure that both faucet handles are turned off (hot = counterclockwise to close, cold = clockwise to close).
- Turn on the water supplies and check the installation for leaks.
- Repair as needed.
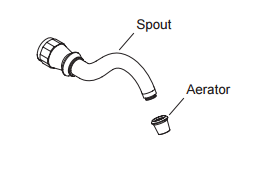
- Remove the aerator.
- Open the valves and run water through the spout for about a minute to remove any debris. Check for leaks.
- Remove all debris from the aerator.
- Turn the valves off, and reinstall the aerator.
|
|
|


