How to Install Tempered Glass Sliding Shower Door In Brushed Gold Finish Frame | BST9979
| This shower enclosure combines quality construction with elegant craftsmanship to offer the best in contemporary styling and functionality. Update the style in your bathroom with the designer glass aluminium framed sliding shower door.This Designer tempered glass shower enclosure is a perfect attraction in any bathroom which can provide quick splash which is quite invigorating and provide the ultimate pampering experience even in outdoor as well as indoor areas. These products are highly known for their features like well-built constructions, rust resistance, longer life service and low prices. Moreover, these products are made under the direction of highly knowledgeable engineers industry using highly developed technology and latest machines. In addition to this, we offer these products in varied designs, shapes and technical specifications. | |  | | |
|
| | | | Features: | | ProductVisit Product Page  | - Brand Name: BathSelect
- Model Number: BST9979
- Glass Shape: Rectangle
- Frame Style: Framed
- Frame Material: Aluminium Alloy
- Frame Surface Finish: Polished
- Opening Style : Sliding
- Glass Thickness: 0.31/ 0.39 inches (8/10 mm)
- Glass Type: Polished glass
- Material: Stainless steel + glass
- Style: Modern Bathroom Door
- Application: Indoor/ Outdoor Shower Room
- Name: Glass shower room
- Usage: Bathroom
| shower | 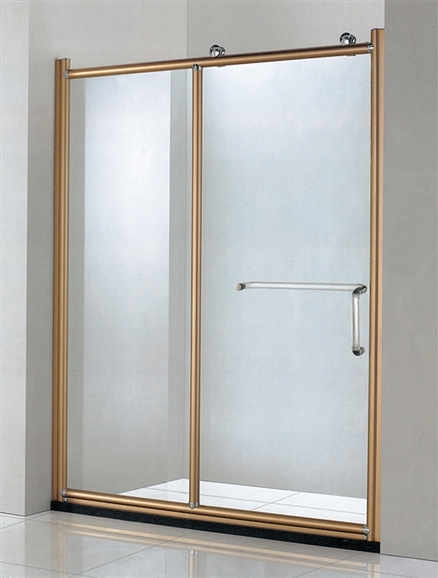
|
Important Note:
Before you begin, please read the installation instructions below. Observe all local building and safety codes.
Unpack and inspect the product for any shipping damages. If you find damages, do not install.
Please note all showers must be installed by a professional and certified plumber otherwise warranty may be voided.
|
|
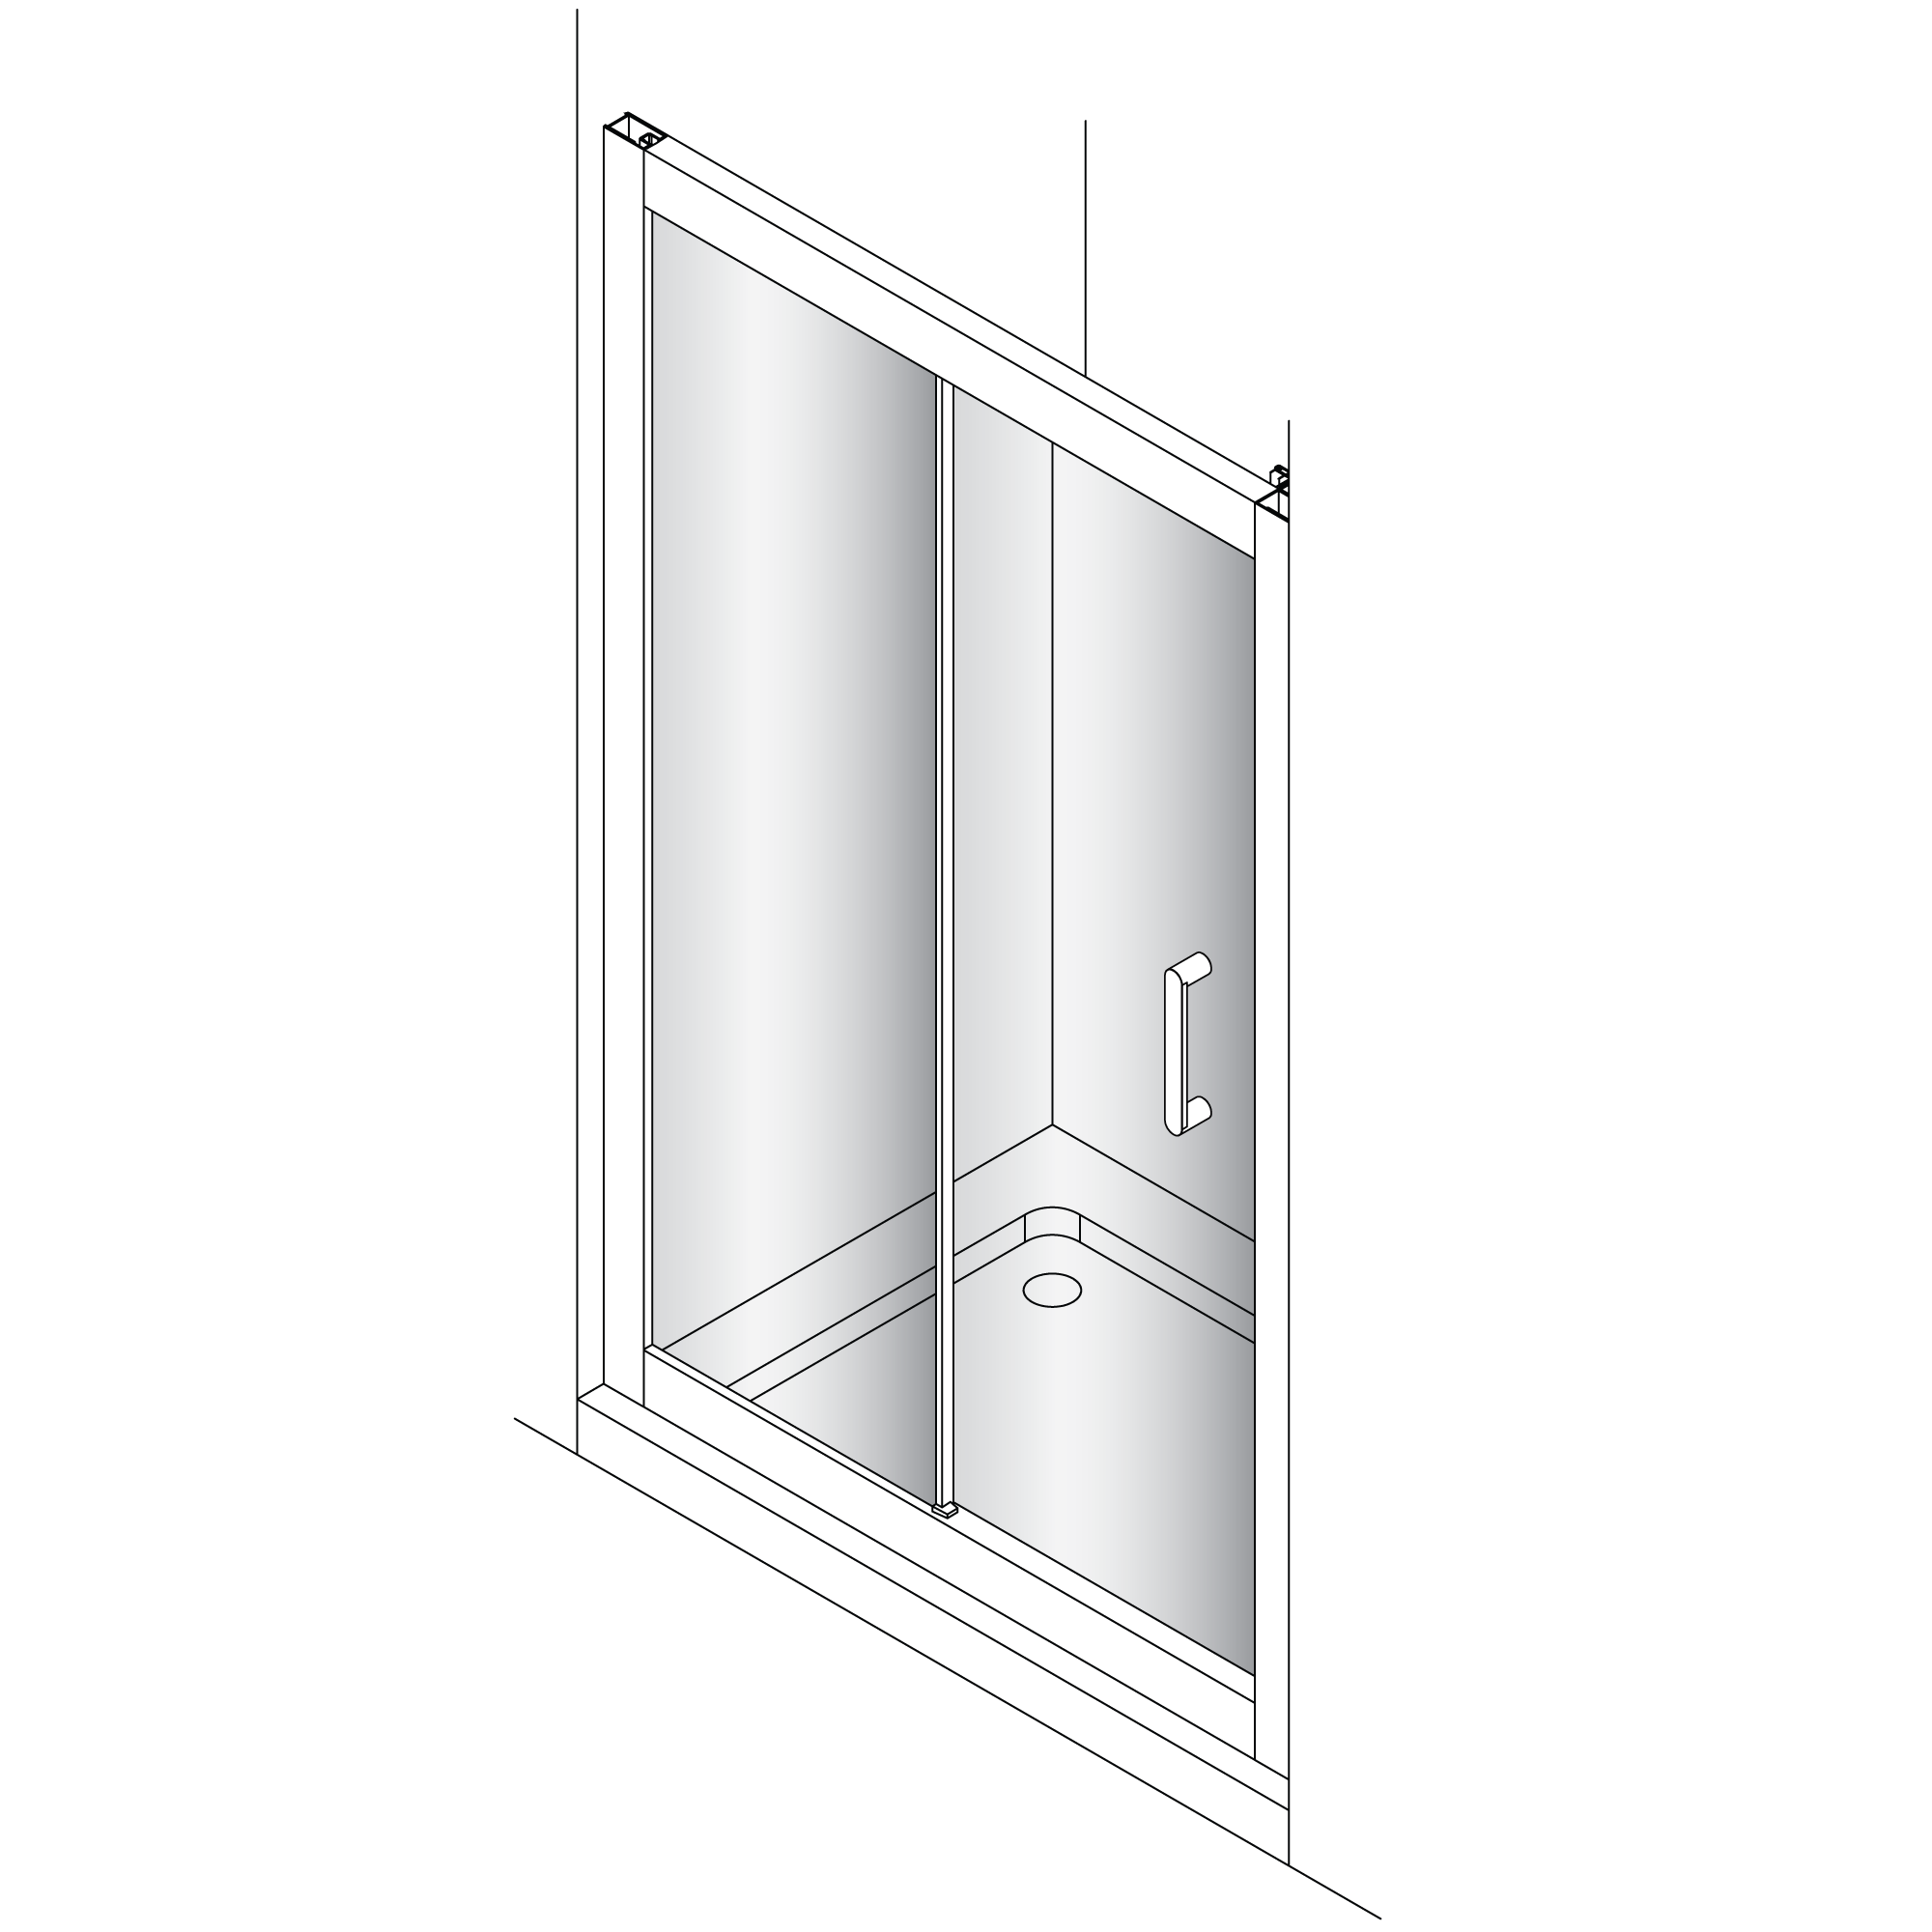
Glass Shower Door Installation Instructions
|
|
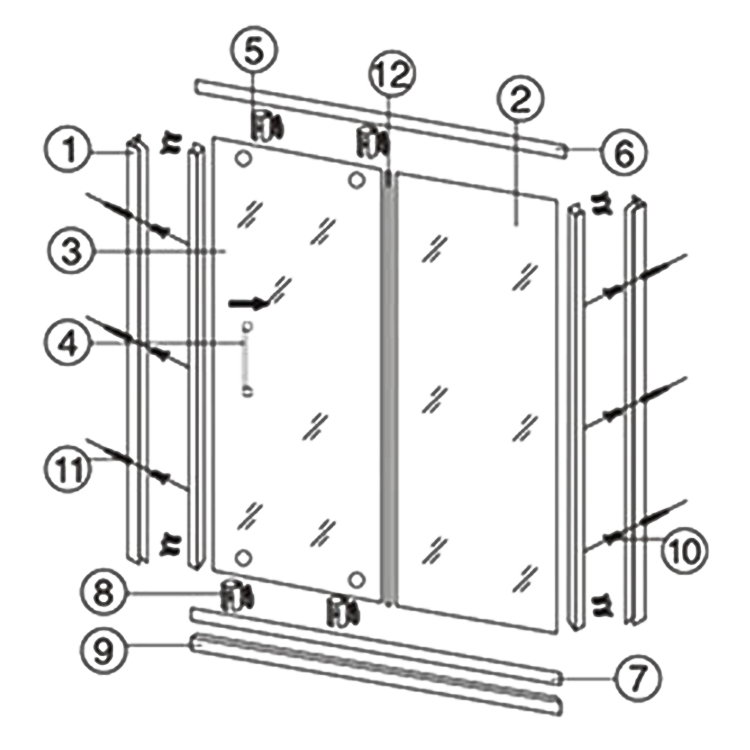
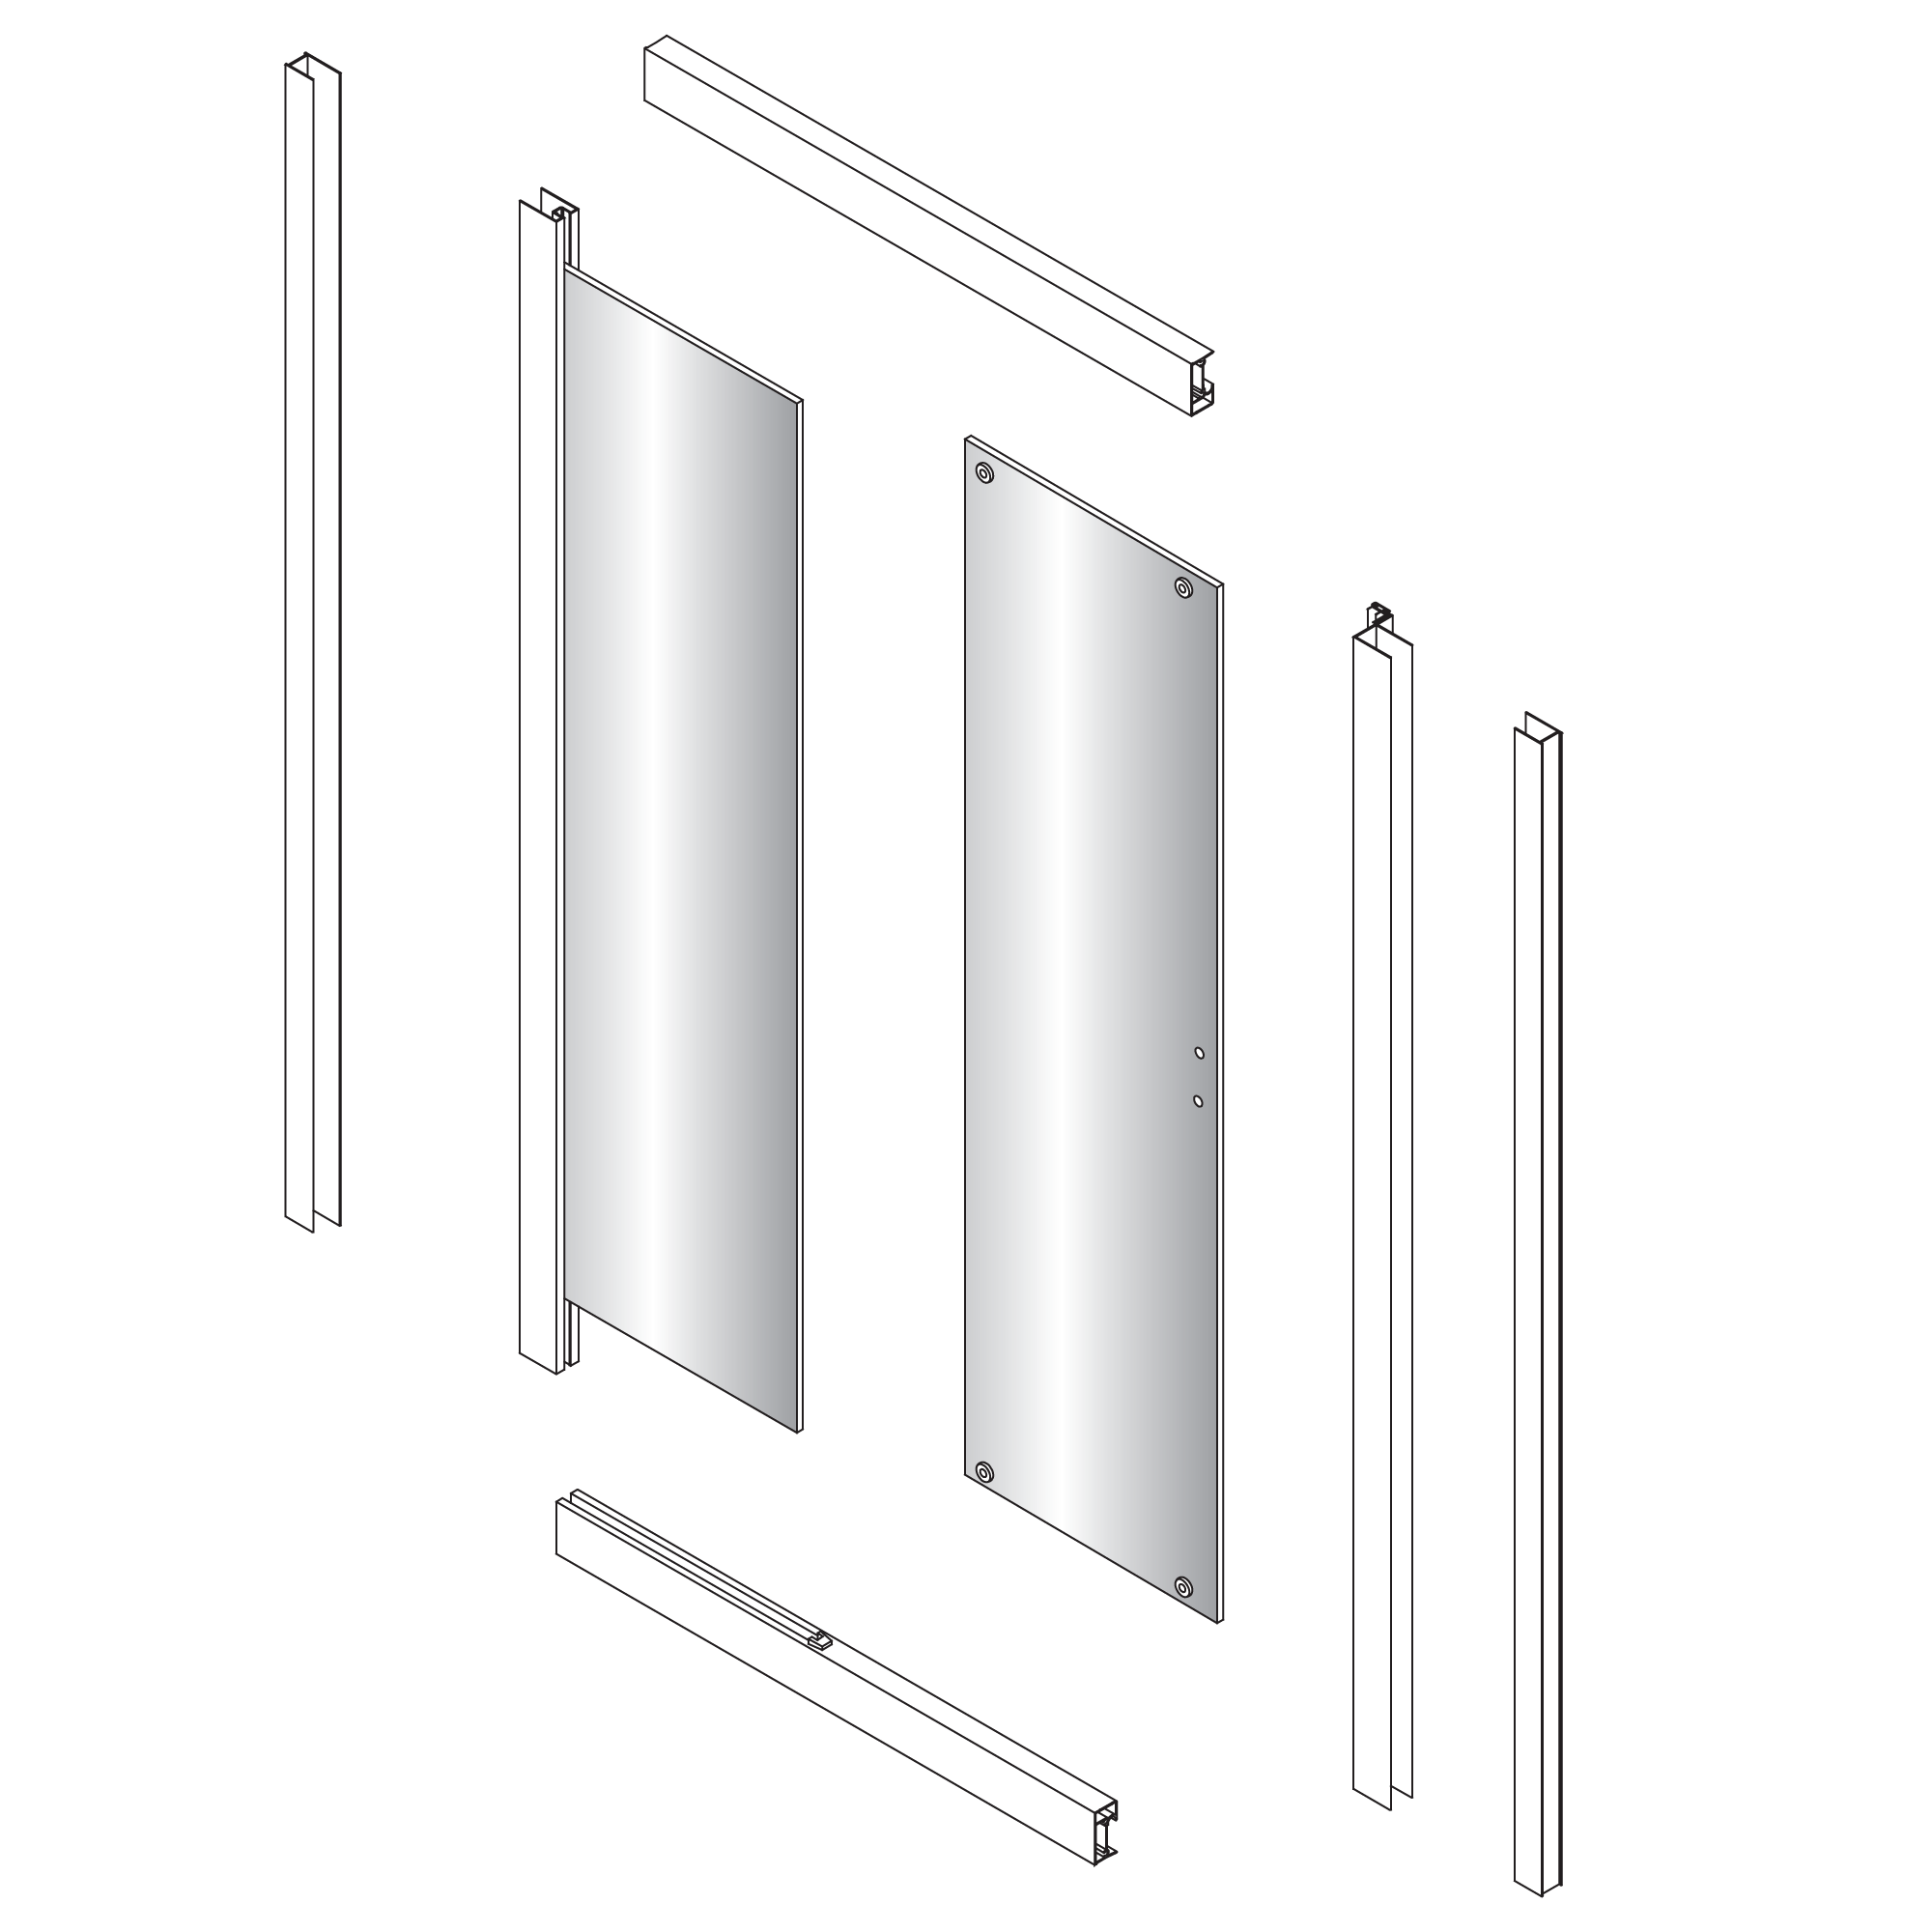
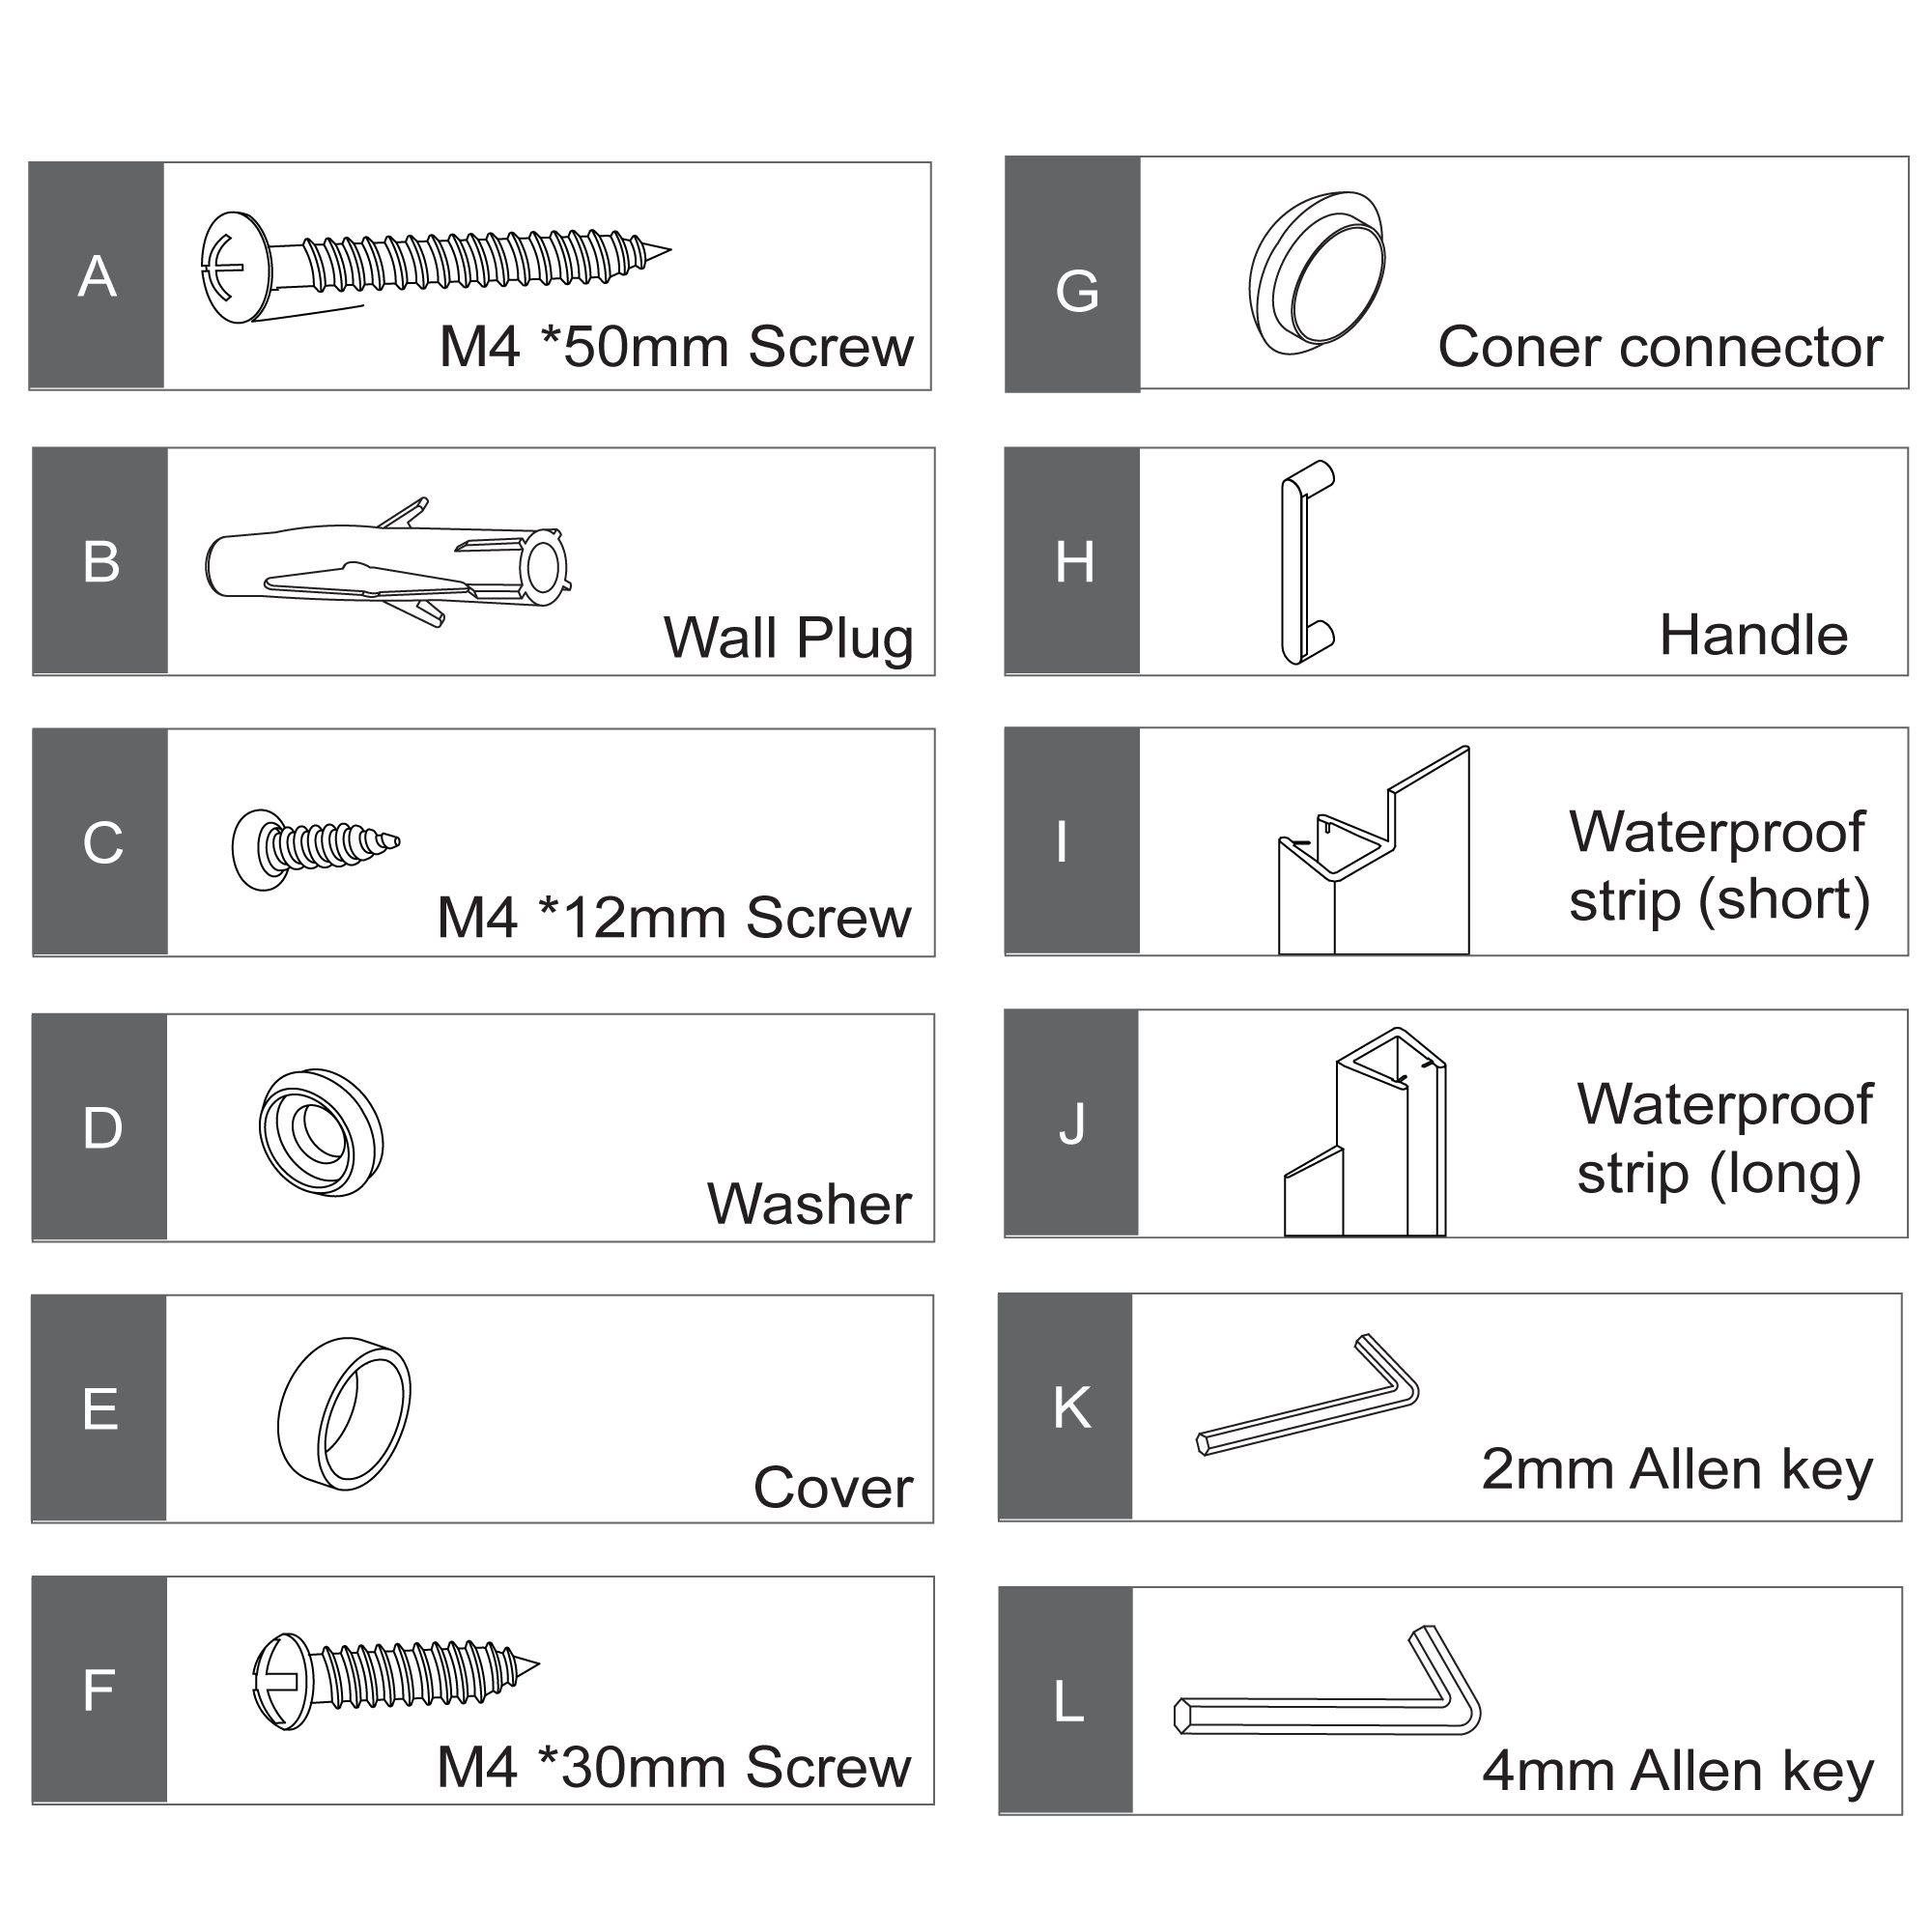
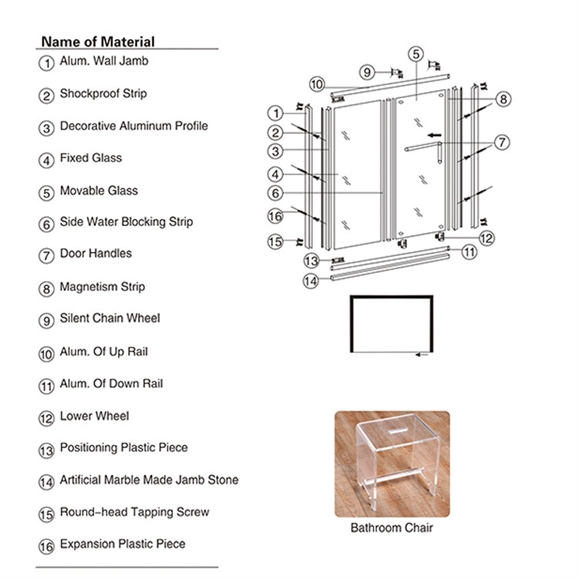
Parts Name:
|

|
shower door
|
1. Wall Jamb Stainless Steel
2. Fixed Glass
3. Movable Glass
4. Door Handles
5. Upper Wheel
6. Up Rail Stainless Steel
7. Down Rail Stainless Steel
8. Lower Wheel
9. Artificial Marble Made Jamb Stone
10. Round-head Tapping Screw
11. Expansion Plastic Piece
12. Central Cylinder
|
|
|
|
|
|
|
|
|
This shower door can be assembled so that the sliding door opens from Left to Right, or Right to Left.
The drawings illustrates the shower door opening from Right to Left.
1 glass is fixed & 1 glass can move
|
|
|
|
|
|
|
|
|
|
|
|
|
shower
door
|
|
|
|
|
|
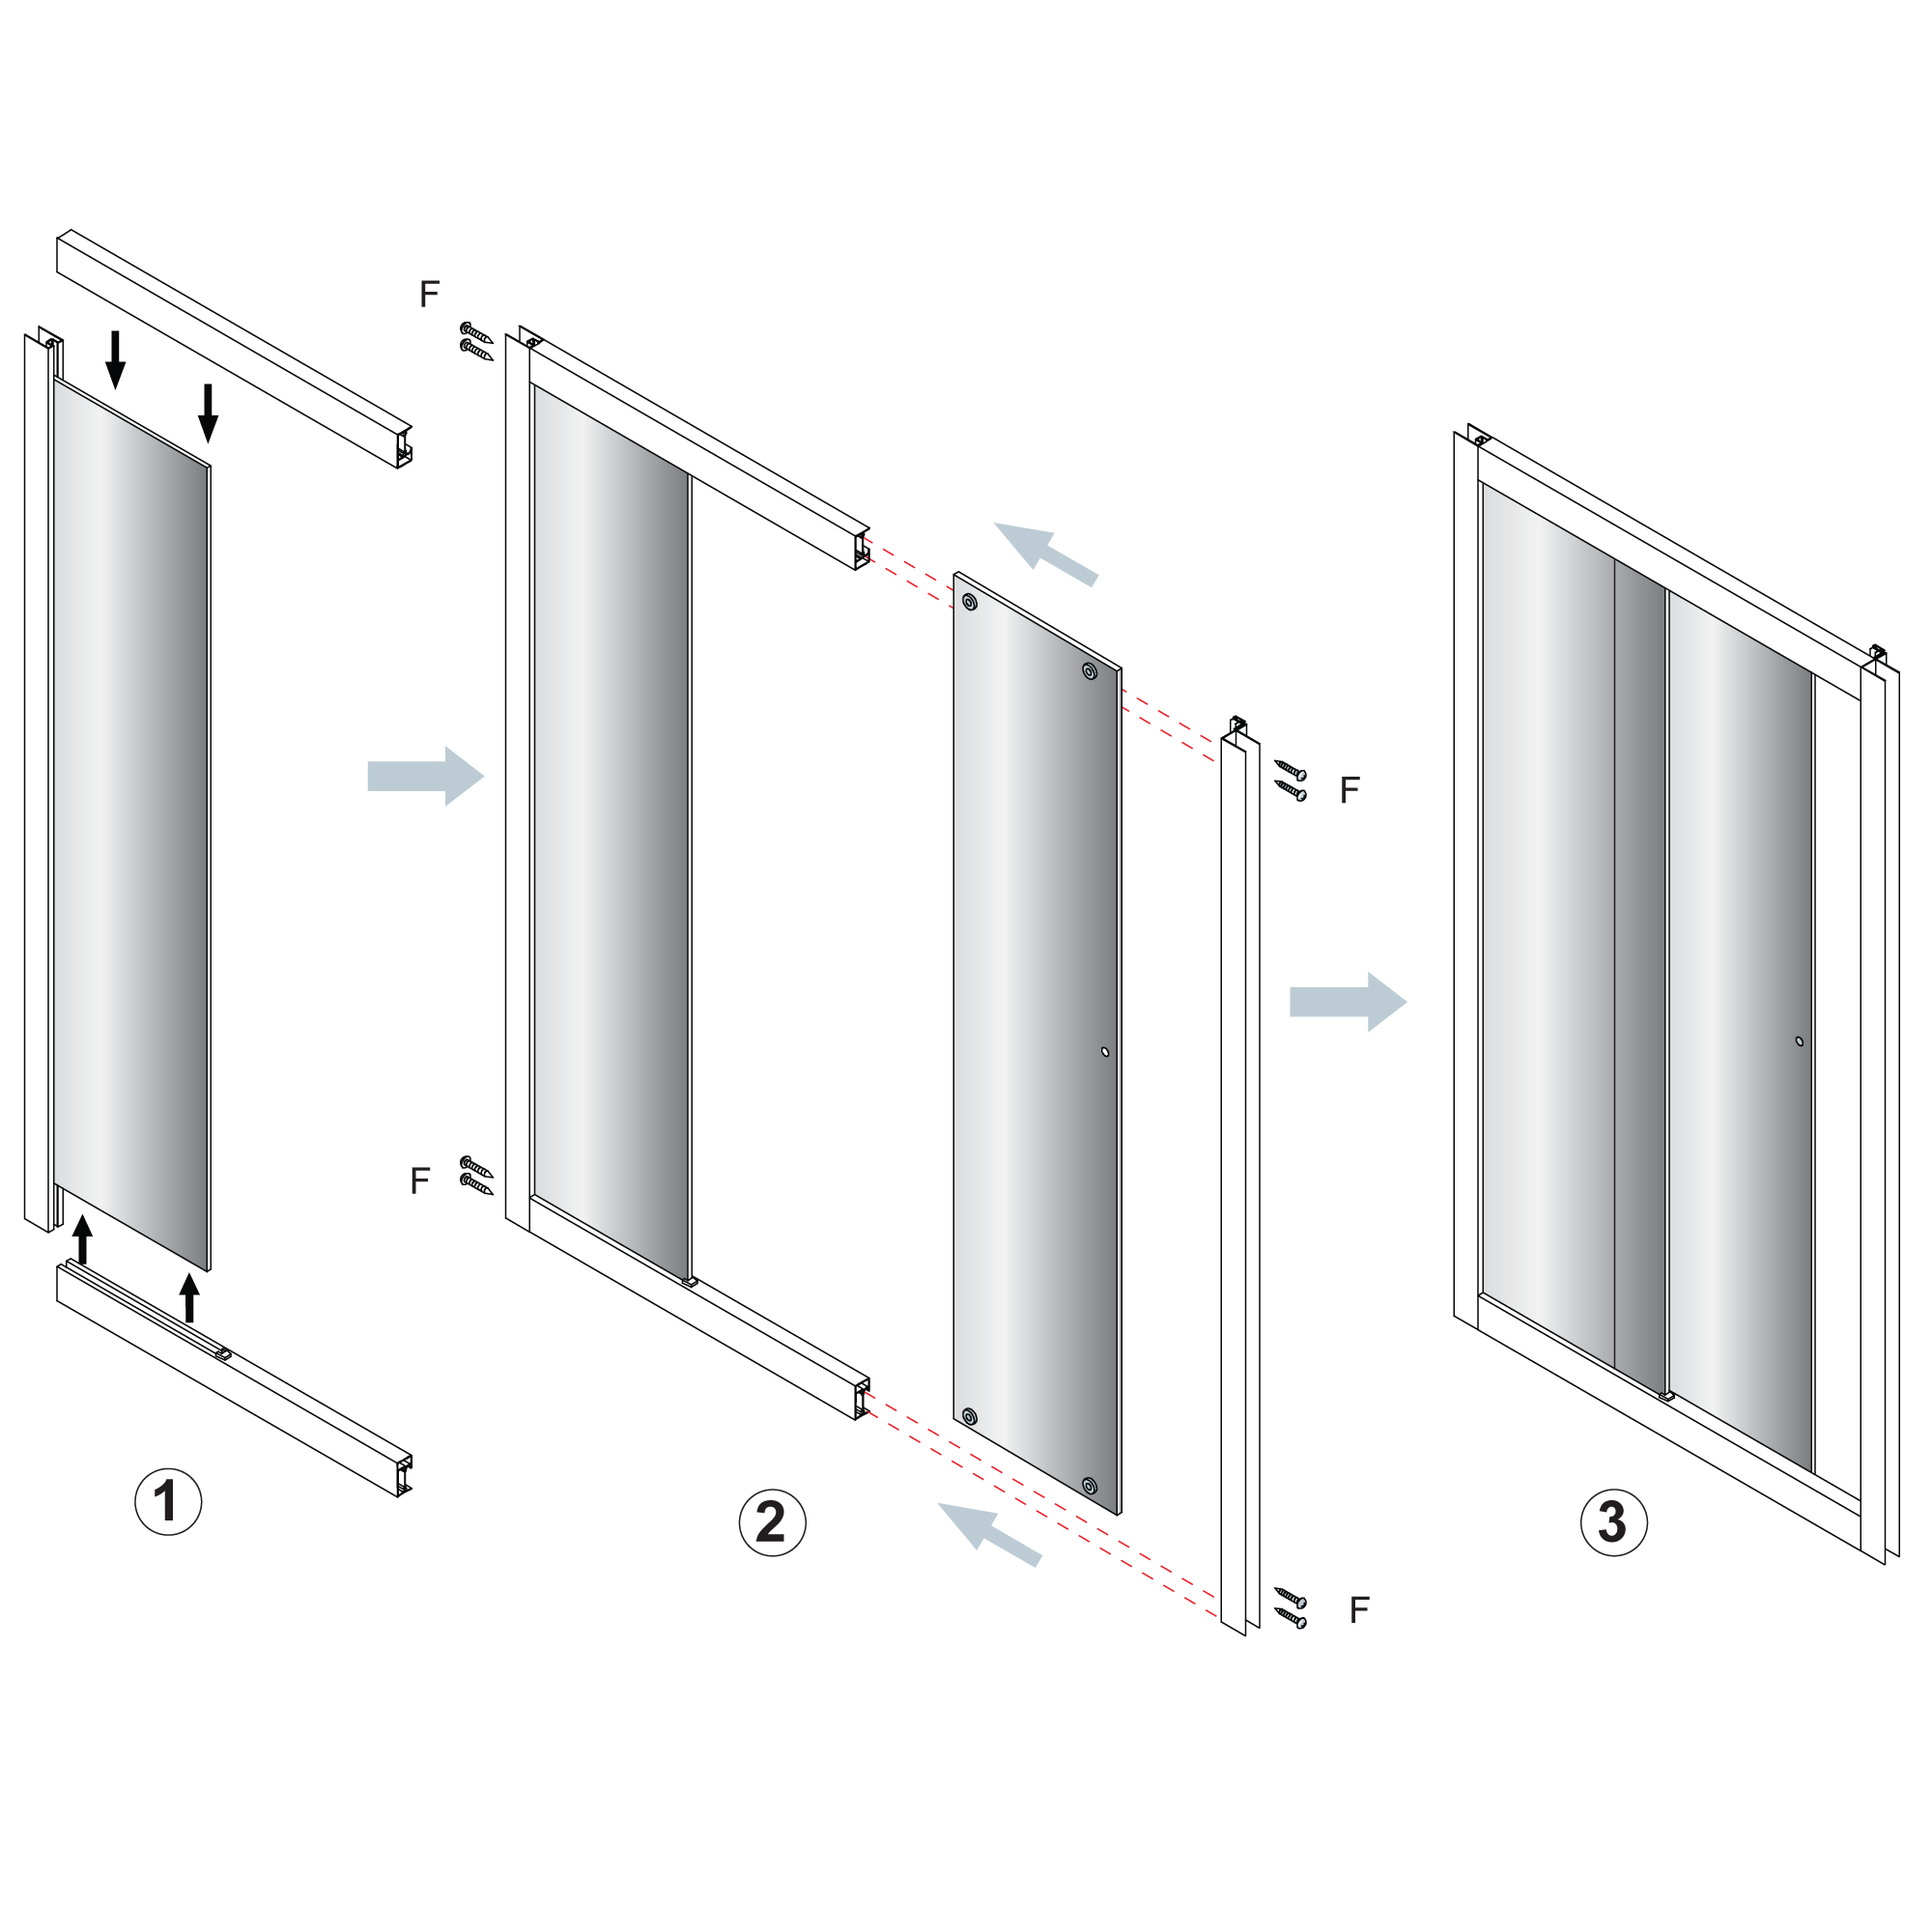
Step 1:
|
|
|
|
Assemble the enclosure using the screws (F) as the diagram below.
|
|
|
|
|
|
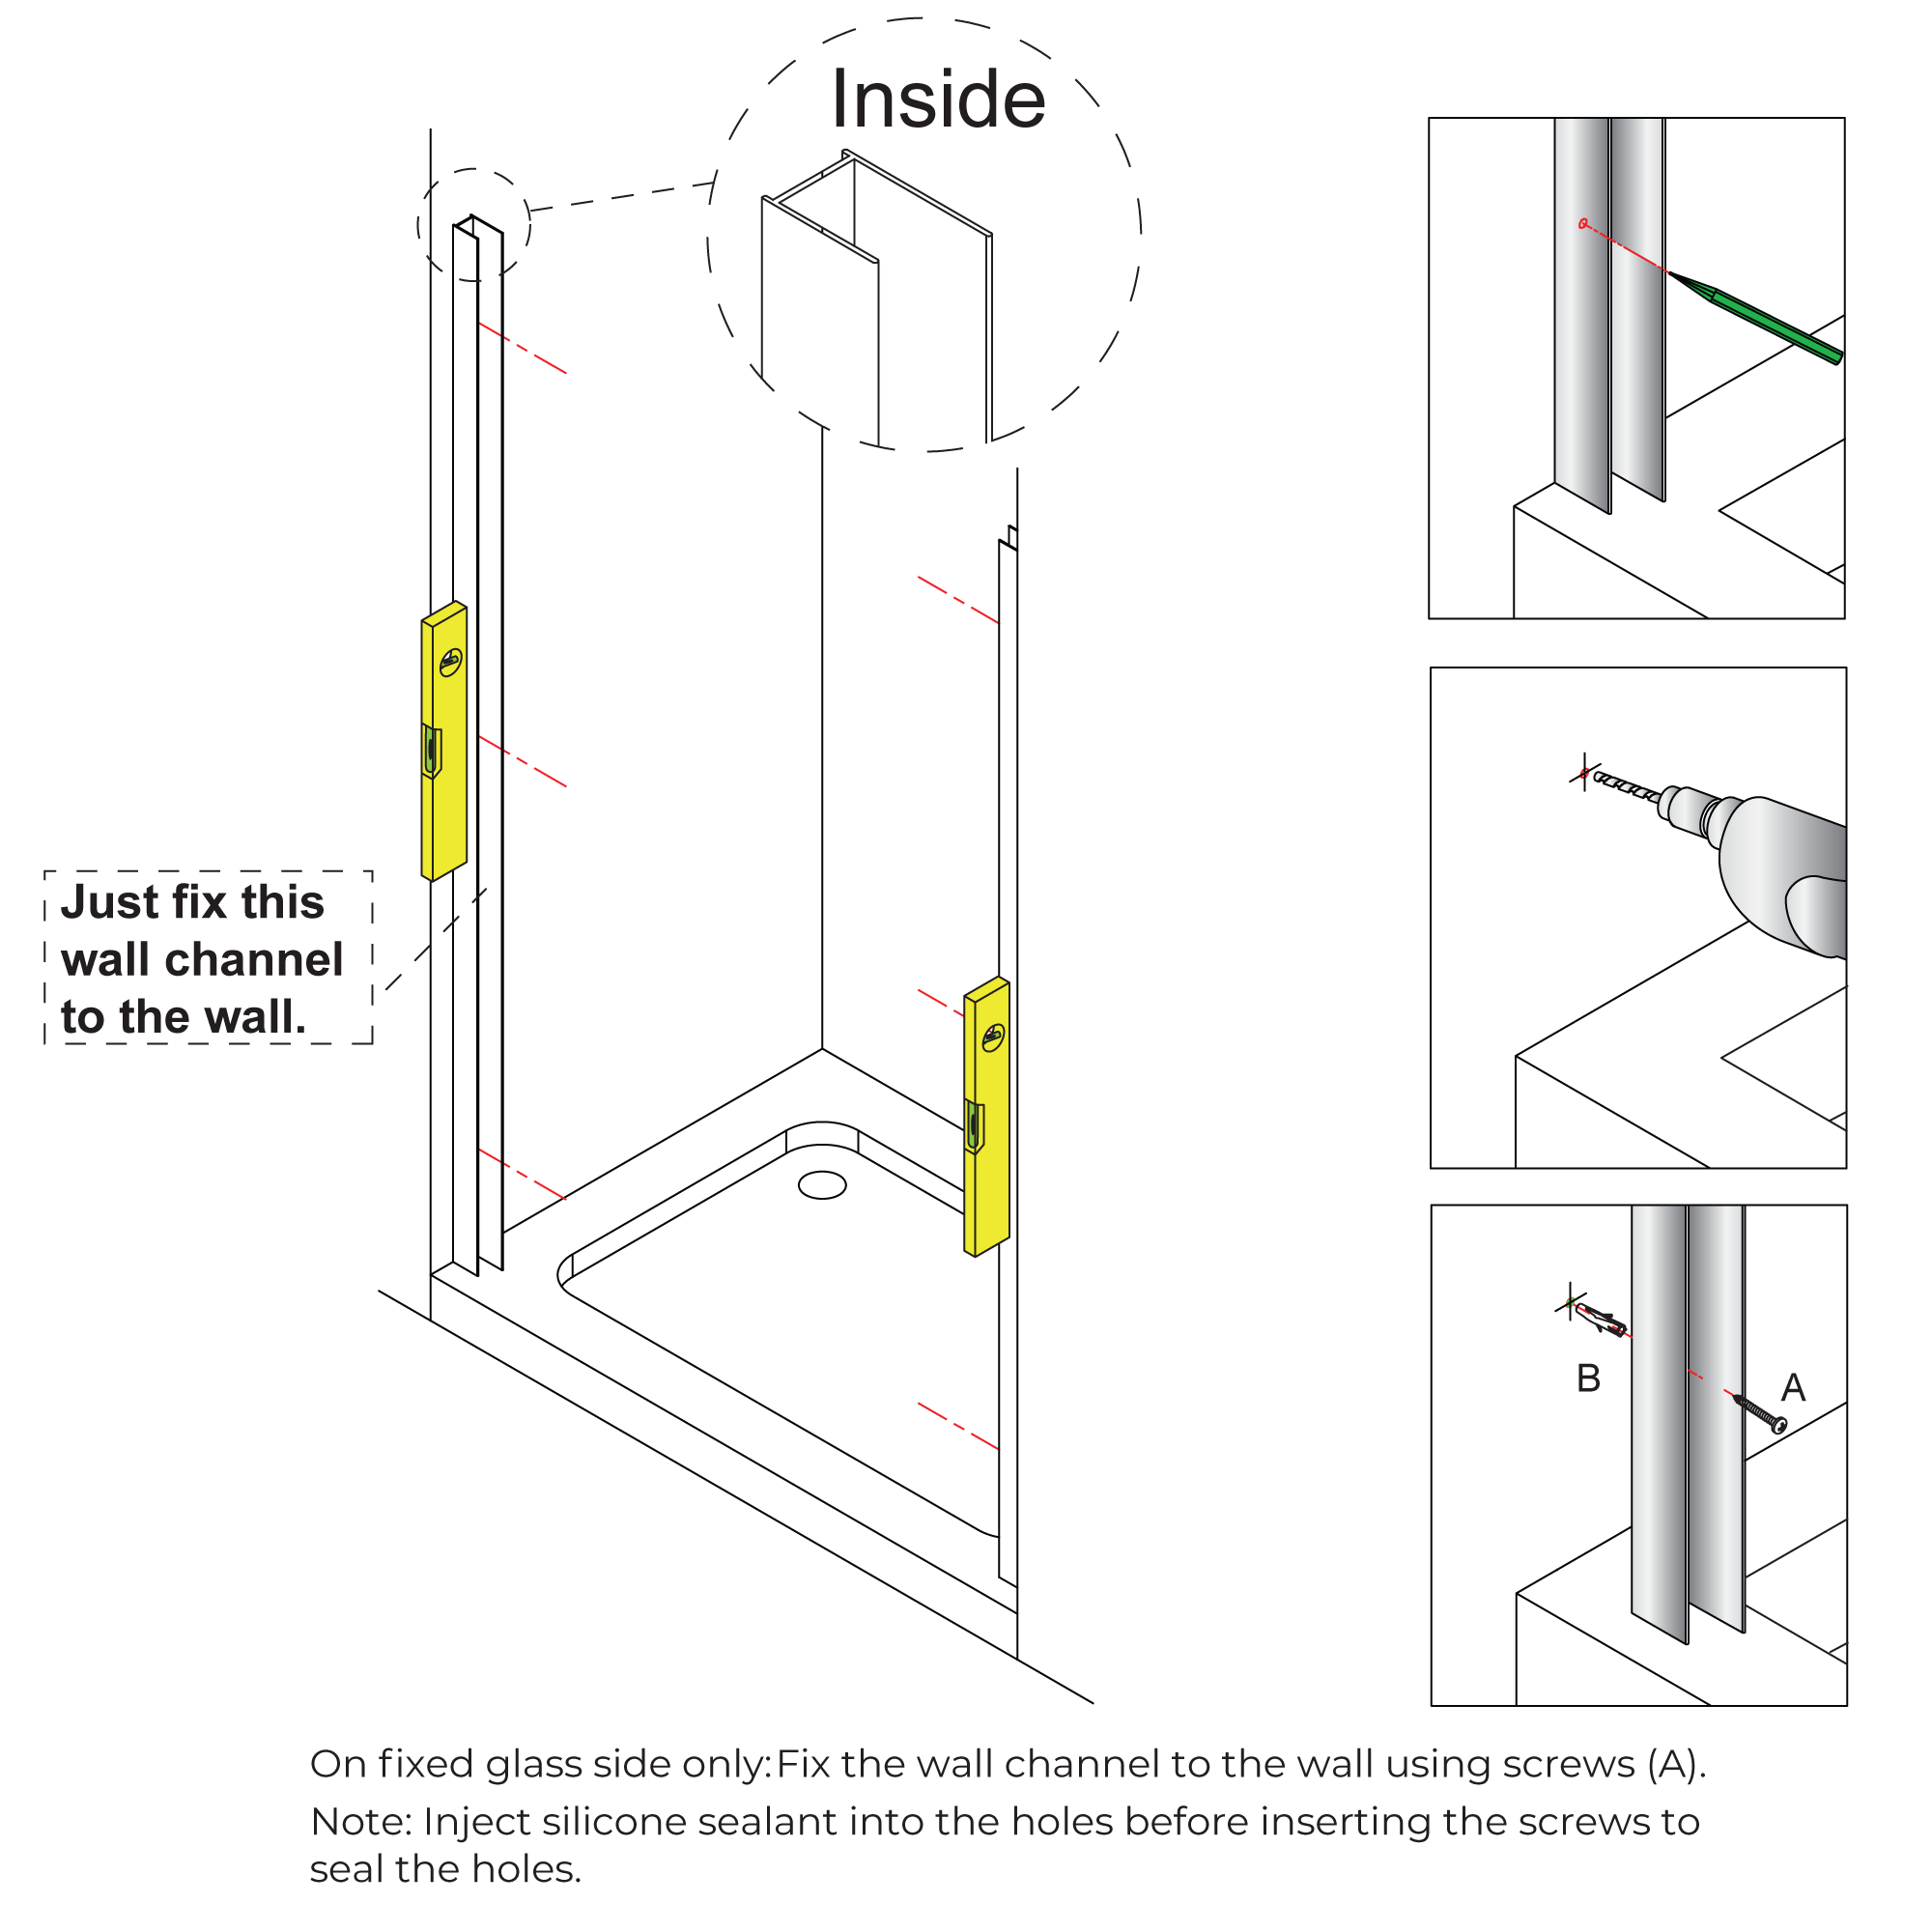
Step 2:
|
|
|
|
Remove both wall channels from the glass panel frame.
Note: Ensure the longer leg of each wall channel is on the inside of the enclosure when fixing. Place each wall channel in position on the tray (10 - 15mm in from the outer edge of the tray), use a spirit level to ensure that they are vertical and mark all 6 fixing holes onto the wall.
Drill holes in the positions marked using a 6mm masonry drill bit. Insert wall plugs (B) into all of the holes (beyond the thickness of the tile).
On fixed glass side only: Fix the wall channel to the wall using screws (A).
Note: Inject silicone sealant into the holes before inserting the screws to
seal the holes.
|
|
|
|
|
|
|
|
|
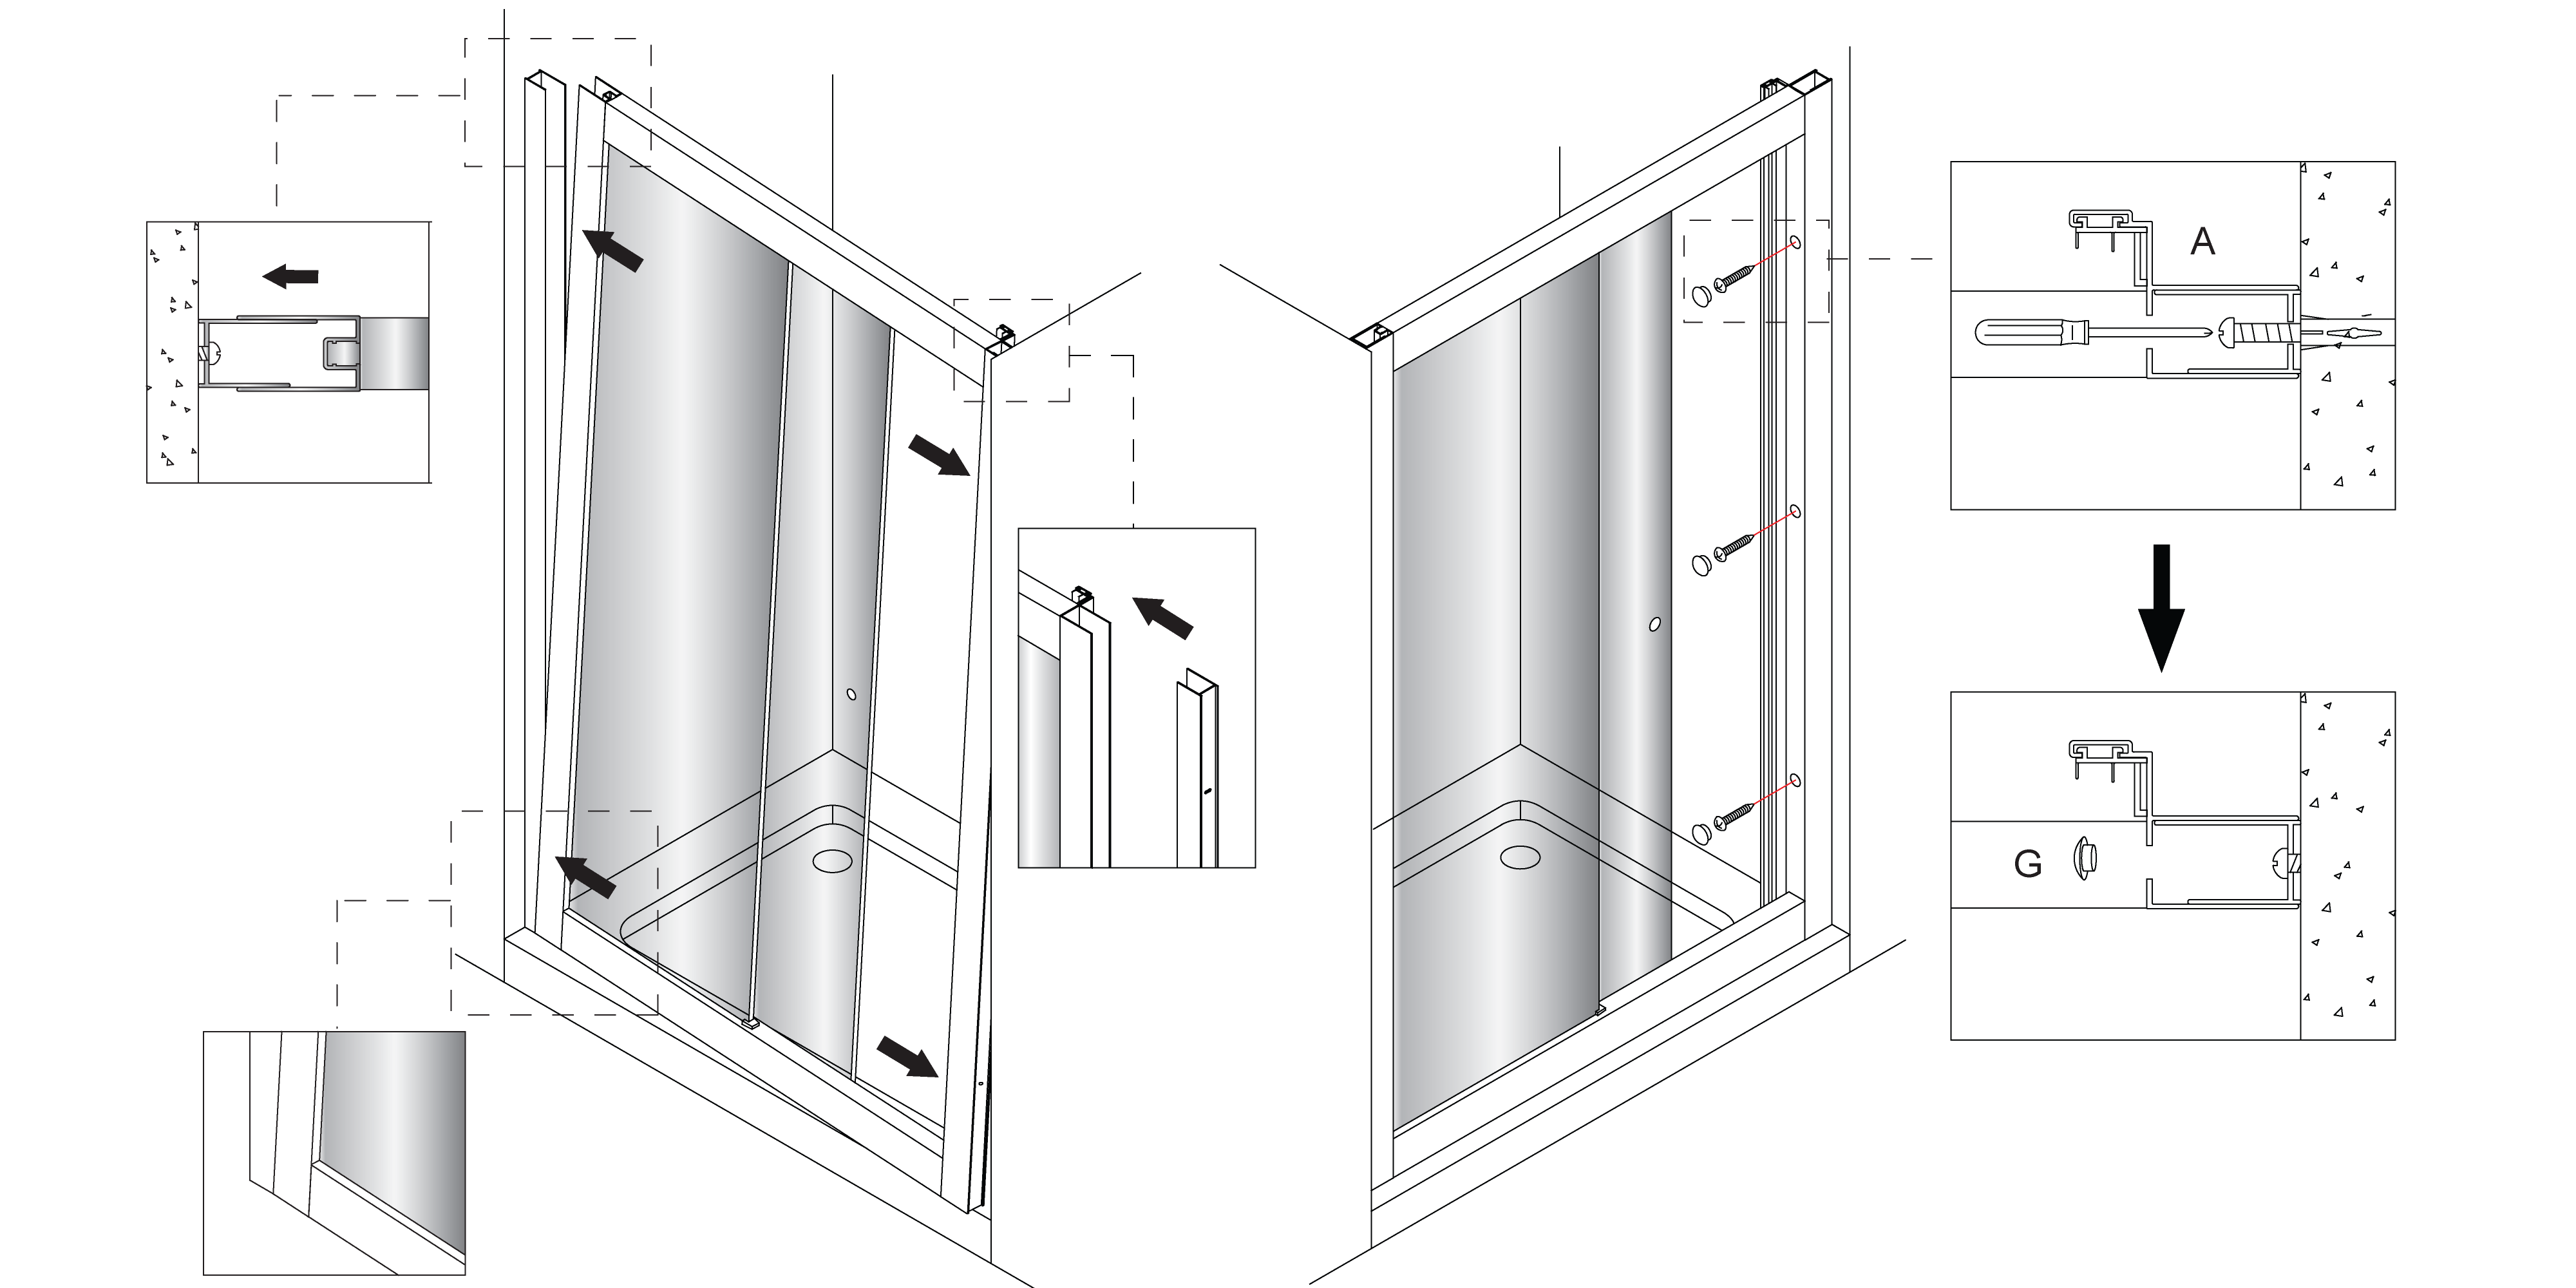
Step 3:
|
|
|
|
Push the remaining wall channel back onto the glass panel frame on the opening/handle side of the door (with the longer leg on the inside of the enclosure).
Insert the door into the fixed wall channel and swing the free end into position on the opposite wall. Line up the fixing holes on the second wall channel with those on the wall and fix through the frame using screws (A) and push on all 3 hole covers (G).
Note: inject silicone sealant into the holes before inserting the screws to seal the holes.
|
|
|
|
|
|
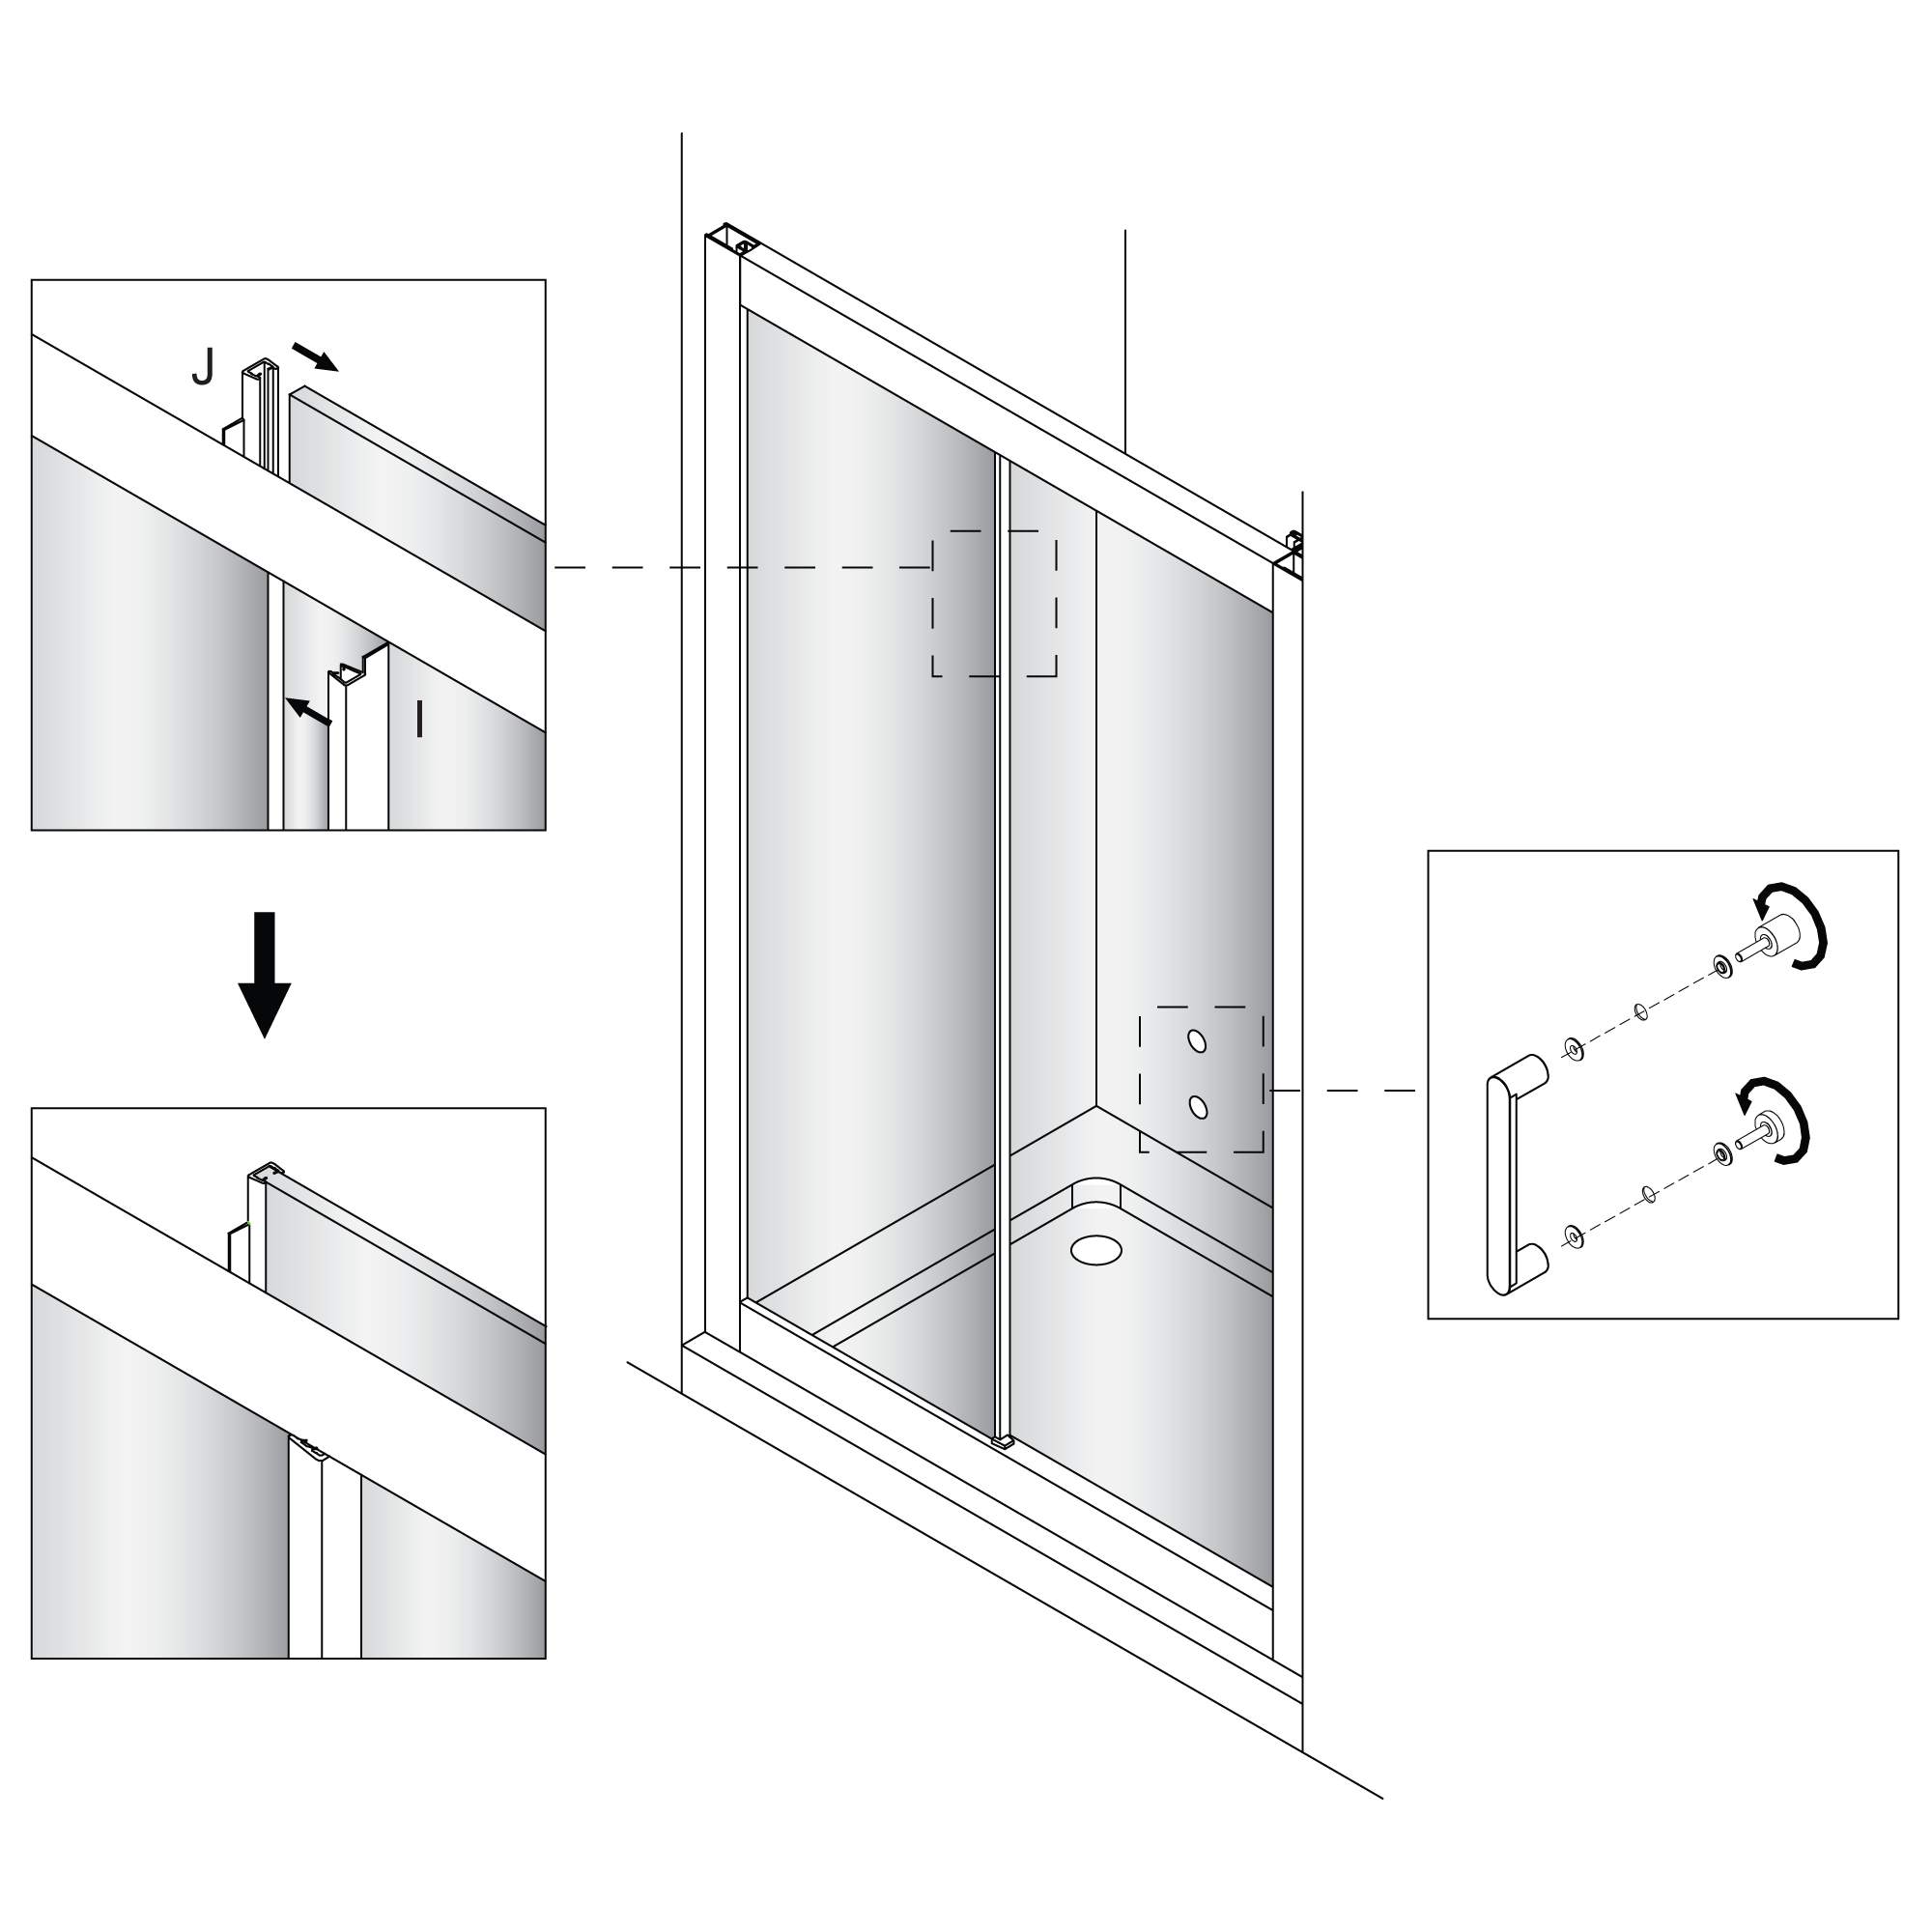
Step 4:
|
|
|
|
Fix the seals & handle.
|
|
|
|
|
Step 5:
|
|
|
|
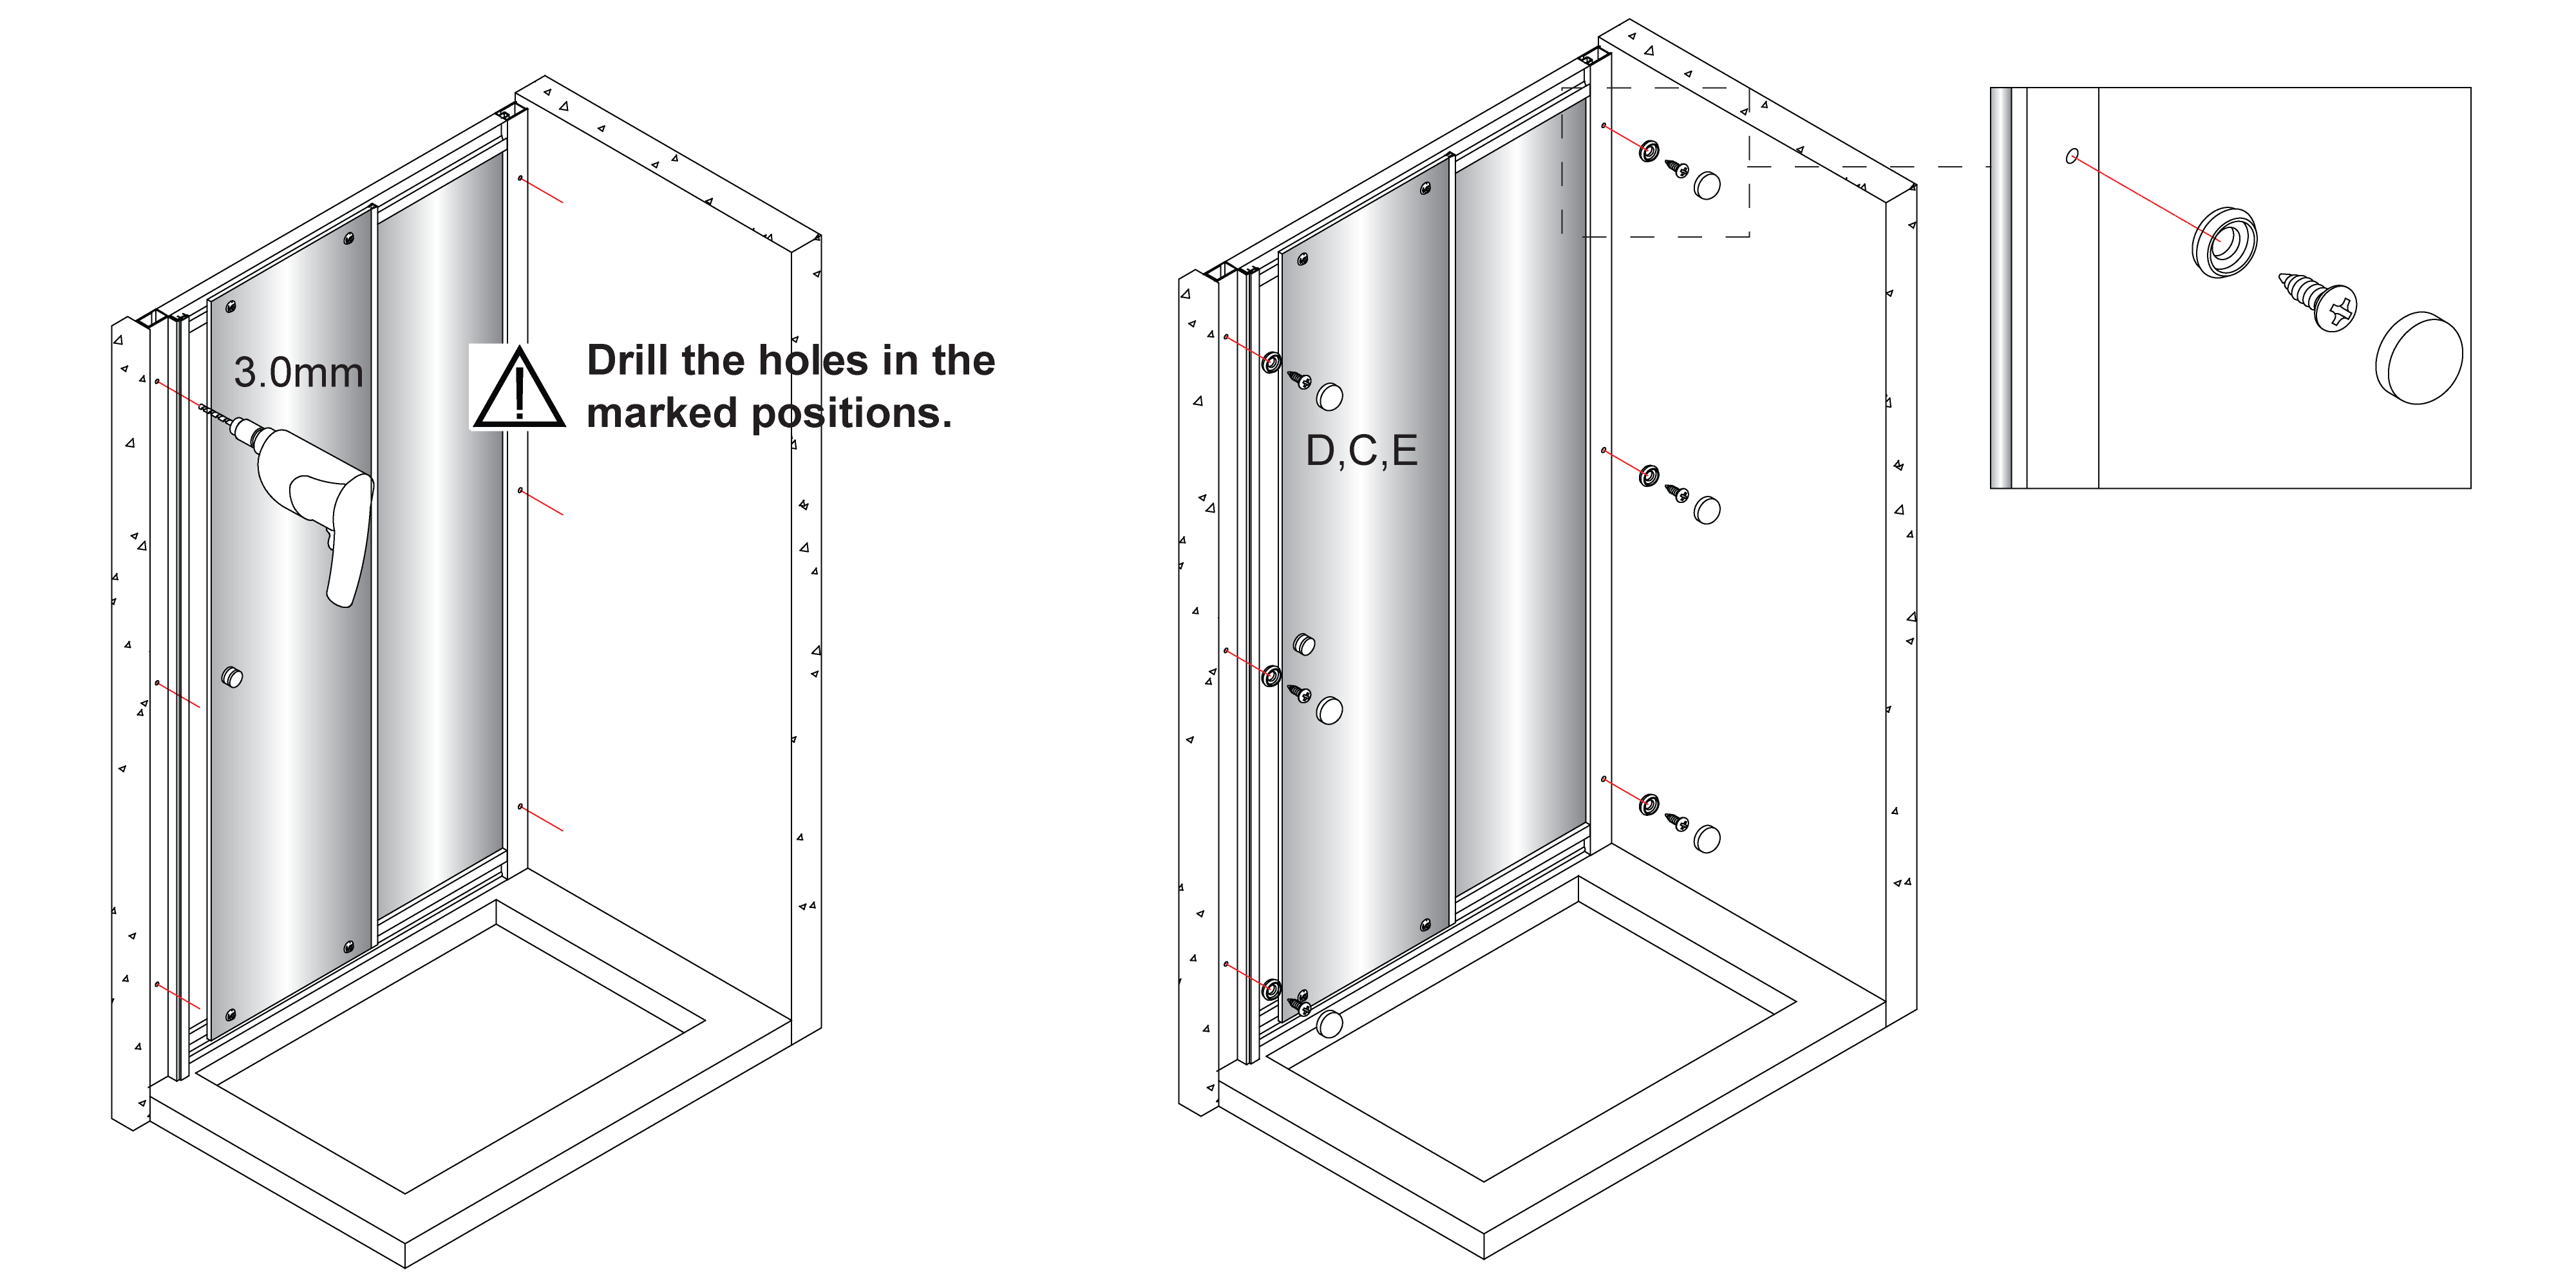
Once you have checked that the glass panel frames centered between the wall channels and also sit horizontally and vertically, fix the glass panel frames to the wall channels.
From inside, drill 3 holes through the glass panel frame (in the marked positions) into the wall channels using a 3.0mm drill bit. Fix using washers (D), screws (C) and push on the screw covers (E).
|
|
|
|
|
|
Step 6:
|
|
|
|
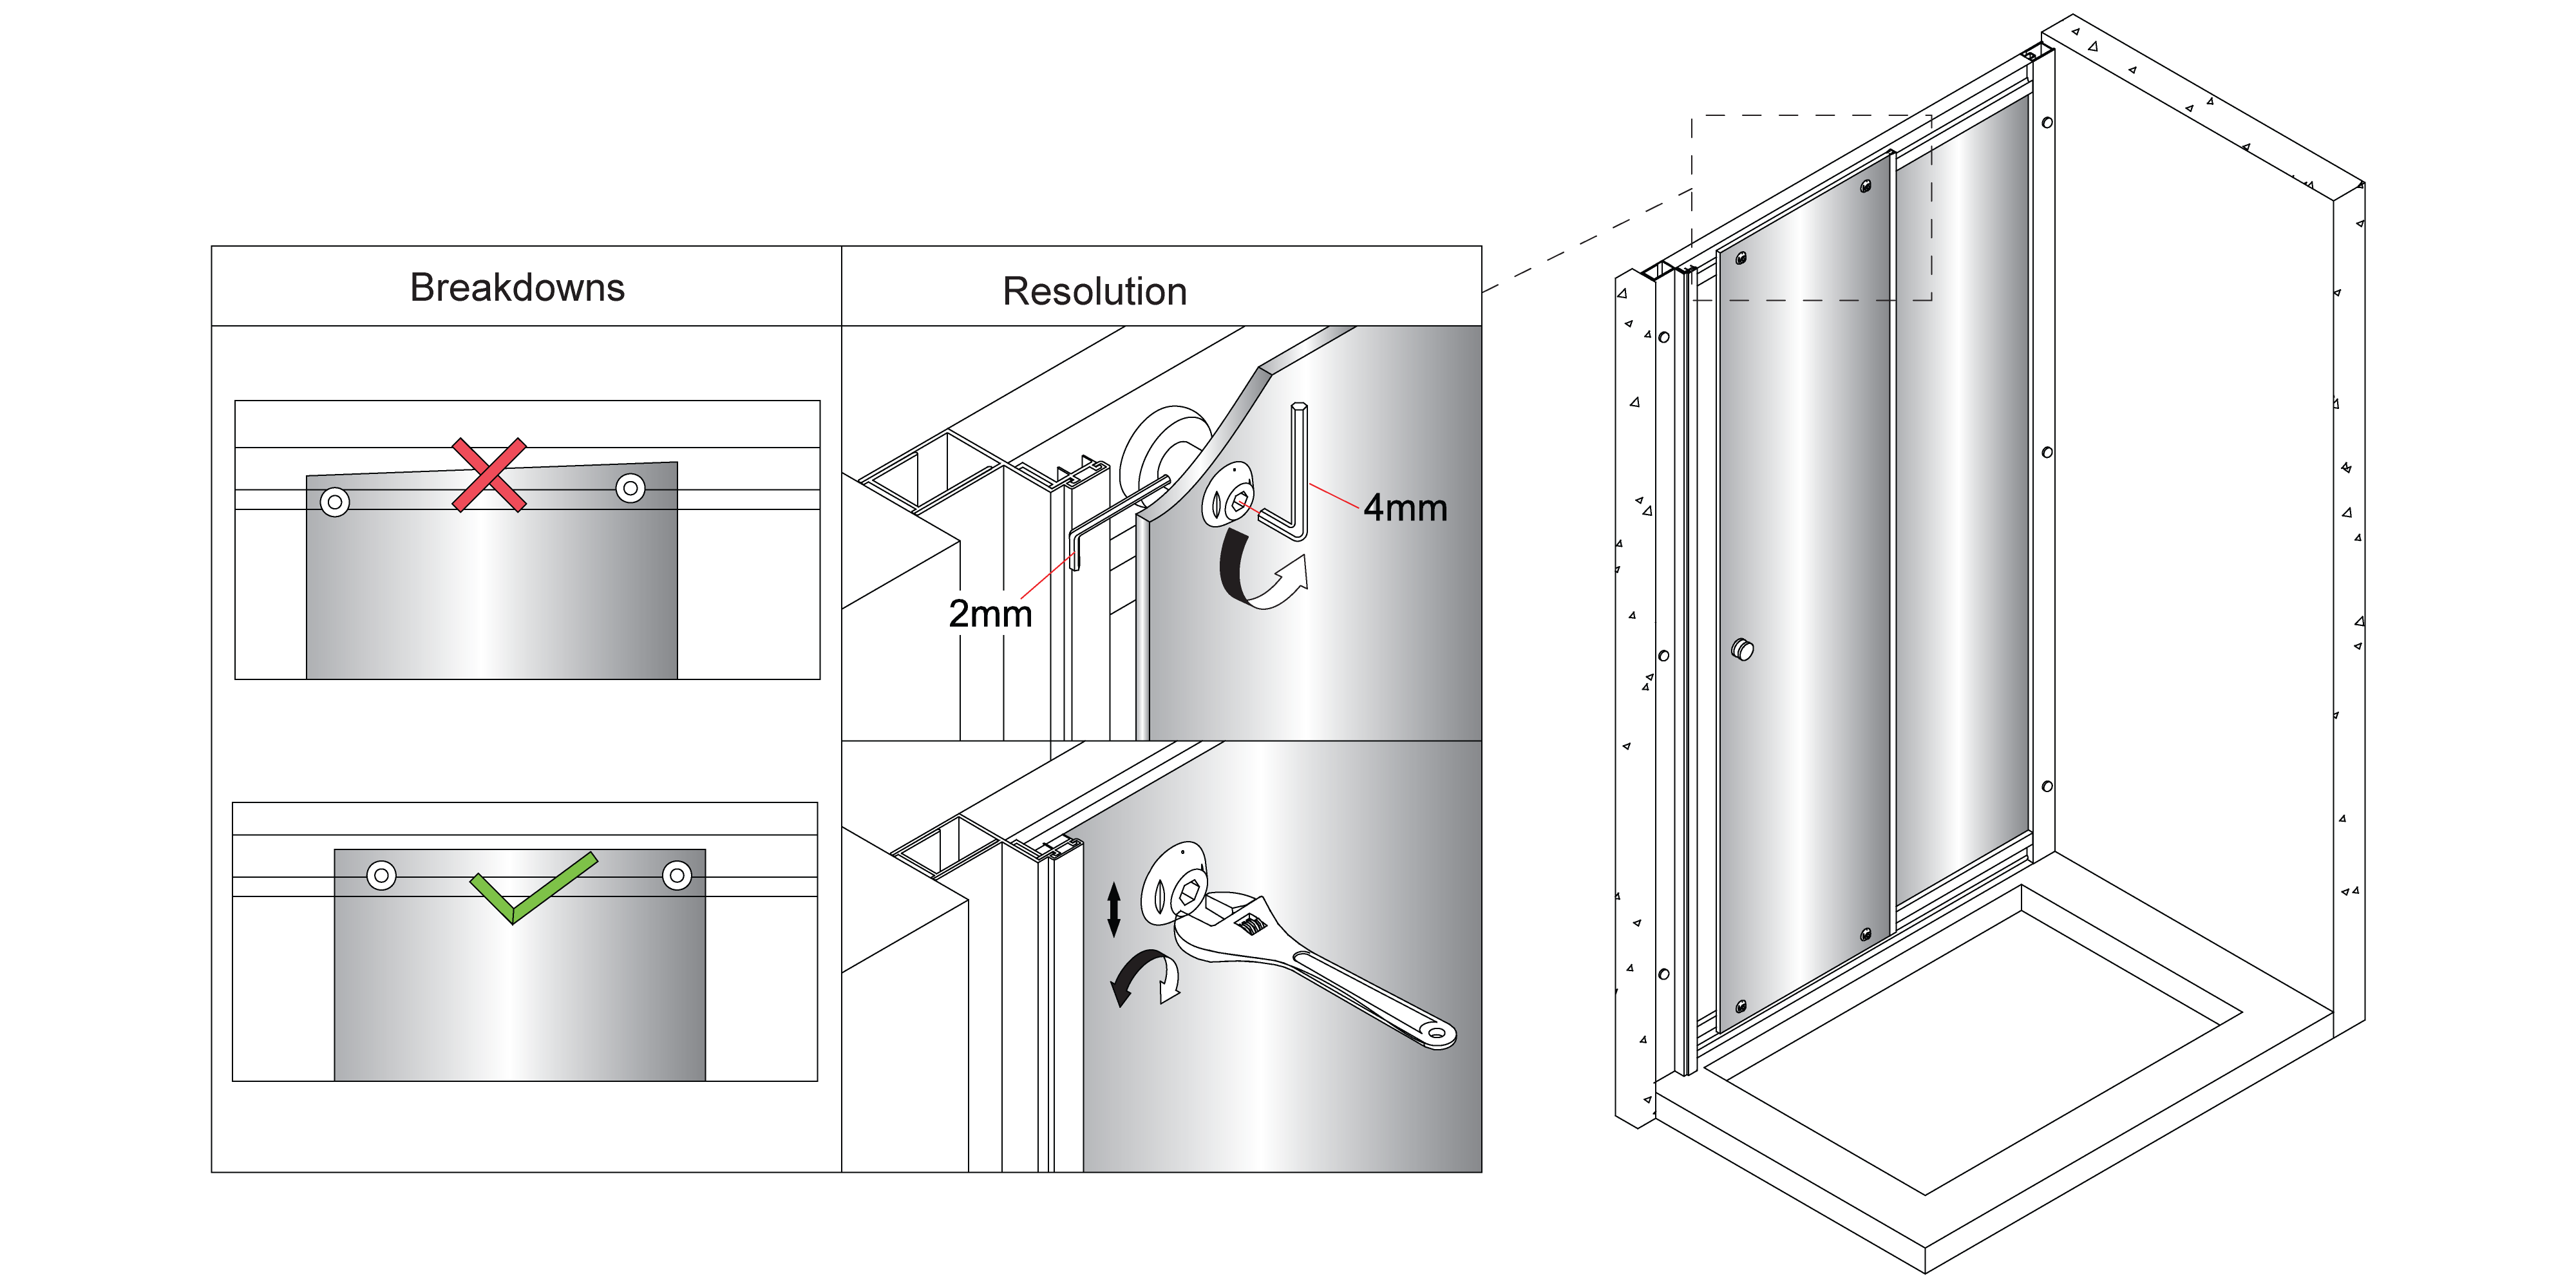
Only adjustment is required.
Please check that if the sliding door is skew or it can not work perfectly.
The top and bottom roller could be adjusted left/right using a spanner to get the sliding door remedy.
1: Follow the diagram below, loosen the roller (The Allen key 2mm is used to keep the roller fixing while loosing the roller with allen key 4mm).
2: Using a spanner to adjust the roller to make the door level.
The roller must be tightened after having adjusted the sliding door vertically and make it work perfectly.
|
|
|
|
|
|
Step 7:
|
|
|
|
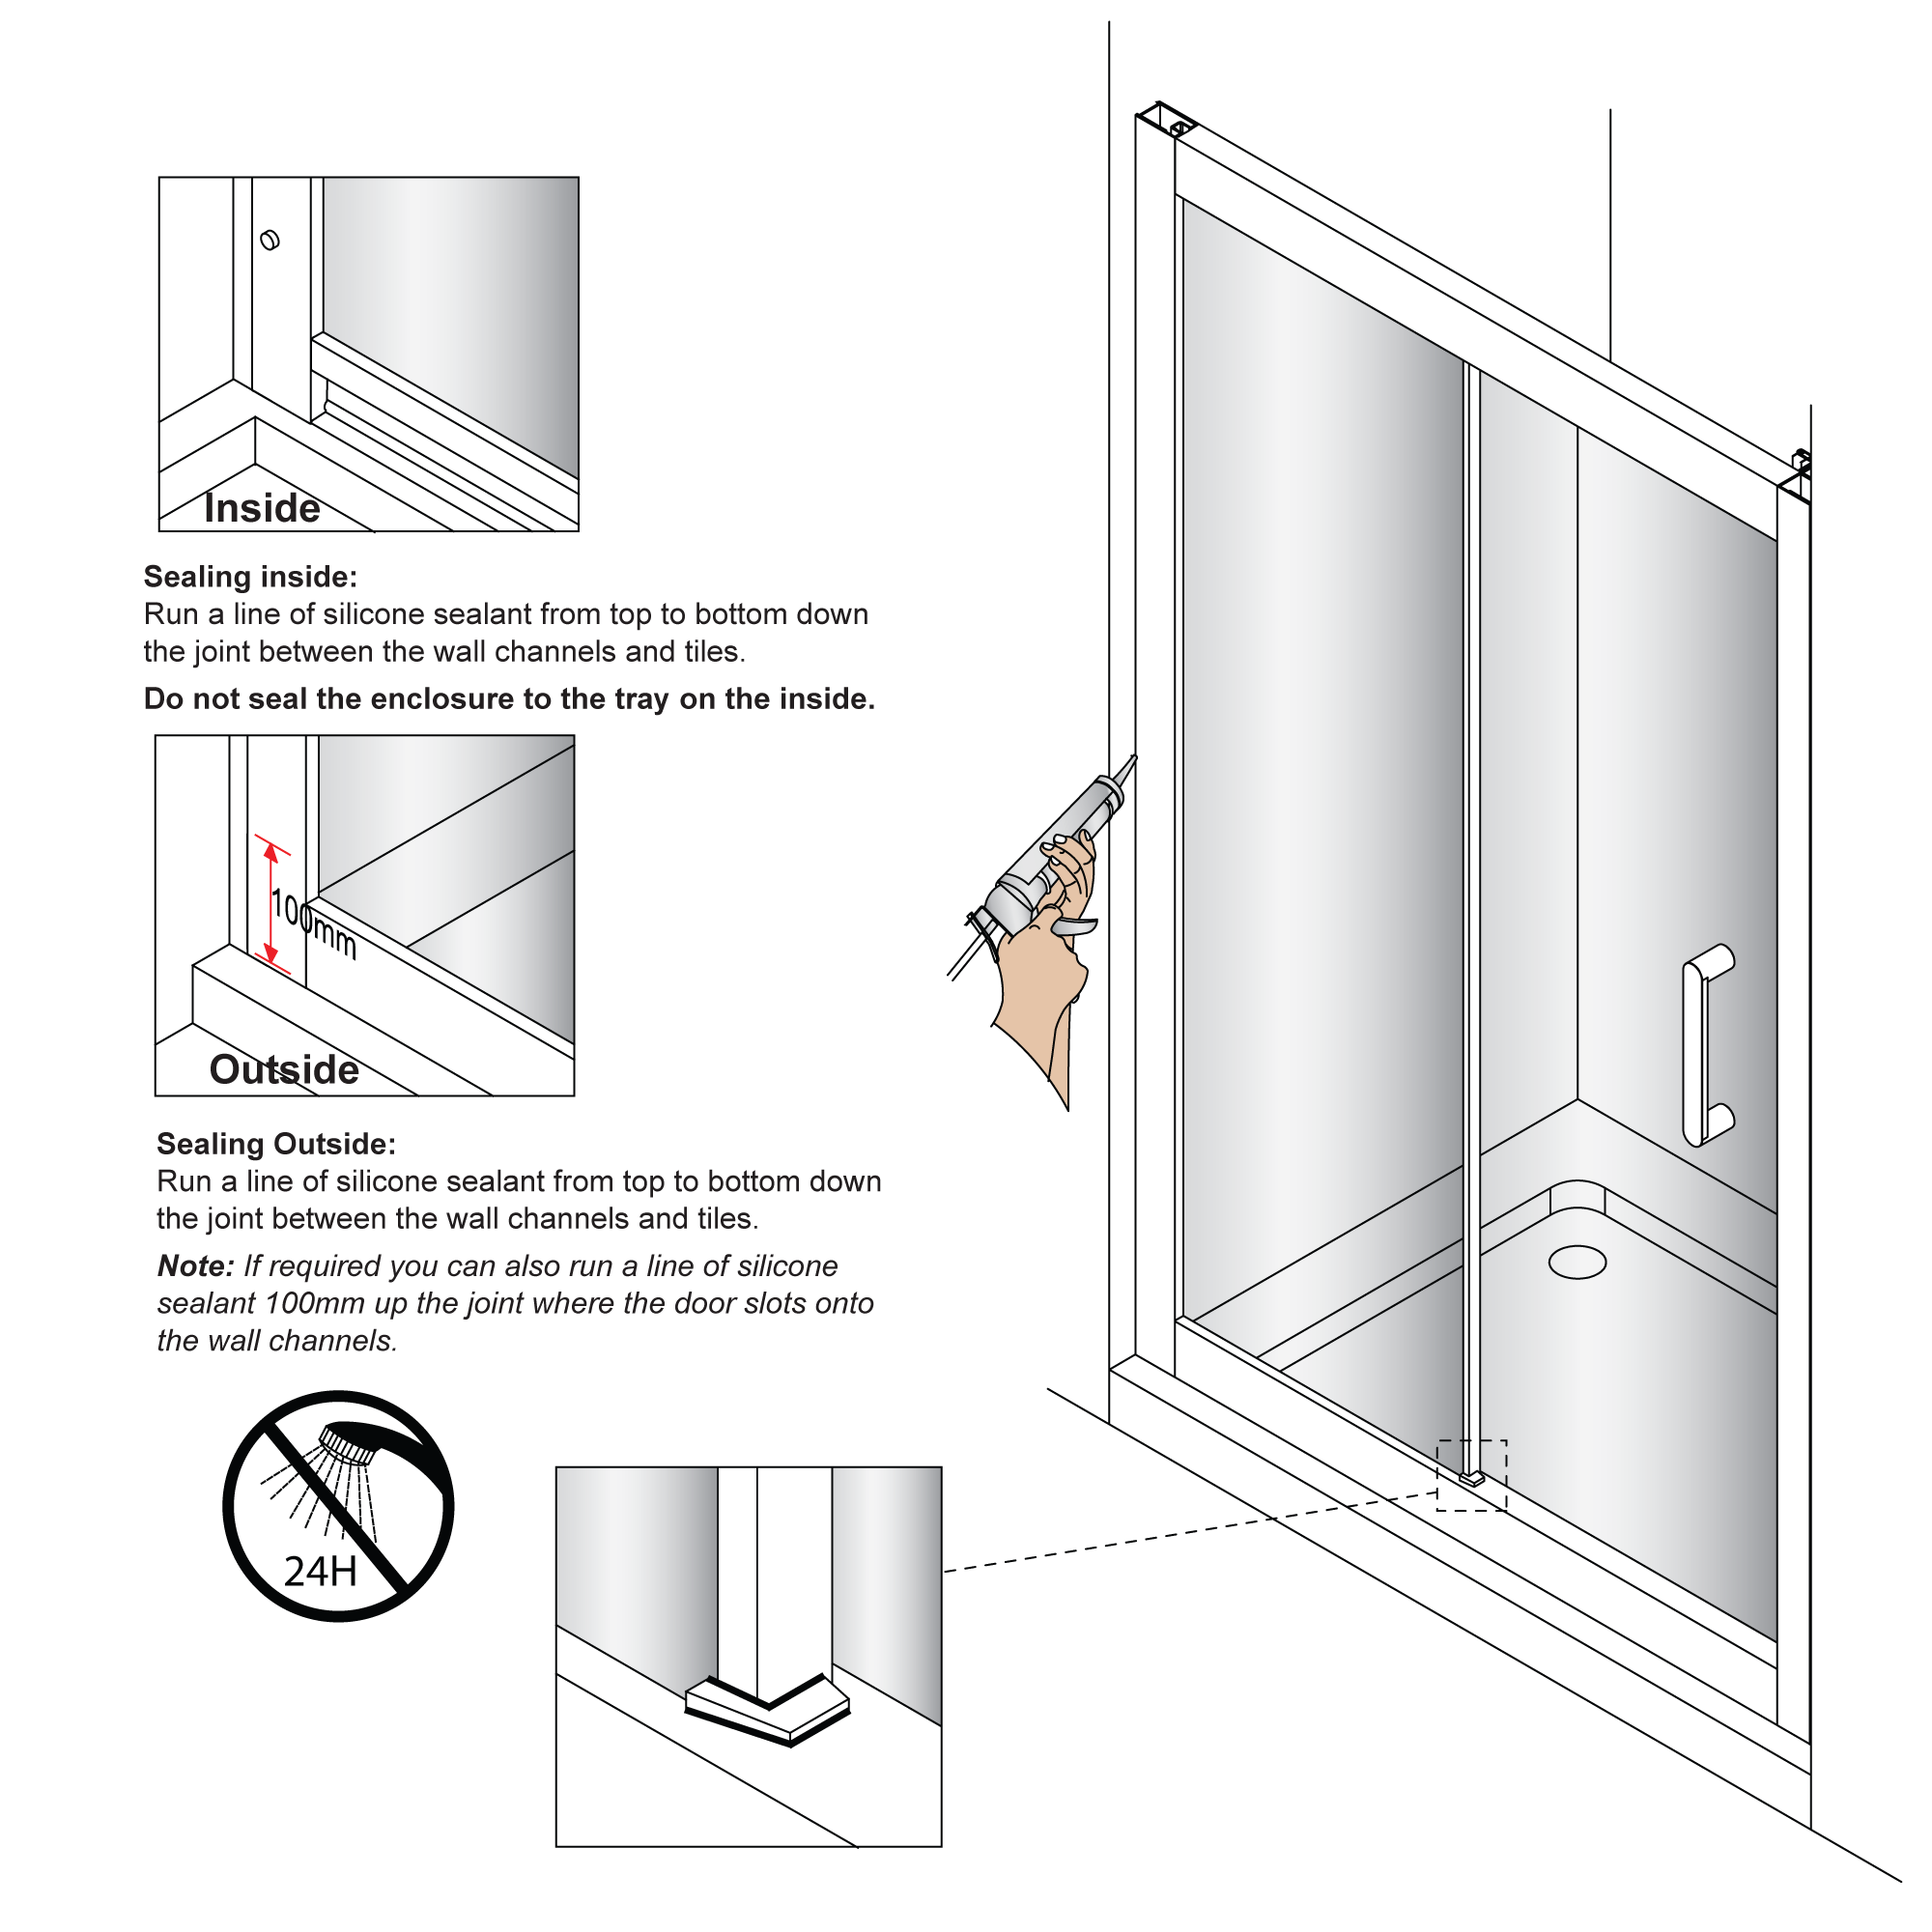
Sealing inside:
Run a line of silicone sealant from top to bottom down the joint between the wall channels and tiles.
Do not seal the enclosure to the tray on the inside.
Sealing Outside:
Run a line of silicone sealant from top to bottom down the joint between the wall channels and tiles.
Note: If required you can also run a line of silicone sealant 100mm up the joint where the door slots onto the wall channels.
VERY IMPORTANT
You must complete all tiling and grouting, and the shower tray MUST be level and fully sealed to the tiles before installation. If you do not fit the enclosure onto a tiled surface, or seal the tiles to the tray before installation, water may soak into the wall behind the wall profiles.
Warning!
Please check for any hidden pipes or cables before drilling holes in the wall.
To stop the drill bit slipping, masking tape can be applied to the tiles when preparing the holes.
When using power tools always follow the manufacturers' user instructions.
Do not sit the enclosure on a bed of silicone, as this will also stop any water from draining back into the tray.
DO NOT SEAL THE ENCLOSURE TO THE TRAY ON THE INSIDE.
If the enclosure is sealed to the tray on the inside, any water that may get into the framework will not be able to drain back into the tray, this may cause the enclosure to leak.
Leave the silicone sealant to dry for 24 hours before using the enclosure.
CARE AND CLEANING
Do not use solvents or abrasive material or chemicals to clean the enclosure.
Only clean using soapy water and a soft cloth, rinse thoroughly afterwards.
|
|
|
|
|
|
Product
|
shower
|
Shower Door
|
|
Material
|
|
Stainless steel, Aluminium Alloy
|
|
Open Mode
|
|
Hinge, Sliding
|
|
Thickness of the glass
|
|
5,6,8,10 mm
|
|
|
|
|
|
|
|