Installation Instructions for Dark Oil Rubbed Bronze Infrared Automatic Electronic Commercial Faucet With Manual Soap Dispenser | BS1094RM
|
|
|
|
|
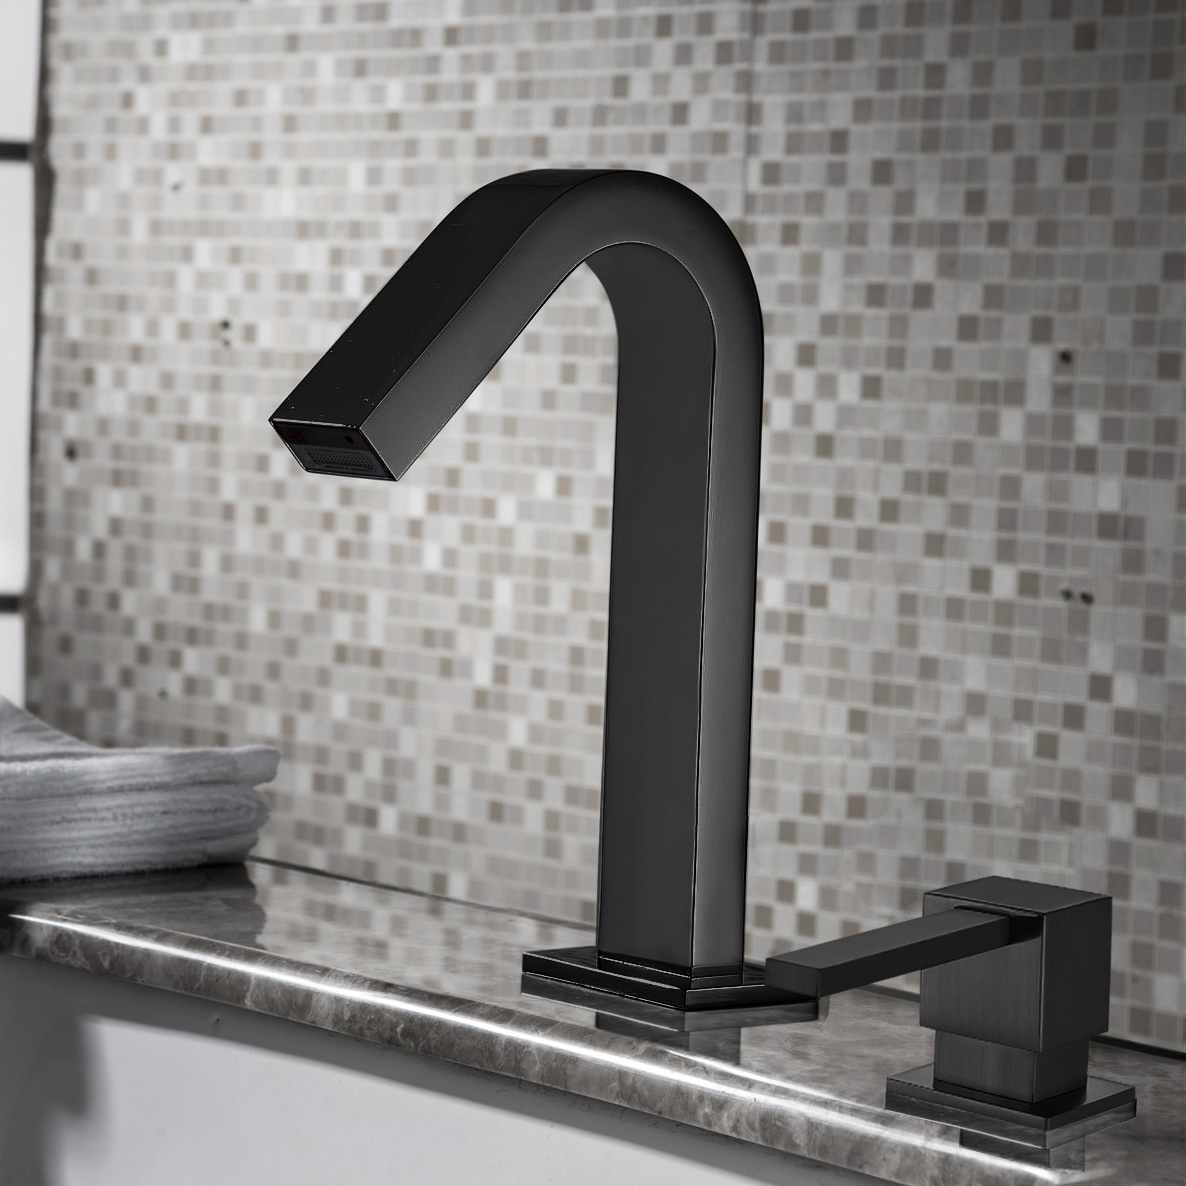
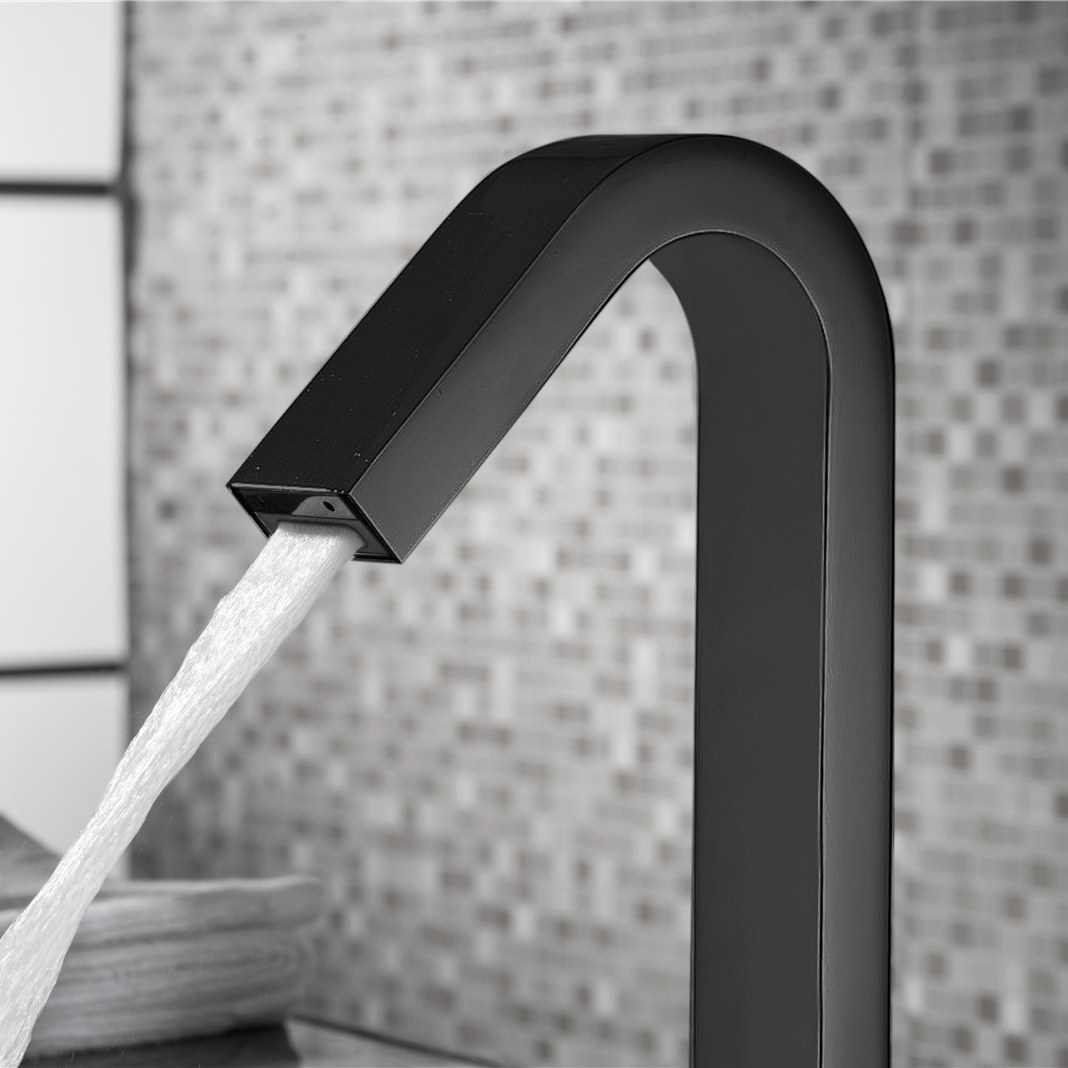
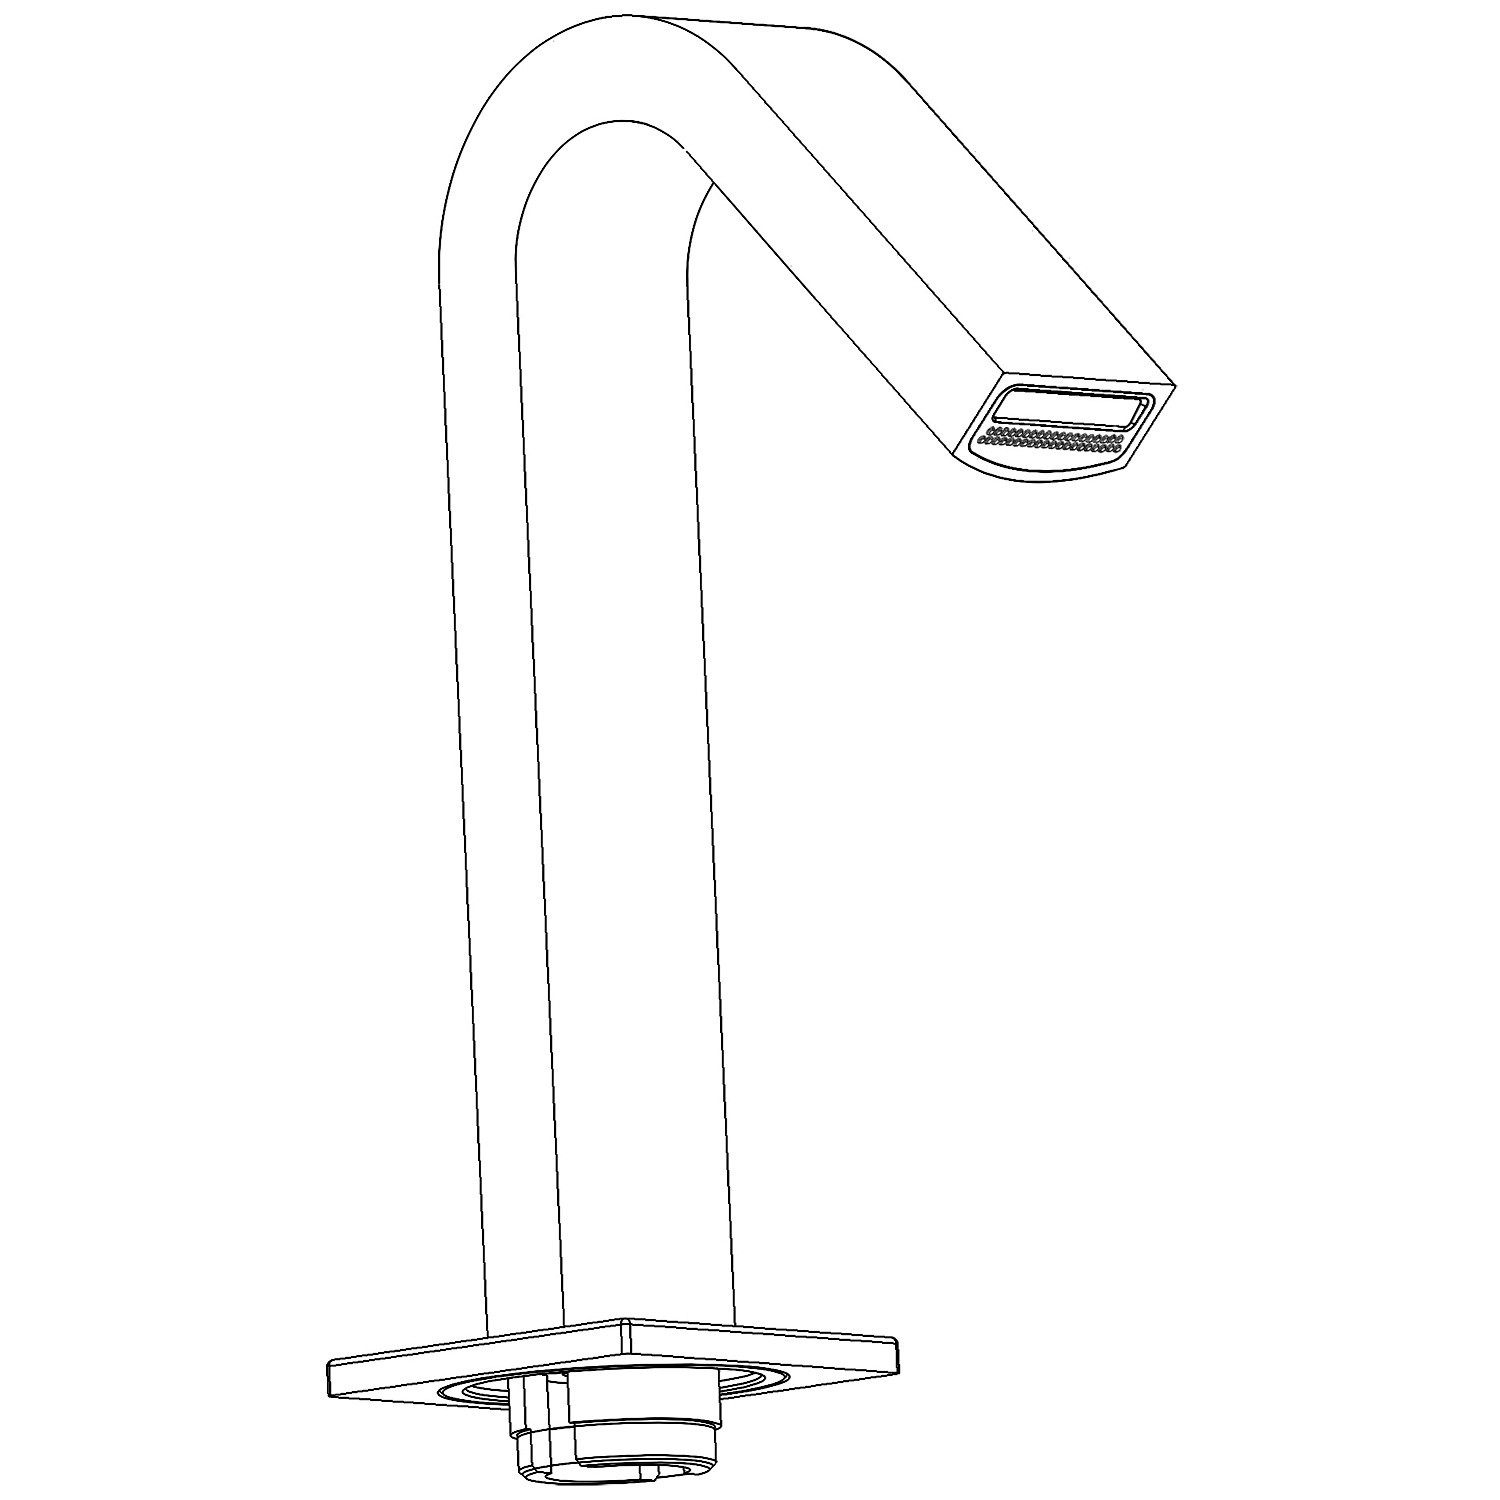
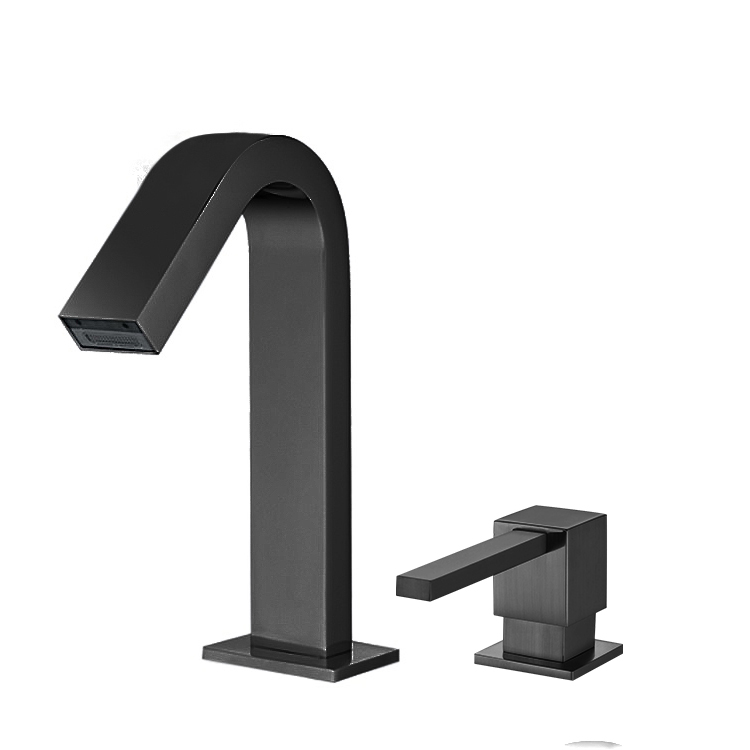
This sensor faucet from BathSelect® brings a new element of design and cost-effectiveness into every bathroom it is installed. The cylindrical base, the infrared sensor, the elegant curve and the dark oil rubbed Bronze finish exudes a stylish and contemporary appeal that is perfect for the modern bathroom. Aside from the voguish design, the BathSelect® Infrared Electronic Faucet is built with solid brass to ensure its longevity - which is why the manufacturer confidently packs it with a ten years warranty. The infrared sensor is sure to work all the time, releasing water only if there is an object within its range and automatically shutting water flow after preset time. This greatly decreases the amount of water wasted from leaving the tap on. The infrared sensor battery is guaranteed to work up to three years. The energy-saving architecture of this electronic sensor faucet ensures you will be able to enjoy this touch-free electronic faucet for years and years to come. Minimize waste of water, by using the automatic faucet. Immediately reduces water waste by eliminating unnecessary and unattended water flow. Uses 4AA Alkaline Batteries (purchase separately).Water Pressure: 0.5 - 7.0 KGS/cm, 10-125 psi. Ideal for commercial use applications in public restrooms, restaurants, office building, public facilities, hospitals. Fits all standard US plumbing.
|
|

|
|
Features:
|
|
Visit Product Page 
|
- Sensor faucet complete motion detection operation.
- Sensitive Sensor with Infrared AI Smart-Chip
- Factory set to 30-second Auto Shutoff (can be adjusted).
- Water Pressure: 0.5 - 7.0 KGS/cm, 10 - 125 psi
- Solid Brass Construction, Dark Oil Rubbed Bronze
- Easy to Install - Instructions Included
- Water resistant solenoid enclosure
- Advanced energy saving design for long lasting battery life
- Comes complete with Hoses & Accessories
- Power Supply: AC110V And DC6V (batteries not included)
- AC/DC power option.
- ADA Compliant.
|
sensor faucet
|

|
Important Note:
Before you begin, please read the installation instructions below. Observe all local building and safety codes.
Unpack and inspect the products for any shipping damages. If you find damages, do not install.
Please note all products must be installed by a professional and certified plumber otherwise warranty may be voided.
|
|
Sensor Faucet Installations Instructions
|
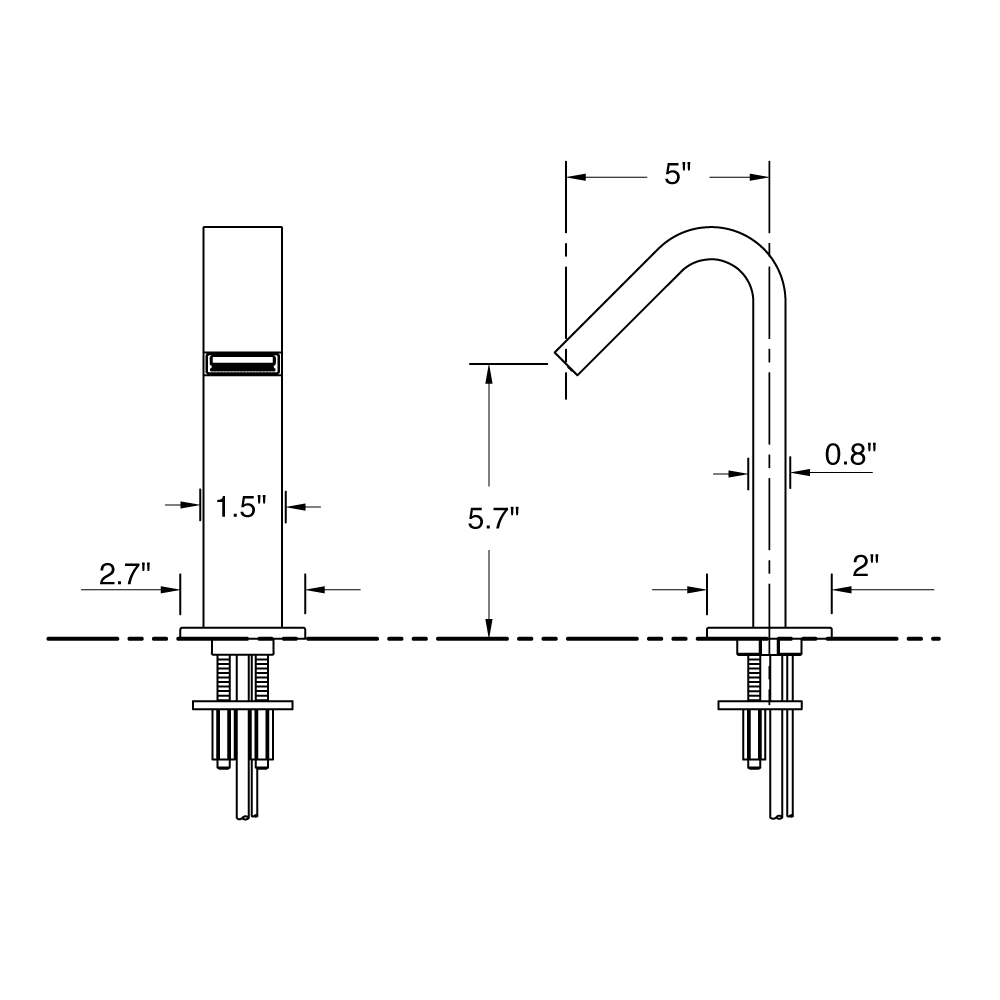
Size
|
|
| |
 |
|
Power: DC 2 pieces of AA size alkaline batteries
AC 220V, 50/60 Hz
Senser Duration: Less than 0.5s
Shut-off Delay: 0.5~1 s
Sensing Distance: Automatic adjustment
Flow Rate: No more than 2.0L/min at 0.3 MPa.
Overtime Flowing Control: Automatically stop flushing when the faucet senses an object for more than 1 minute continuously
Ambient Temperature: 1~55 °C
Supply Water Temperature: 0.5~71 °C
Supply Water Pressure: 0.05~0.86 MPa
|  |
|
|
| |
|
Step 1:
|
sensor
|
Step 2:
| |
 |
|
 | |
How to Install the Faucet
1. Fixing the faucet and lavatory
Install the mounting stud to the bottom of the faucet, then slip the washer over the mounting stud and put them into the groove on the spout. Insert the power wire and supply hose into the hole from the underside of the lavatory. From the underside of the lavatory, slide the rubber washer, metal washer and fixed nut onto the mounting stud. Tighten nut to make faucet installed on the lavatory.
|
|
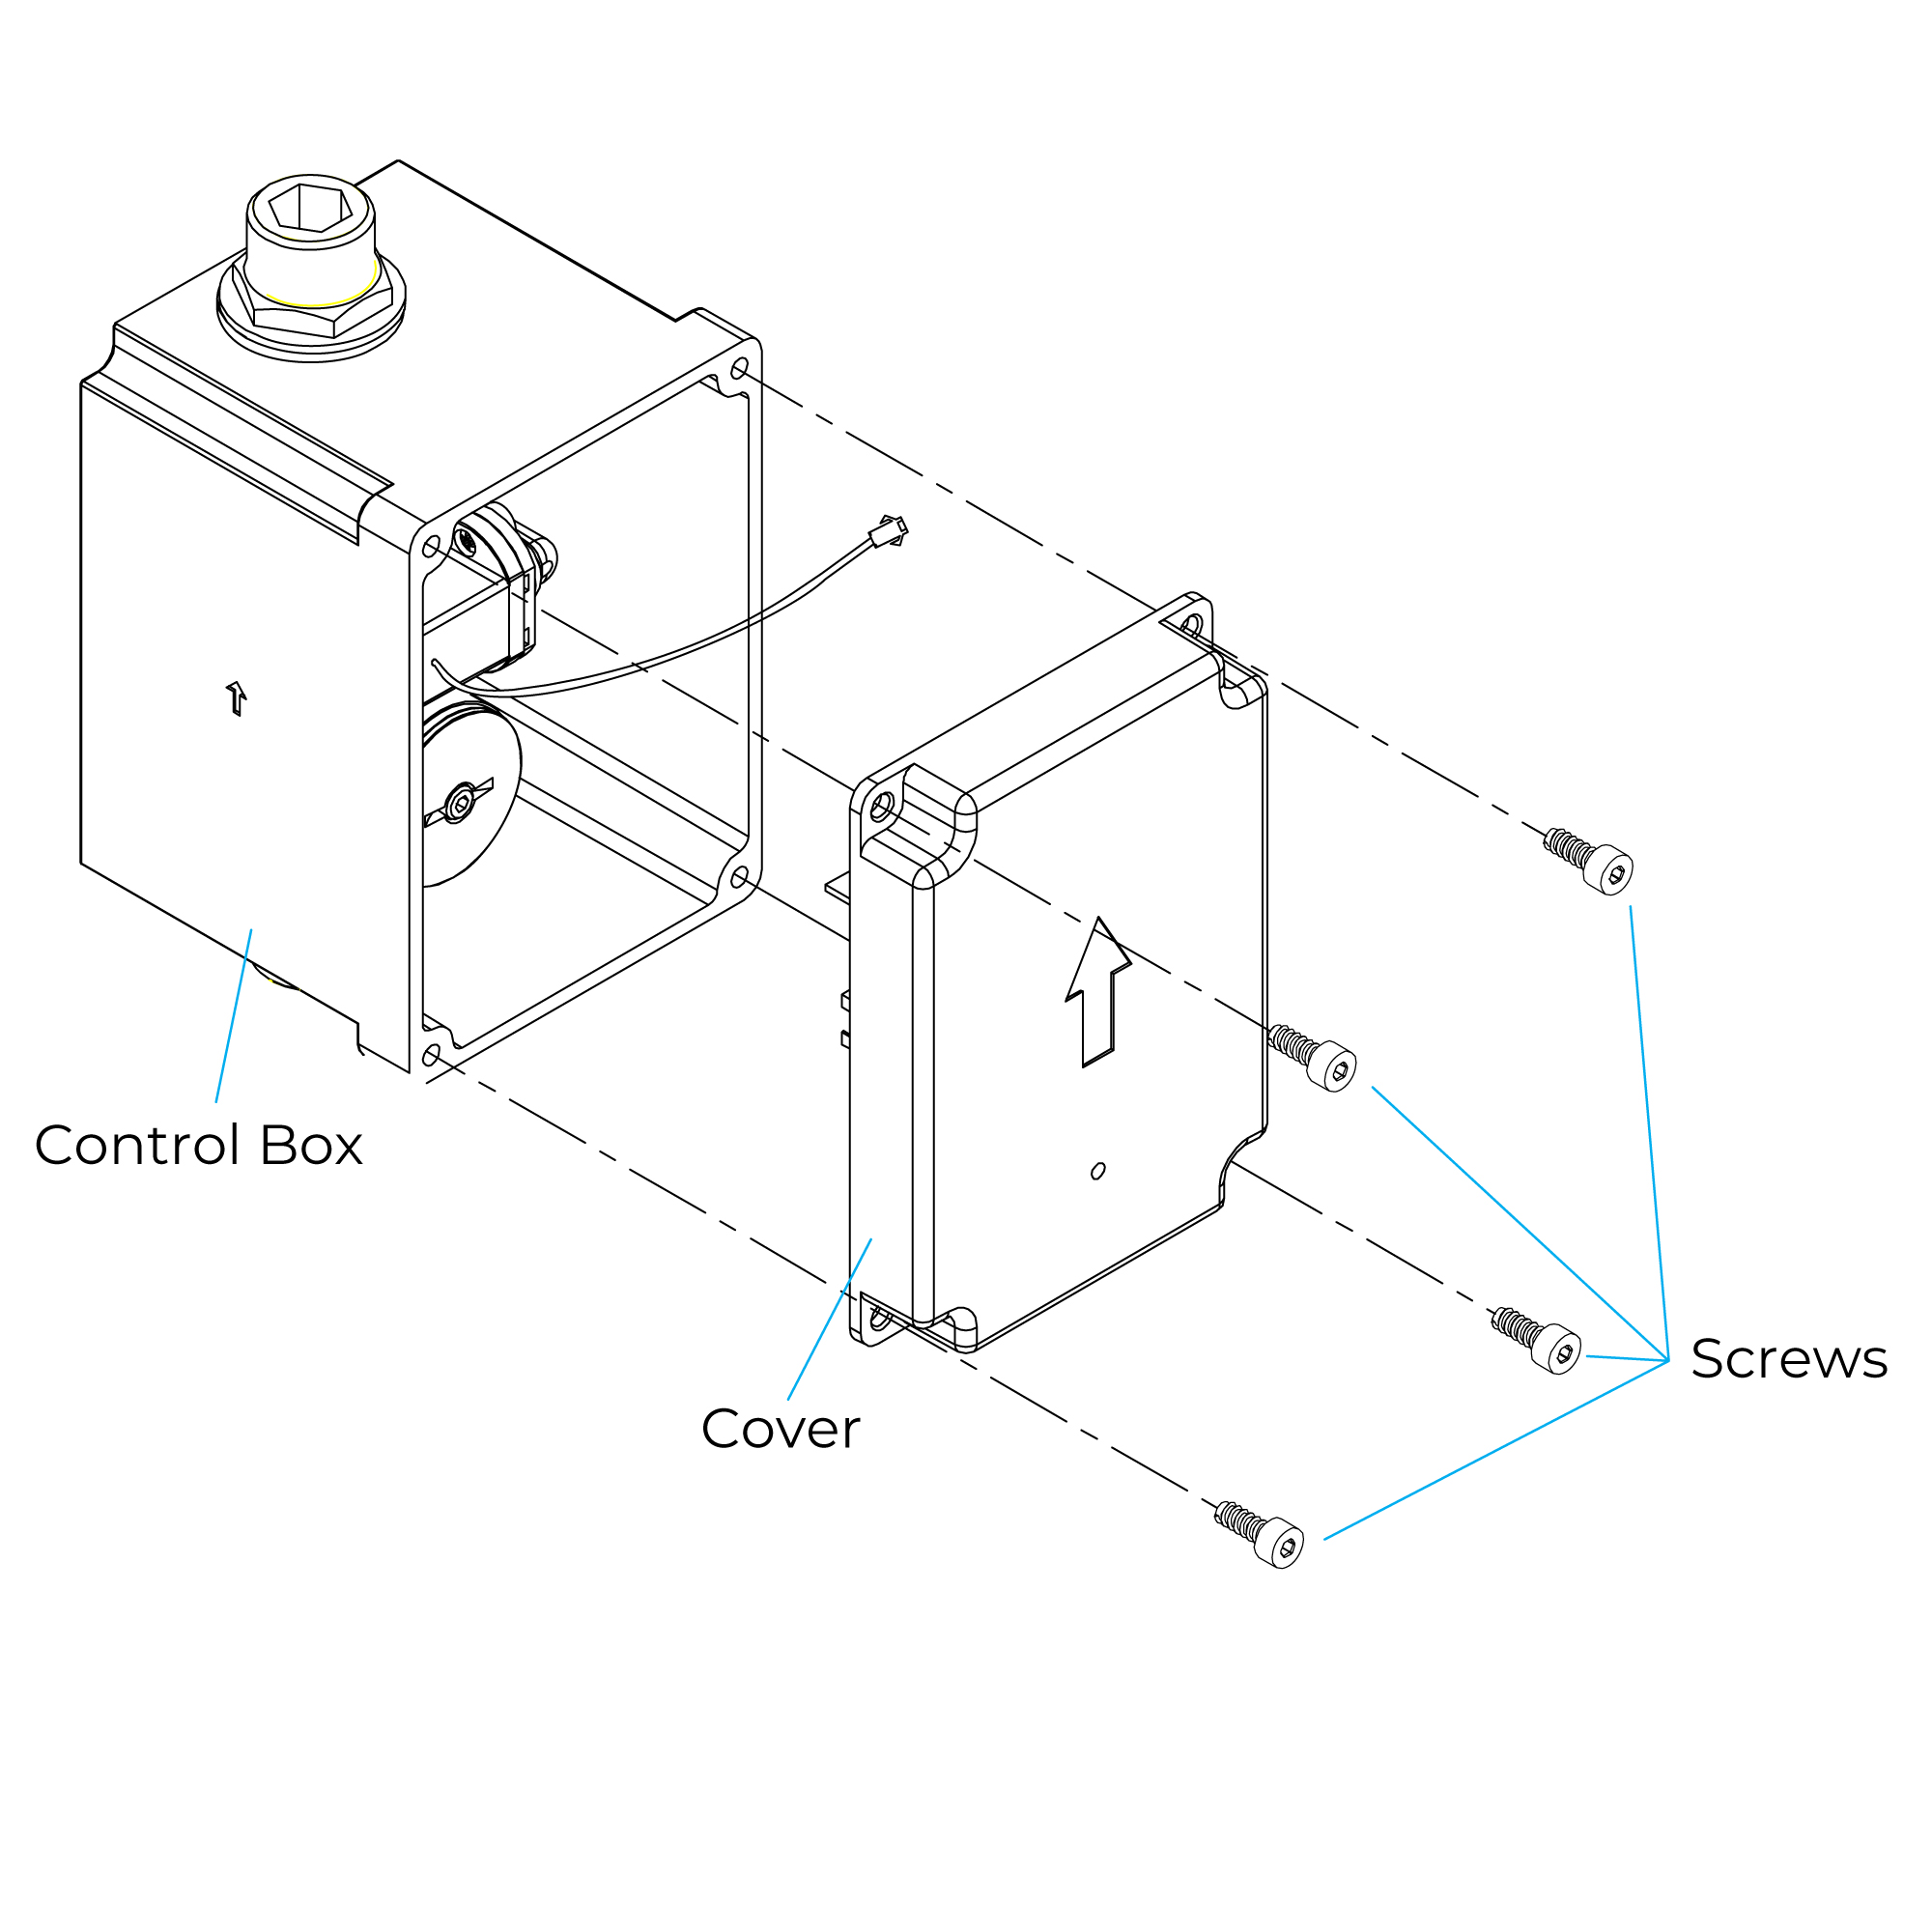
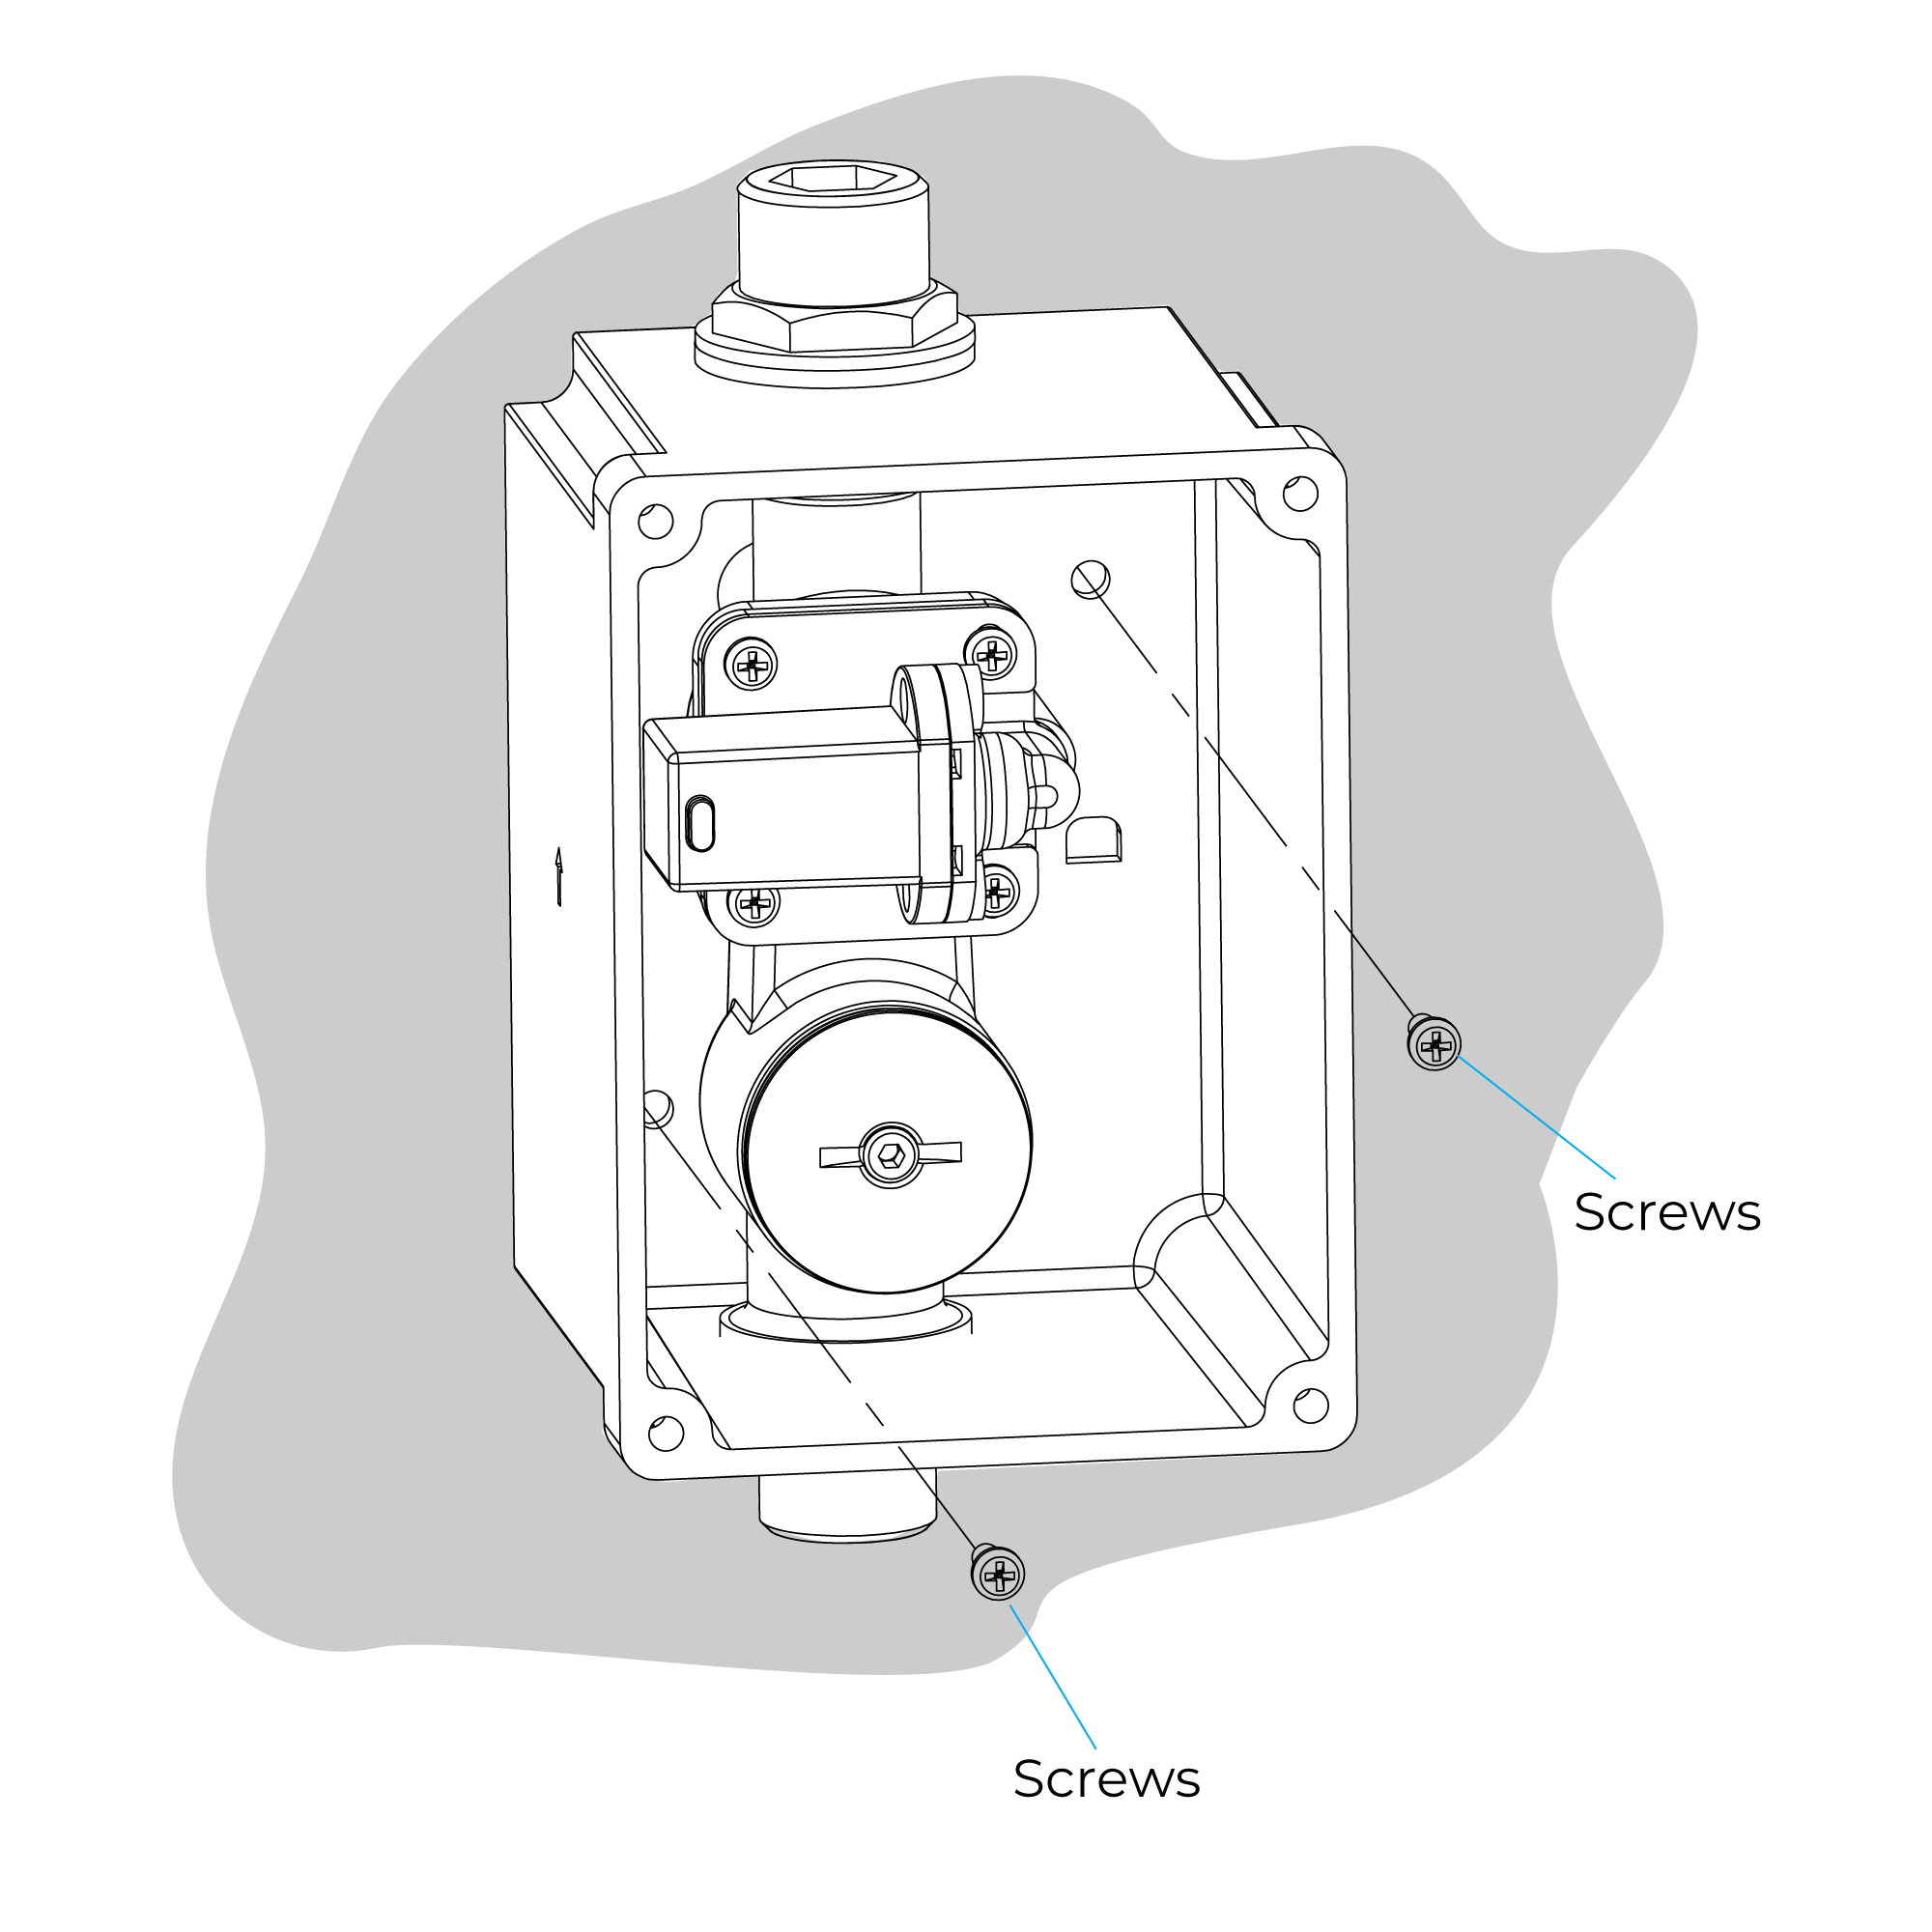
2. Fix the control box
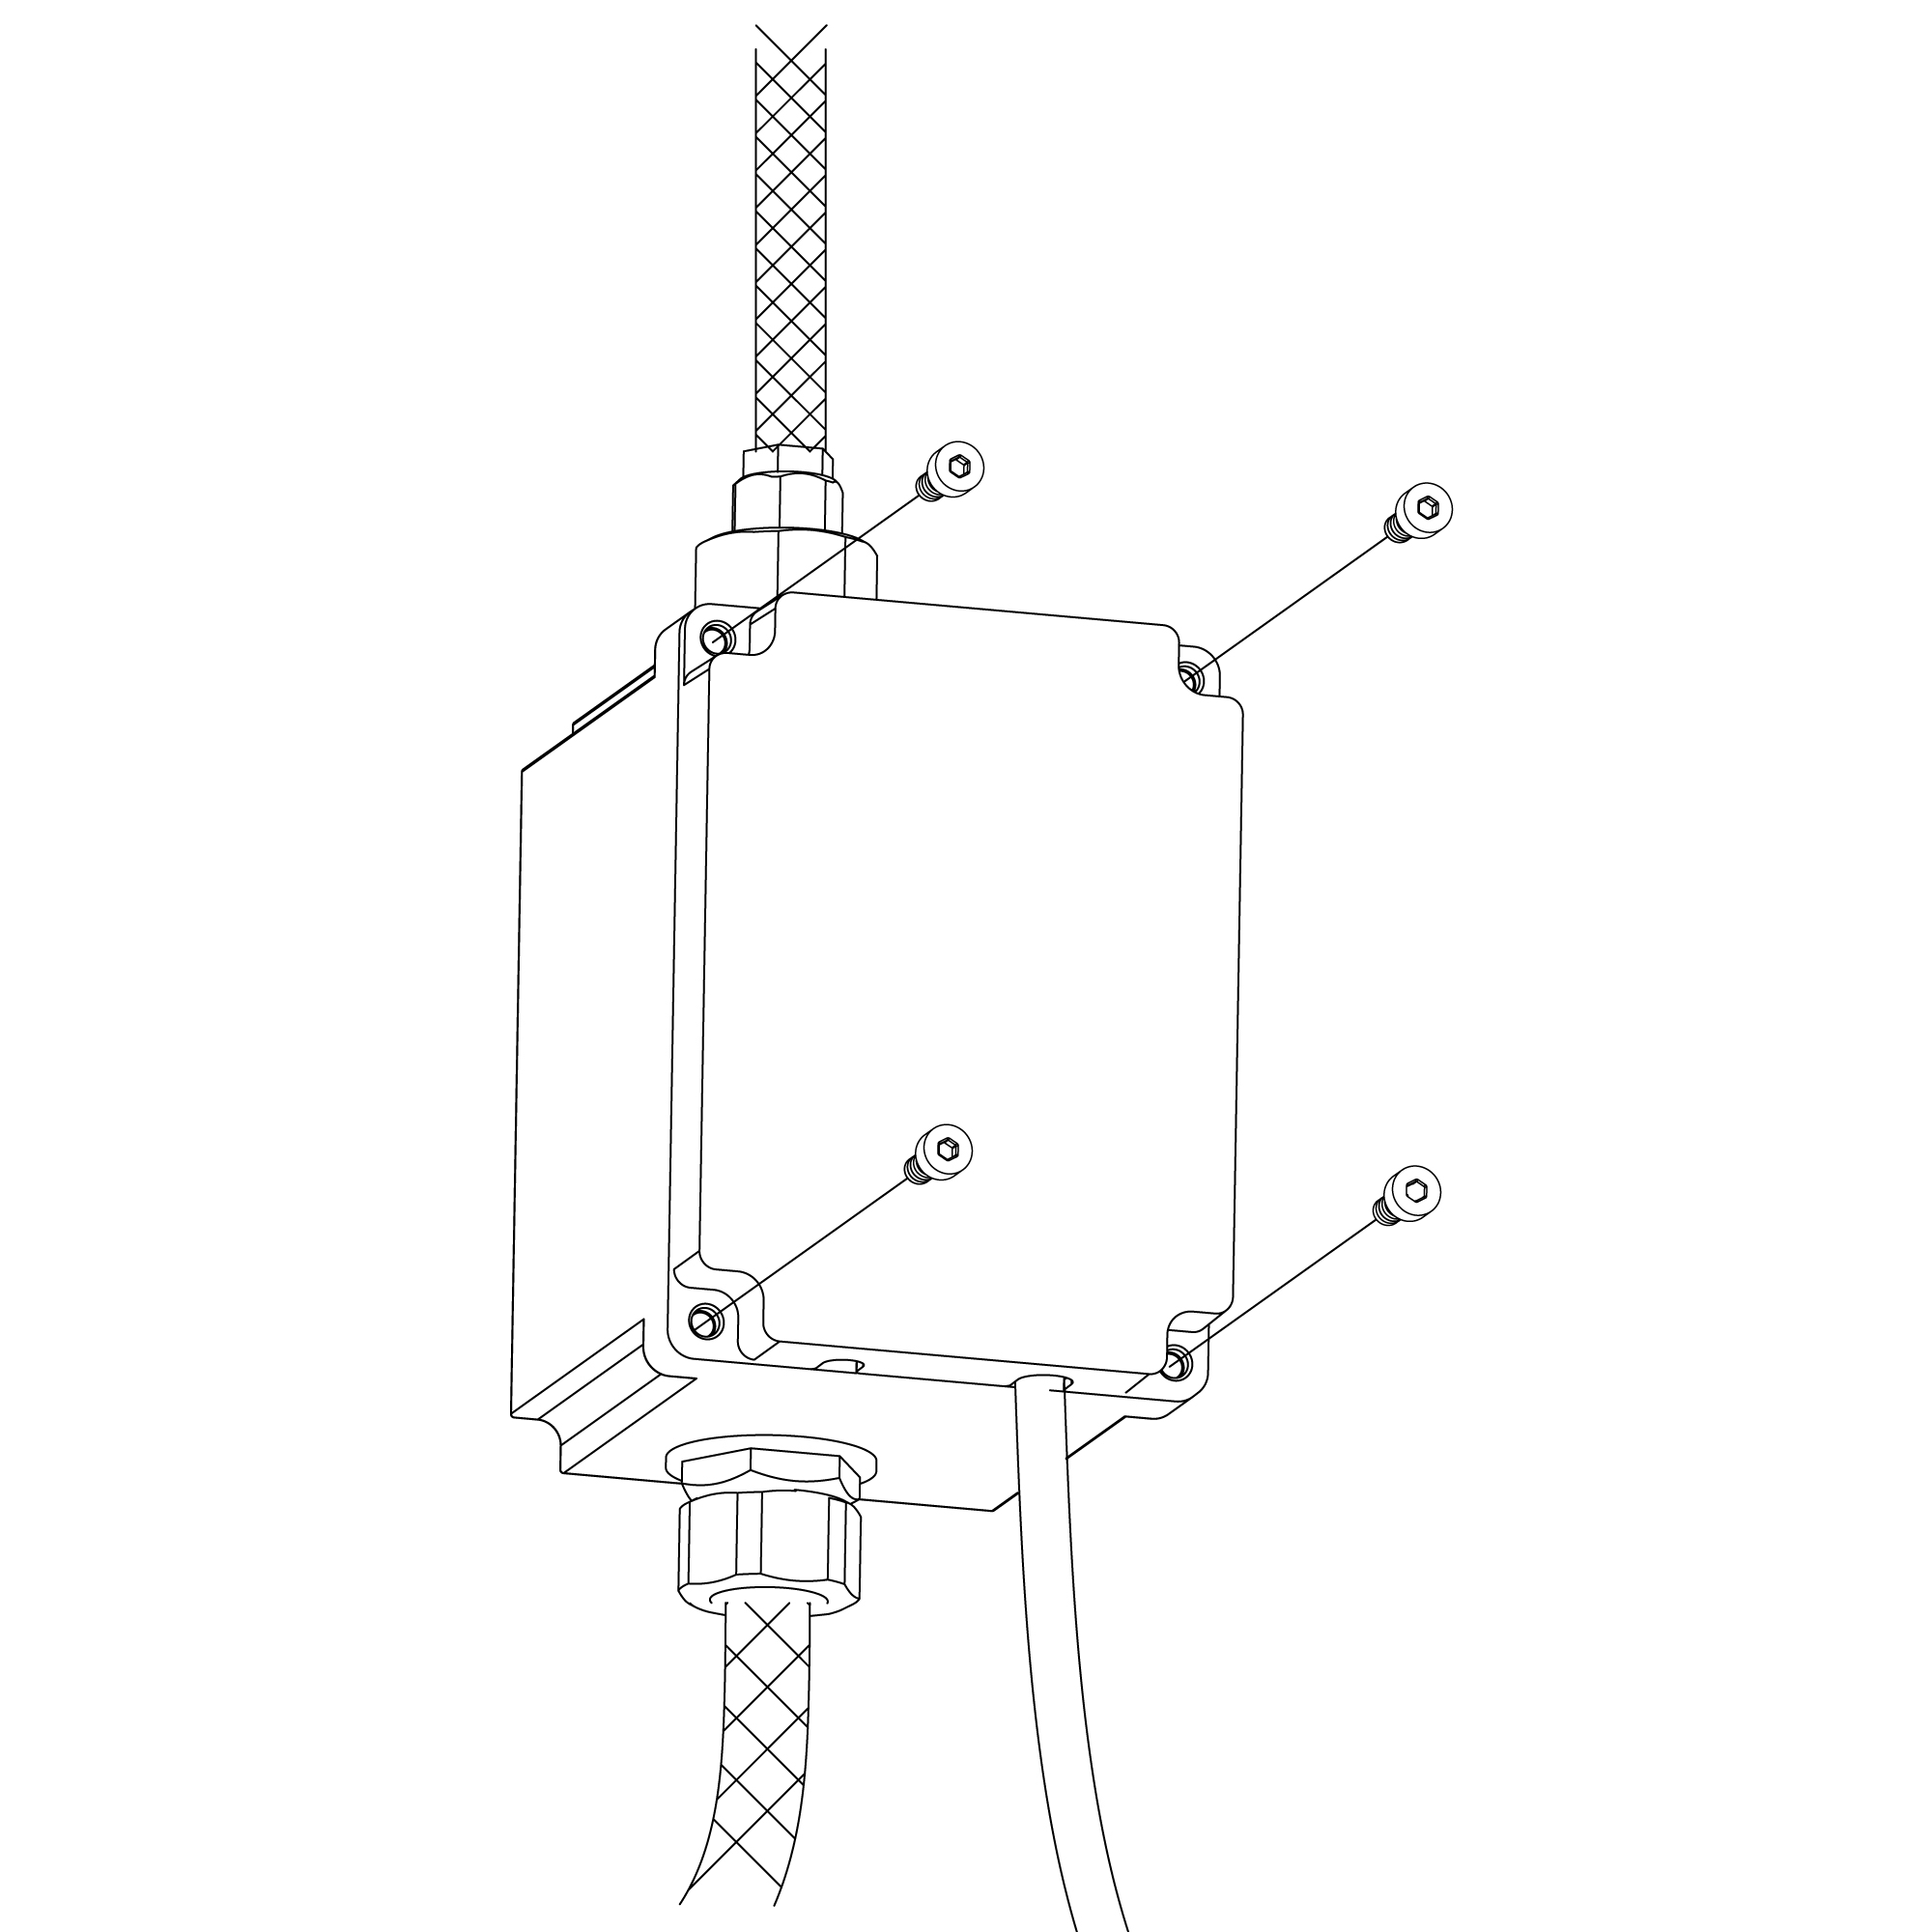
Remove the cover after loose the screws. Determine the installation location of control box per rough-in, then drill holes and place sheath in it. Make the control box cling on the wall and outlet upturned, then fix the control box on the wall by screws, keep the control box parallel to the wall.
| |
|
|
| |
|
Step 3:
|
|
Step 4:
| |
 |
|
 | |
|
|
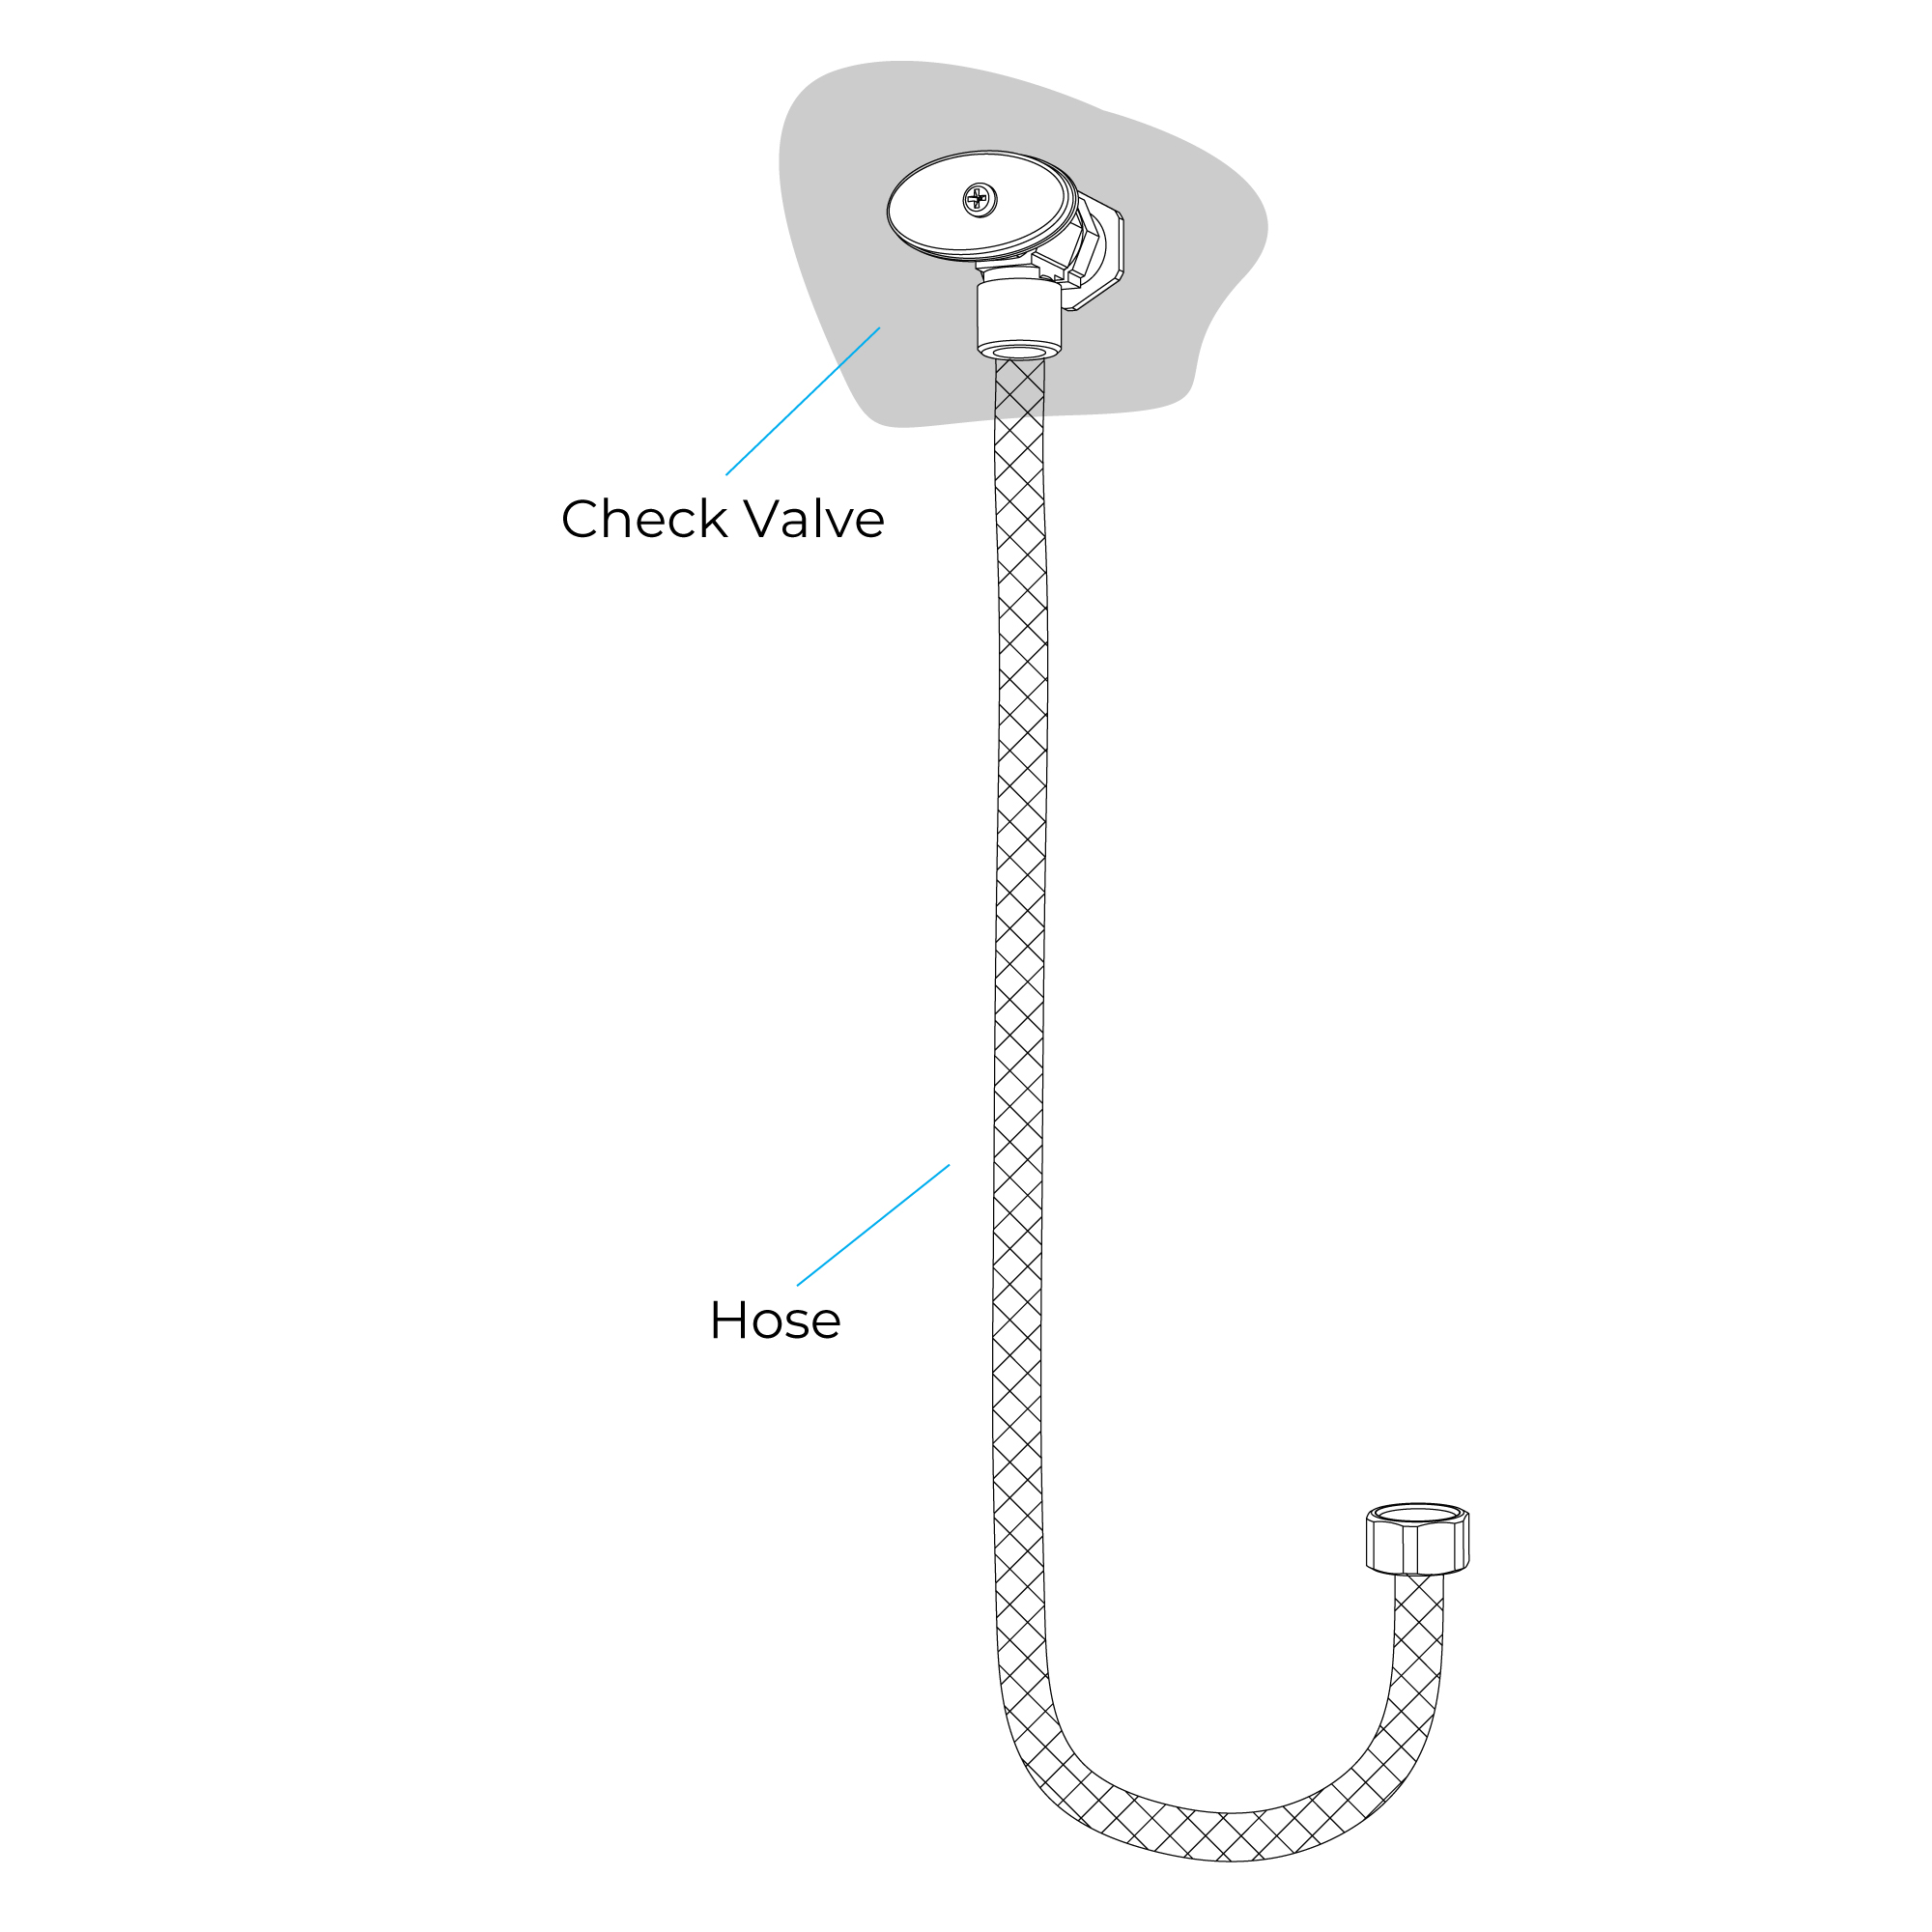
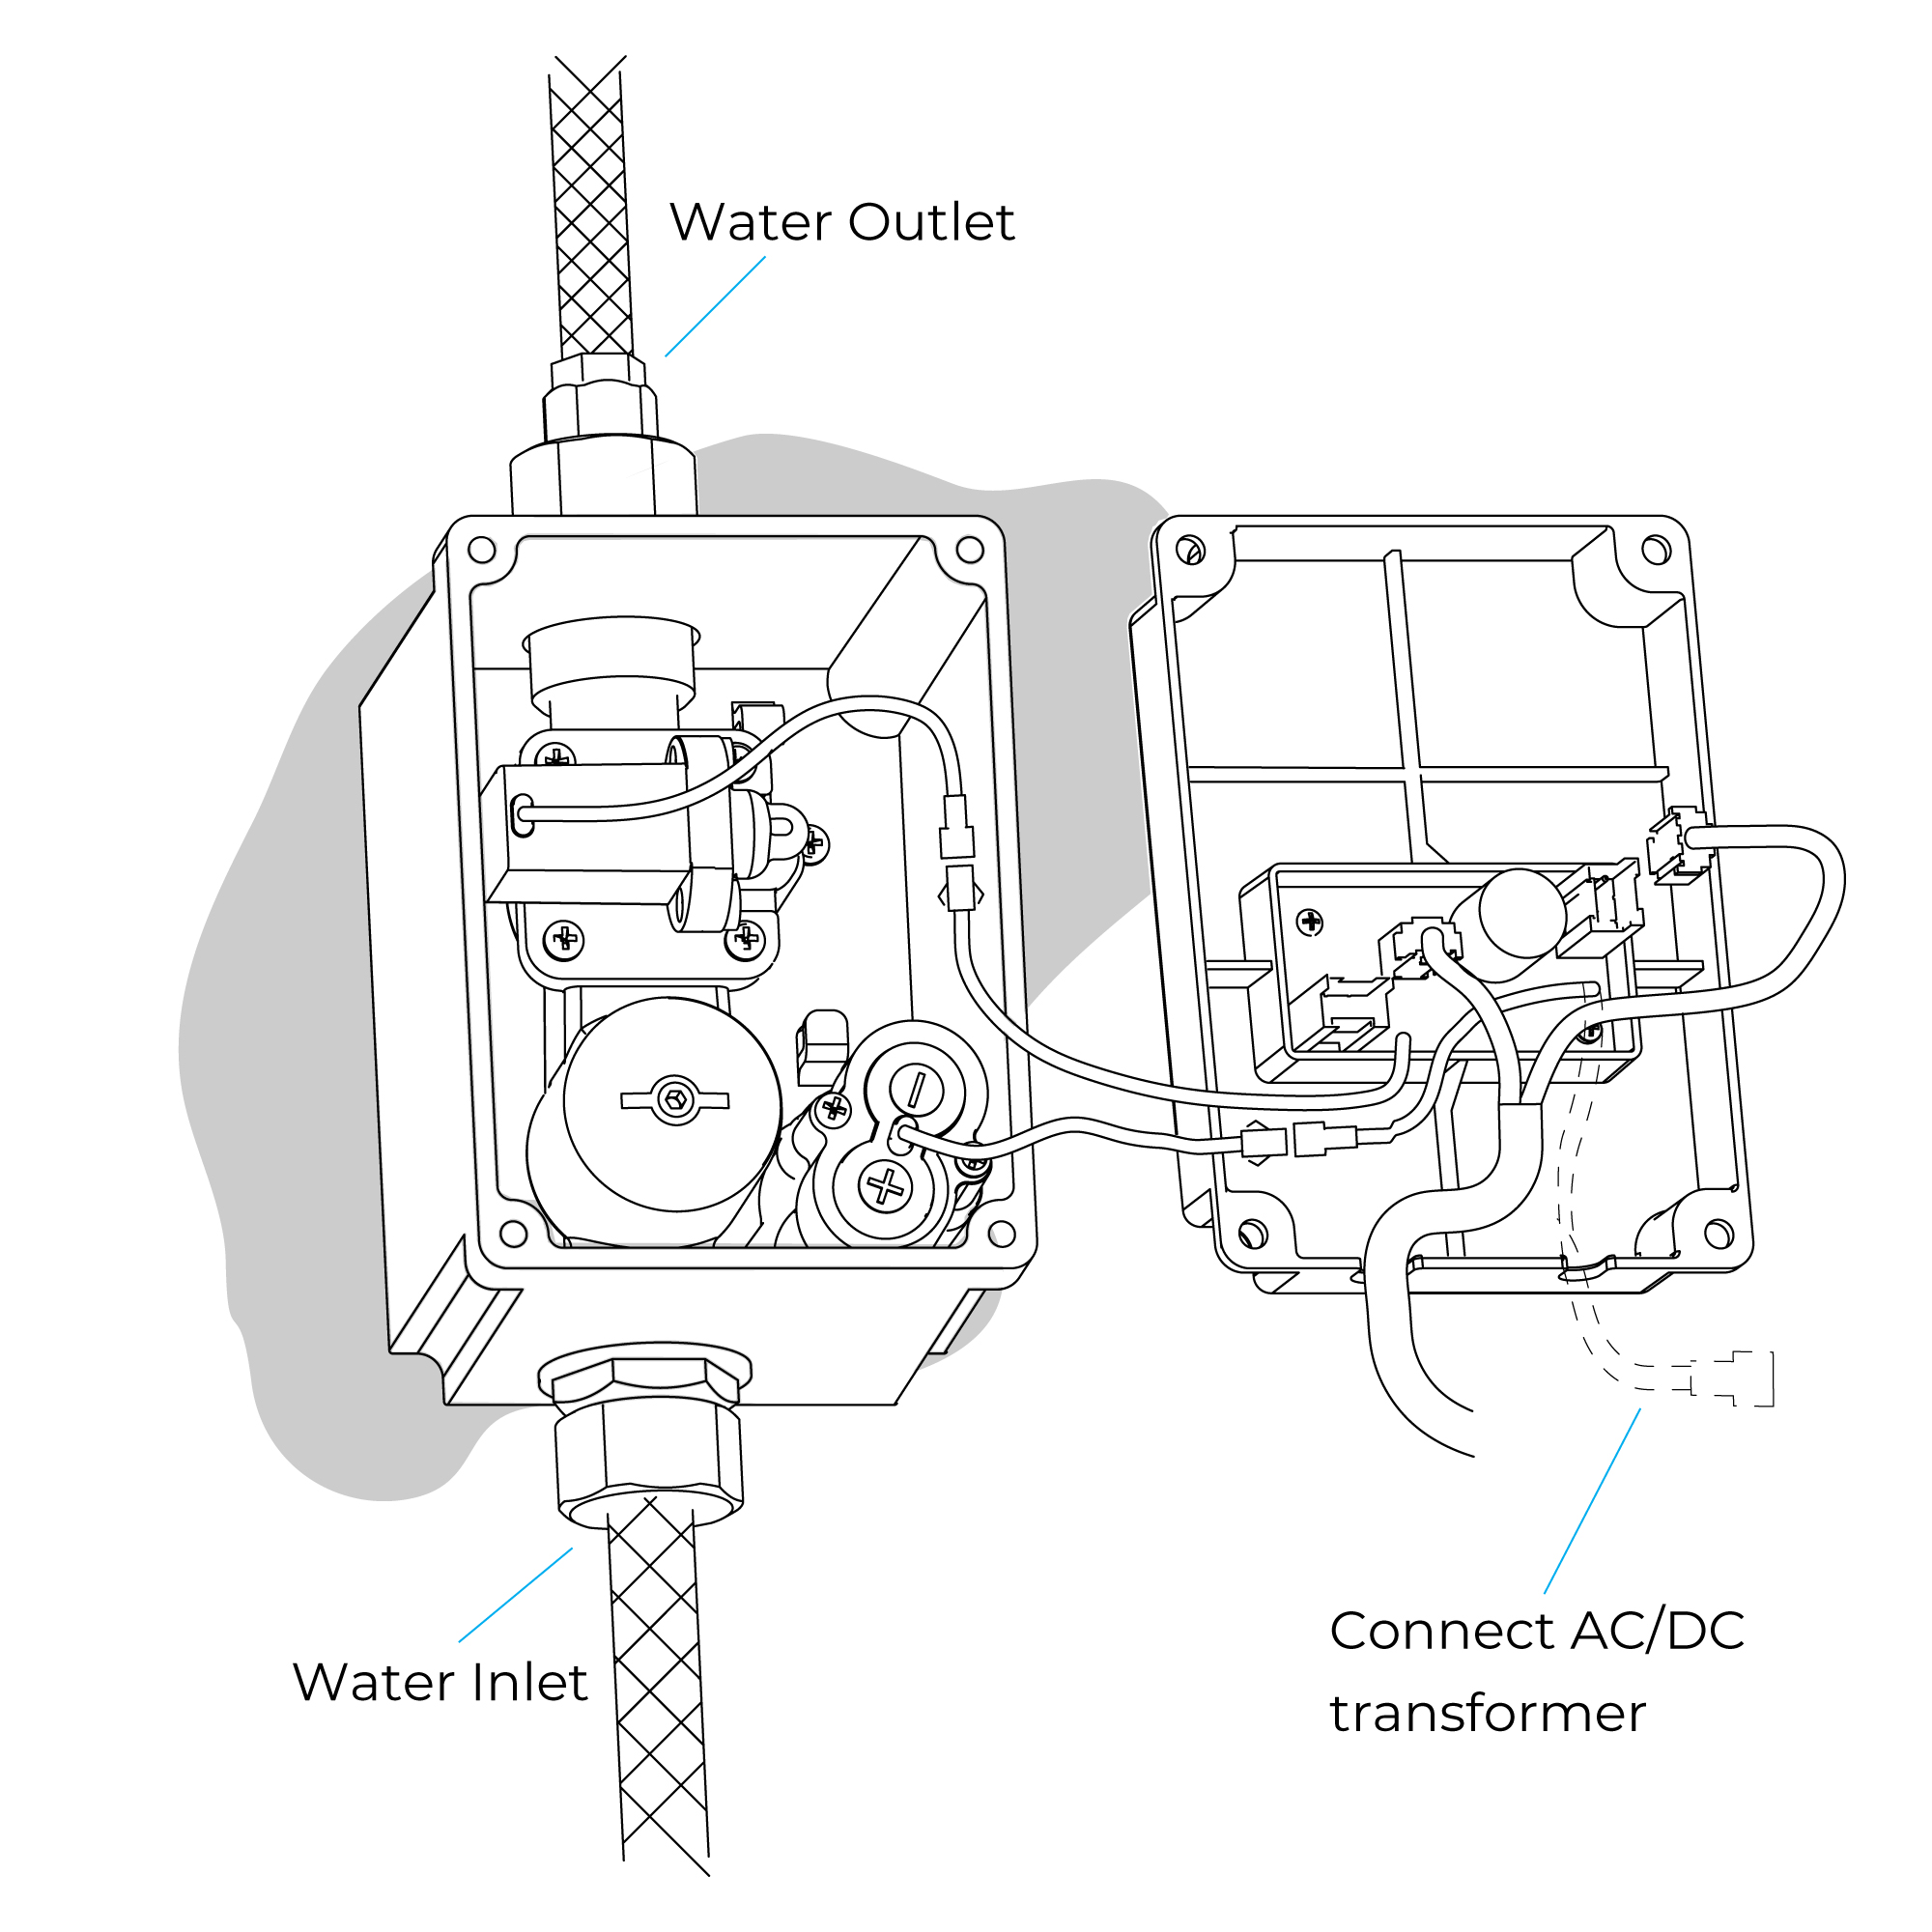
Connect the check valve and outlet together, then connect the hose and check valve. Put a bucket in the front of the hose, turn on the check valve completely and open the water supply. After the water flushing about 1 minute, make sure no leakage and turn off the water supply.
| |
|
|
| |
|
Step 5:
|
|
Step 6:
| |
 |
|
 | |
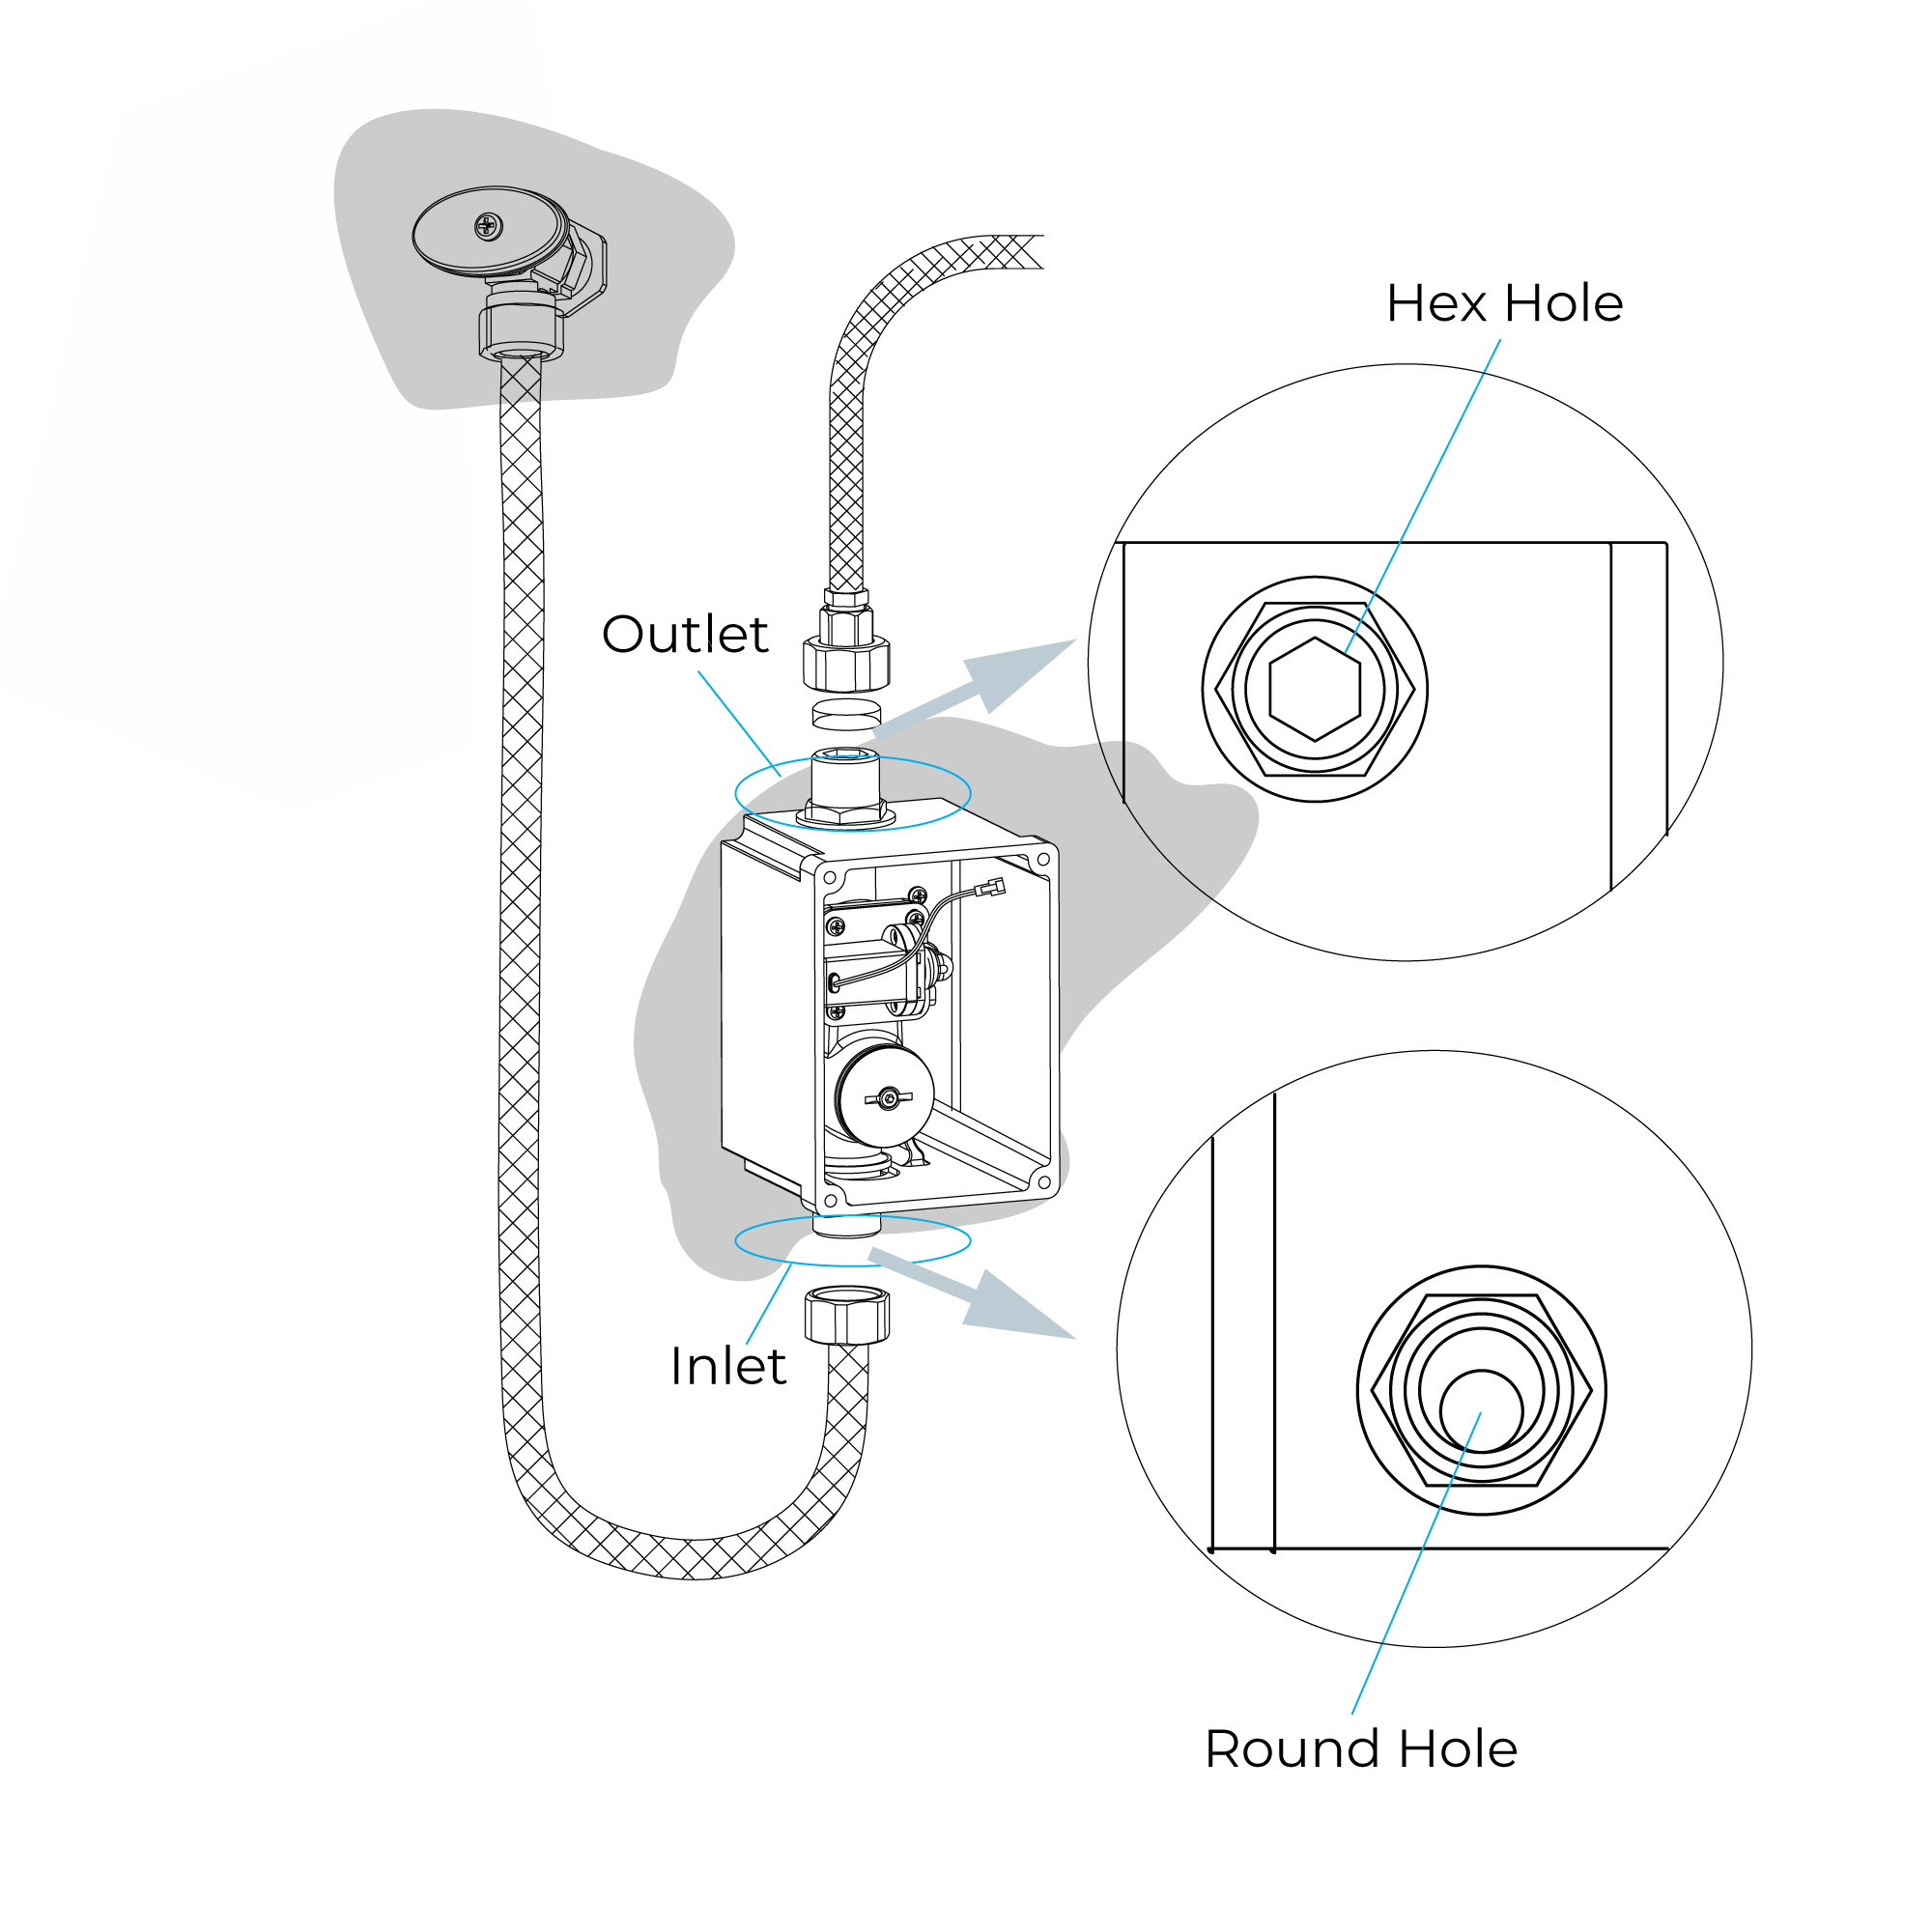
Connect a hose to the inlet of valve, then connect the outlet of valve and inlet of spout assy. Note:
1. Do not lose the washer of the hose.
2. Please let users prepare the check valve by themselves.
3. Do not confuse the inlet and outlet.
|
|
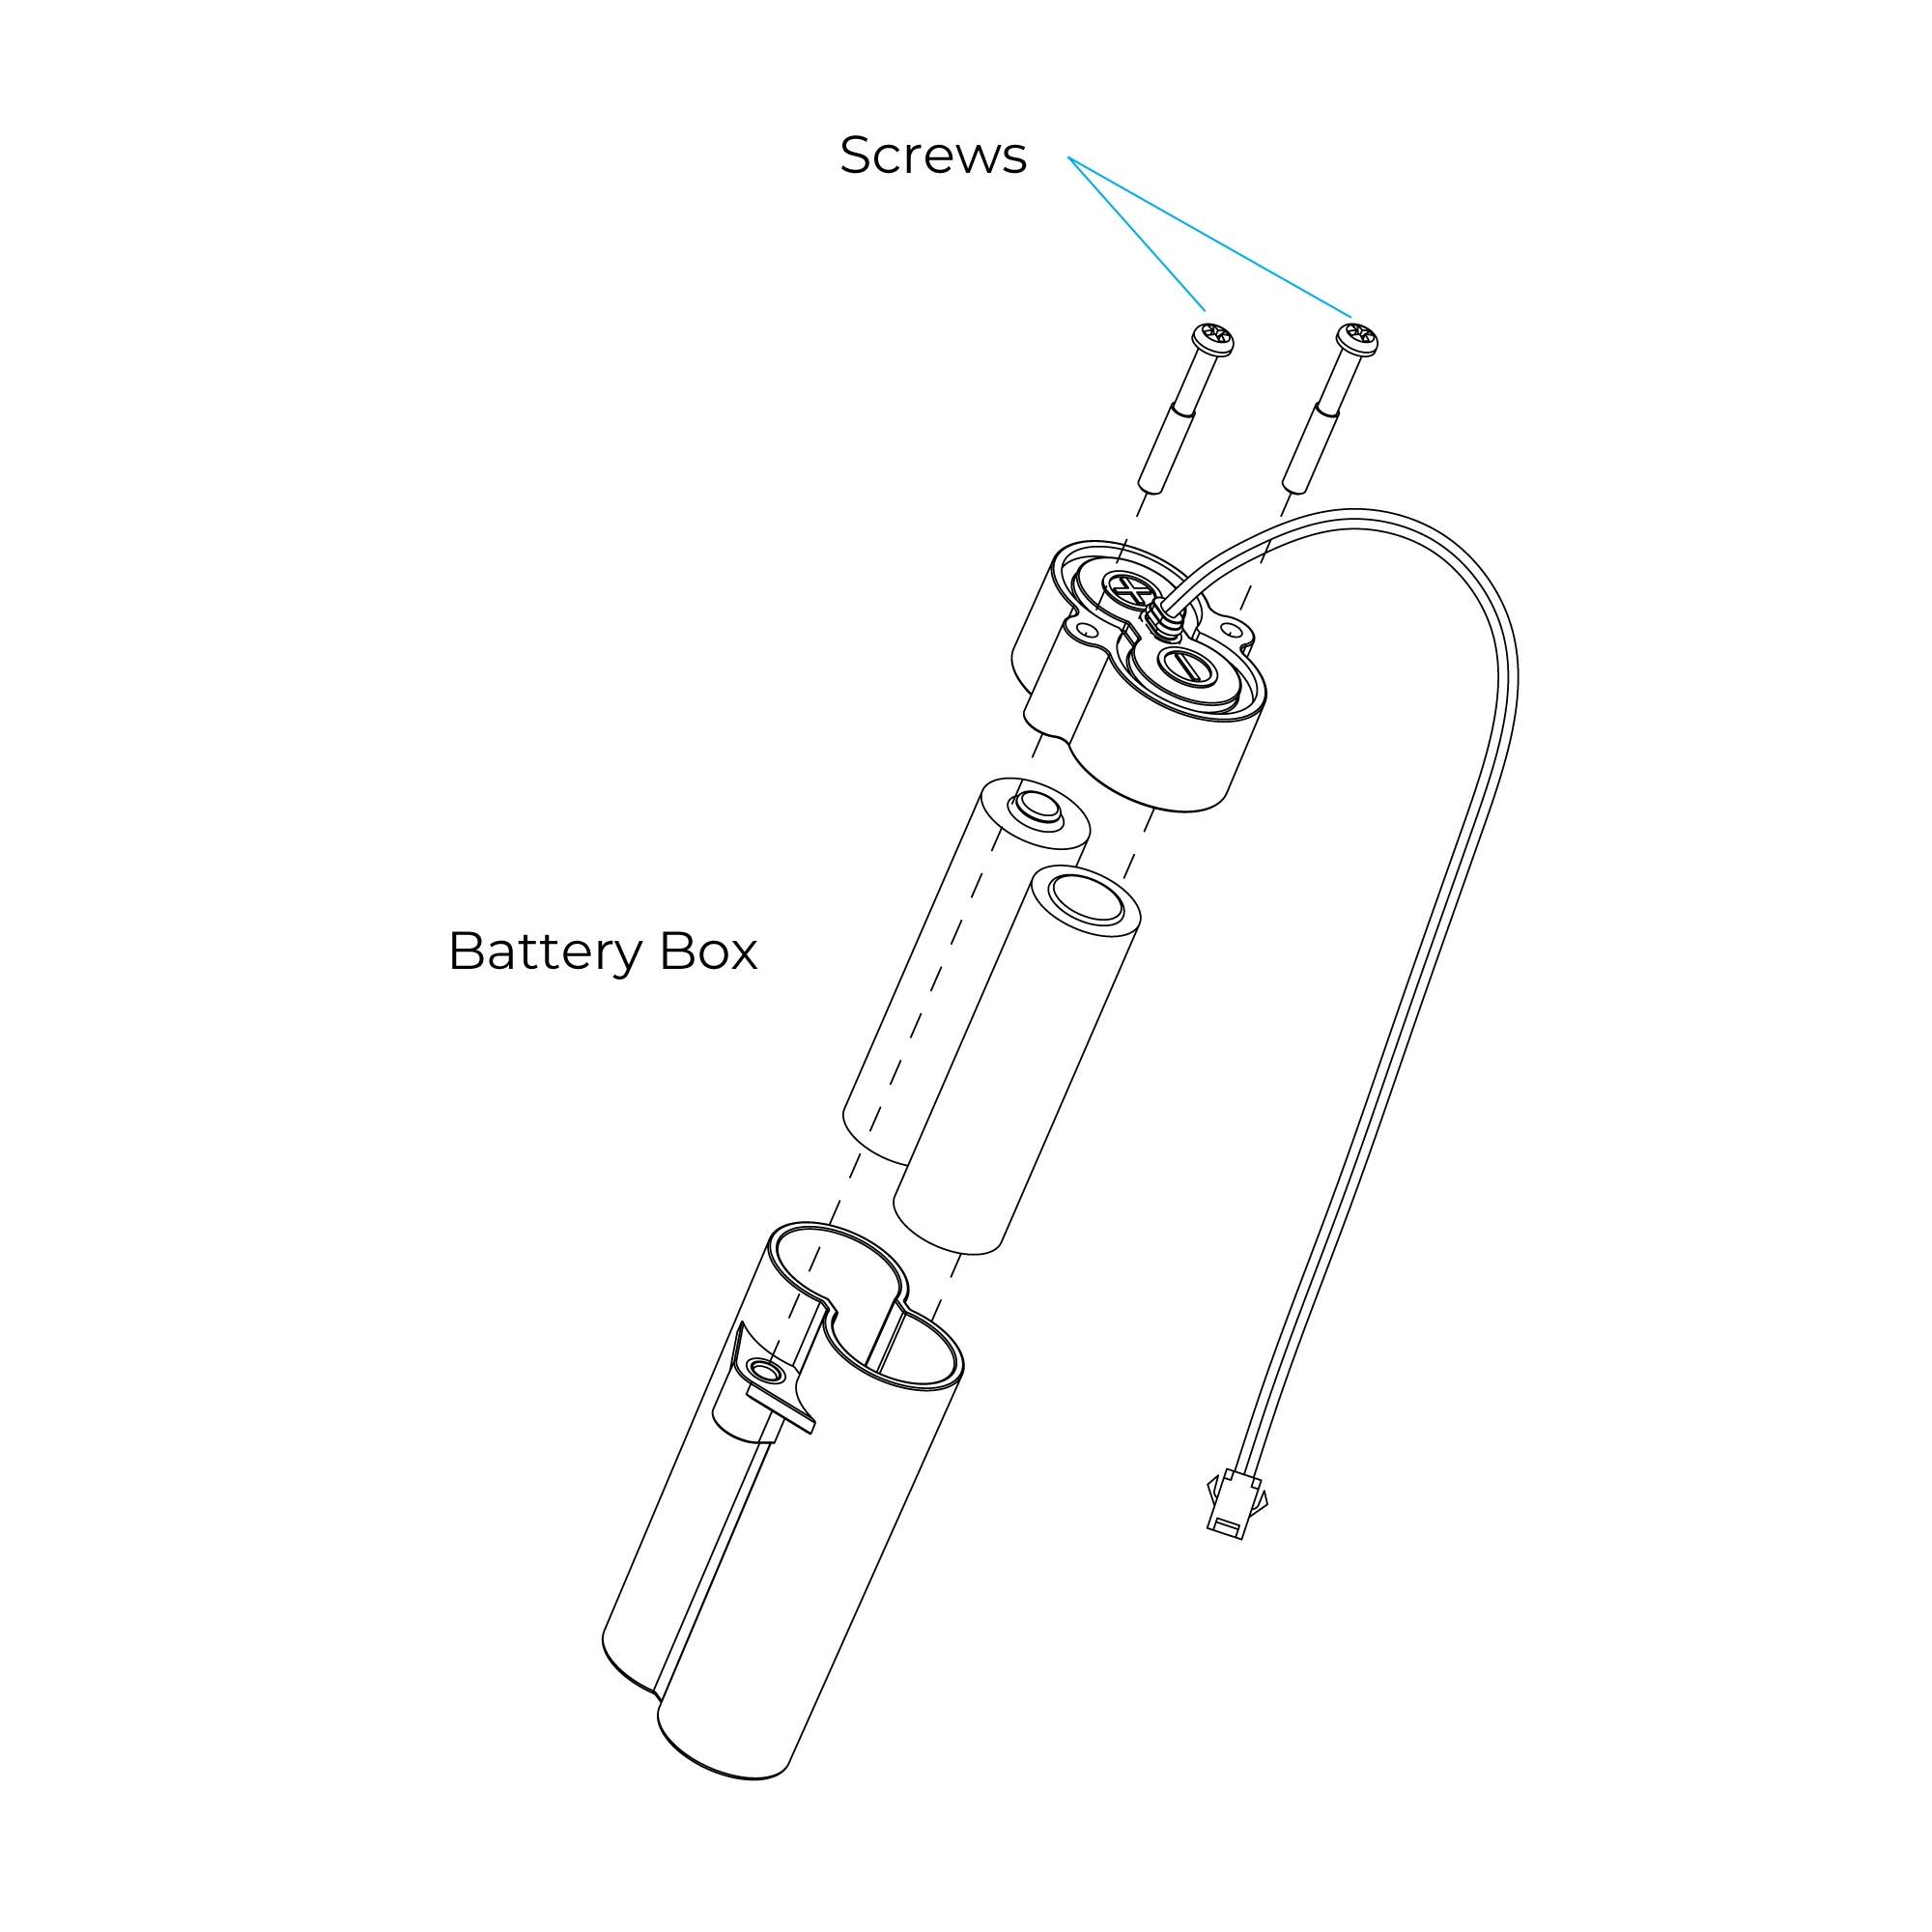
Take out the battery box and loose the screws, place two âAAâ batteries into the box according to the negative and positive pole mark on the cover of the battery box. Put the box in the particular groove in the valve box after tight the screws.
Note:
Do not mistake the pole and mixture the new and used batteries.
| |
|
|
| |
|
Step 7:
|
|
Step 8:
| |
 |
|
 | |
Finally, connect the red-green lines in solenoid valve and the cover of valve box, then connect the black-orange lines in power supply and control board (If your faucet is AC version, please let the black-green line in the control board through the âUâ gap and connect with the line of AC power box). Connect the red and white connectors in the sensor line and cover, and tight the box and cover by screws.
|
|
Note:
1. When installing the box and cover by screws, make sure the sensor line needs to be through the âUâ Gap of cover.
2. Connect the batteries, the faucet will be in the period of automatic adjusting sensing distance (about 2minutes). The faucet will not work during this period.
| |
|
|
| |
|
Step 9: (Sensing Range)
|
|
Step 10:
| |
 |
|
 | |
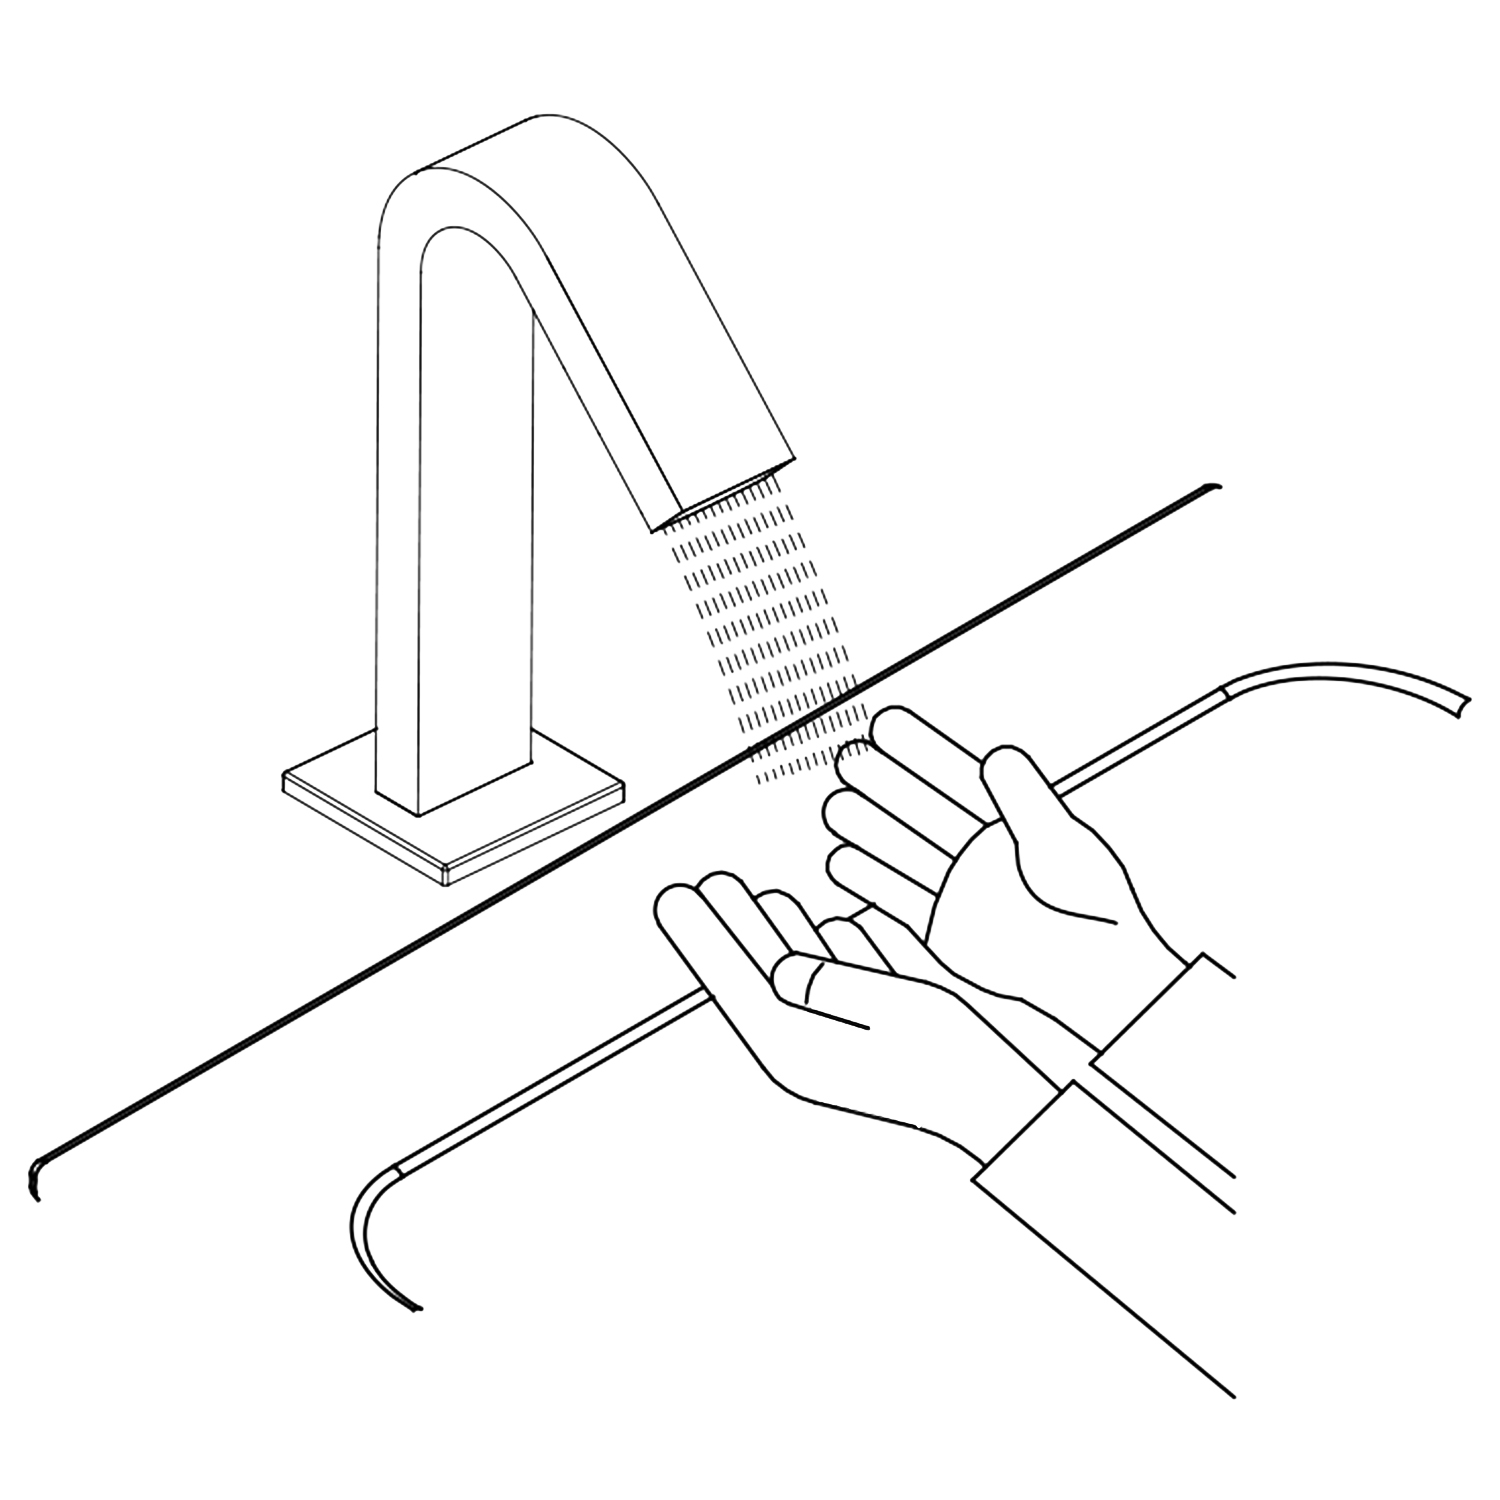
Put your hand in the sensing -range, the faucet should turn on. The faucet should turn off after removal within 0.5~1 seconds. The sensing distance will be adjusted automatically as per the condition of the lavatory and the surrounding environment.
|
|
| |
|
|
| |
|
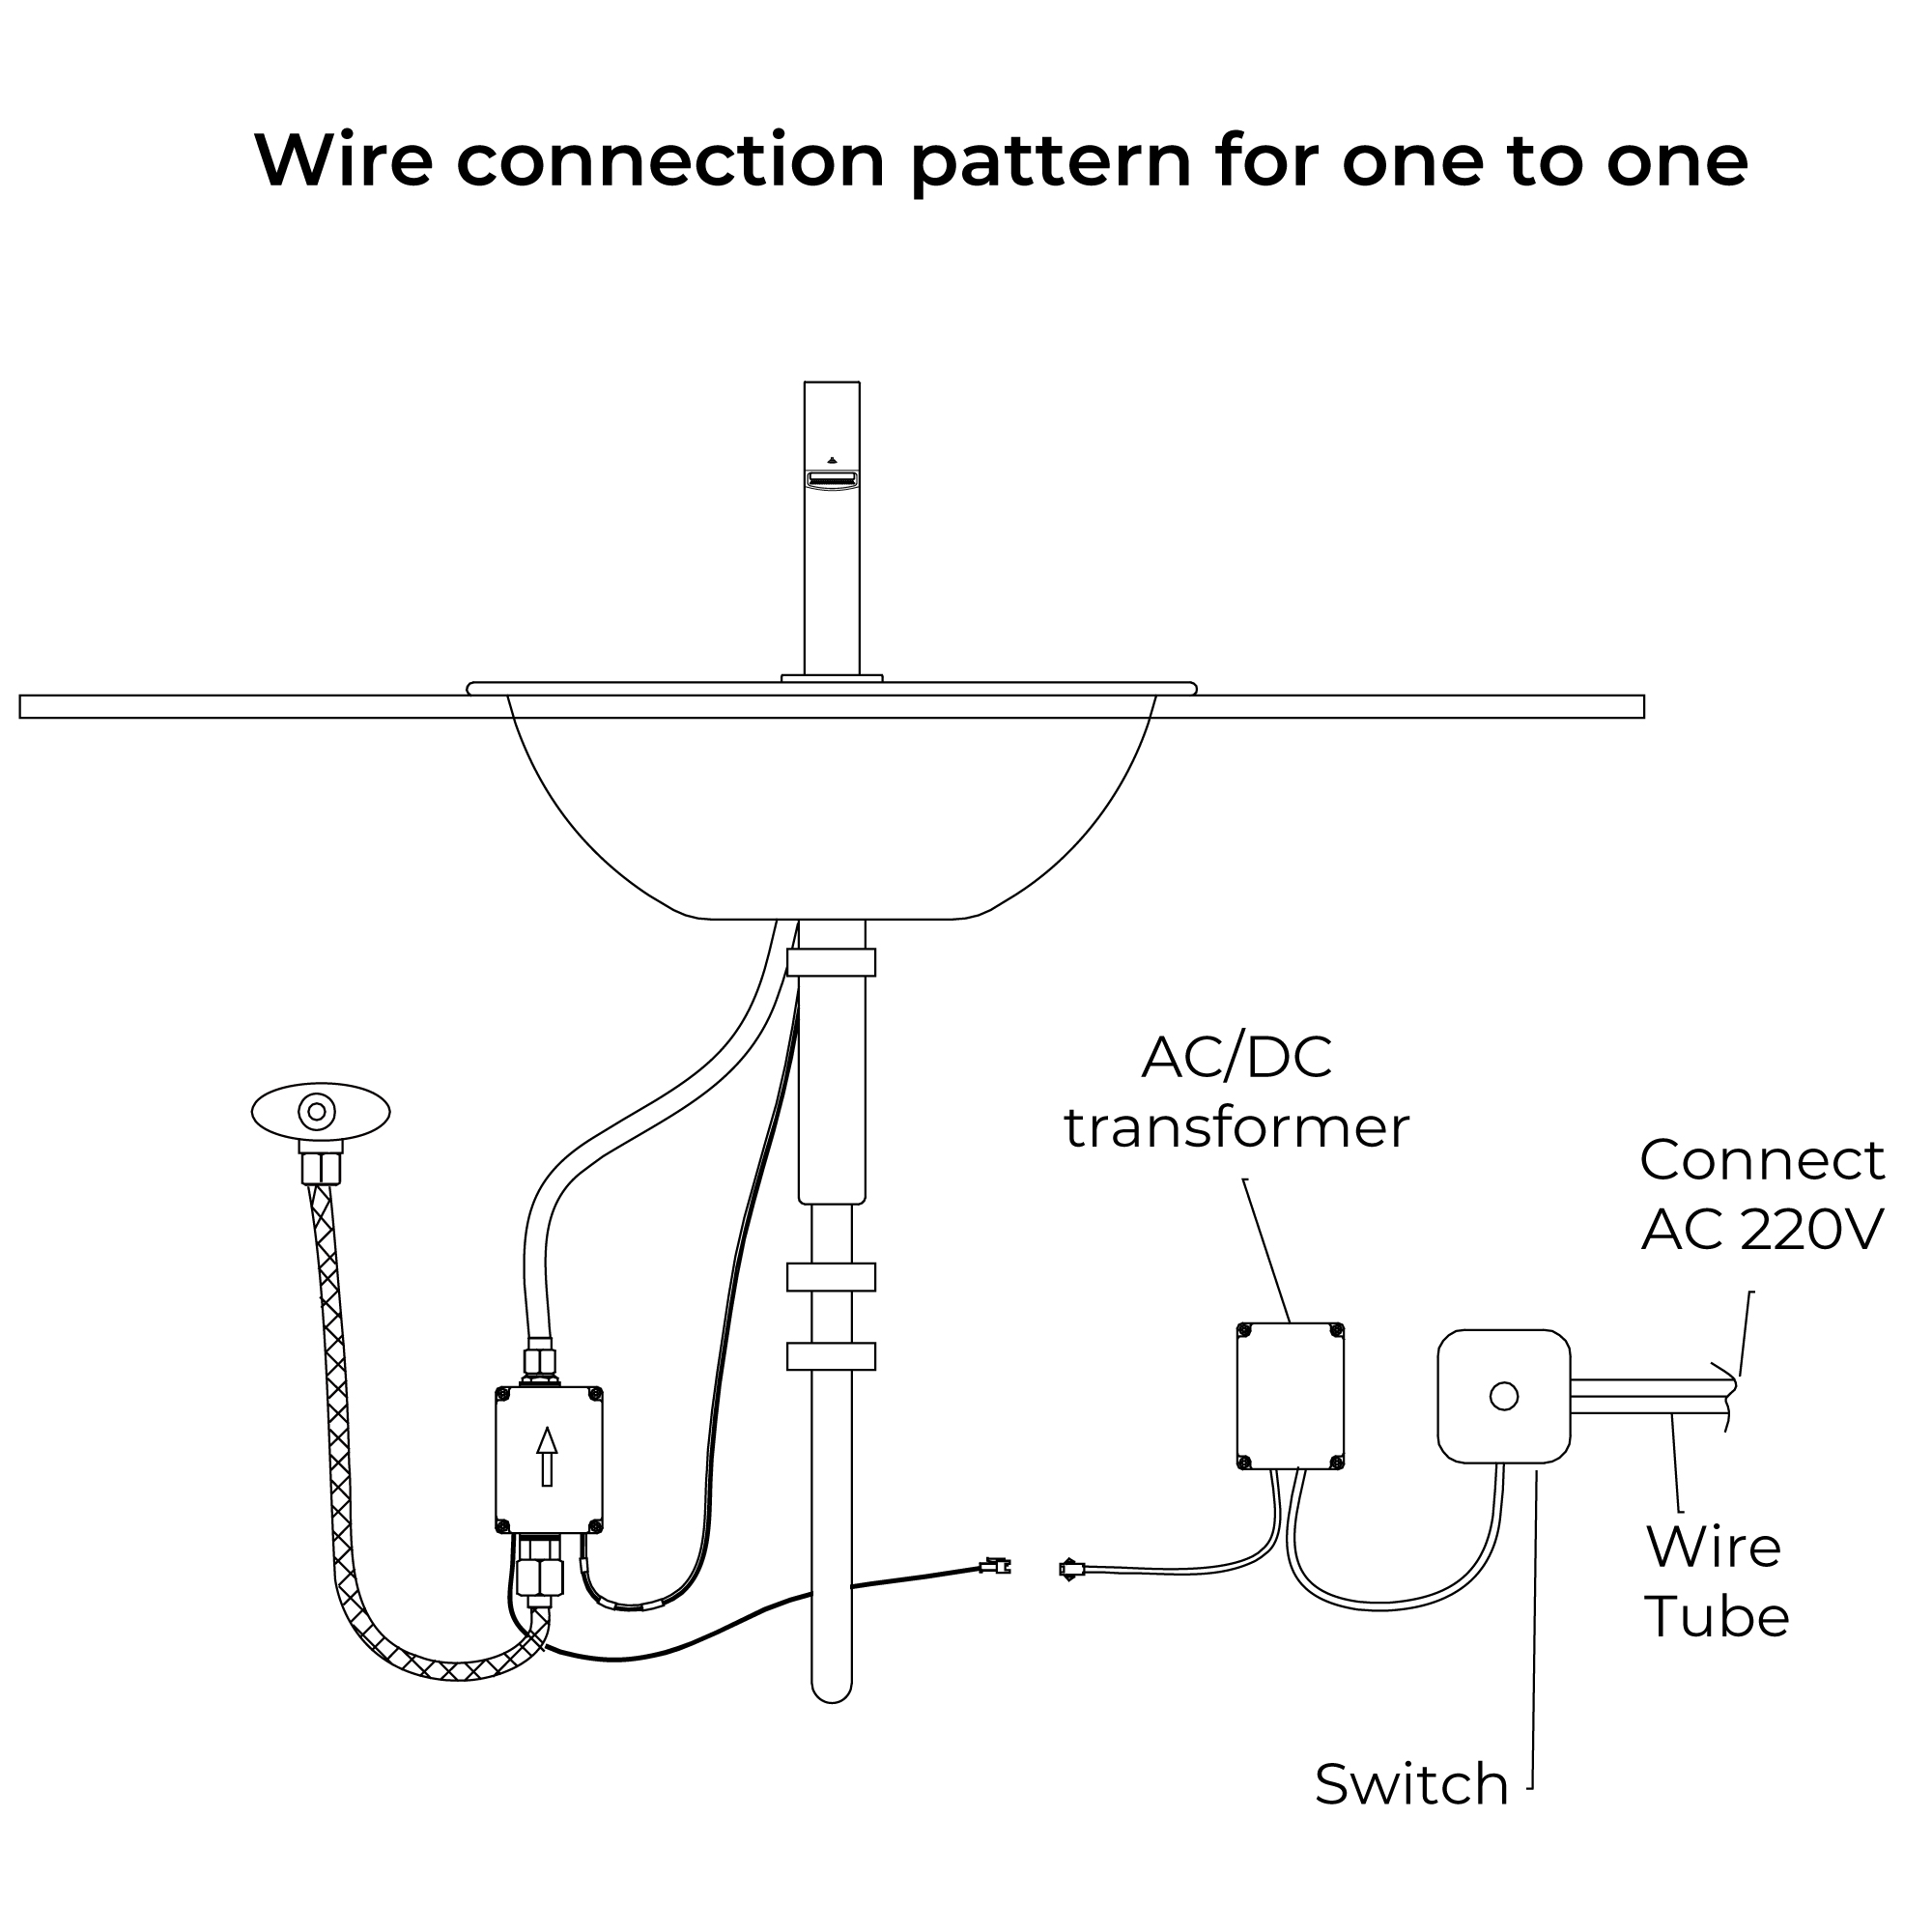
Step 11: (Single Faucet Connection)
|
|
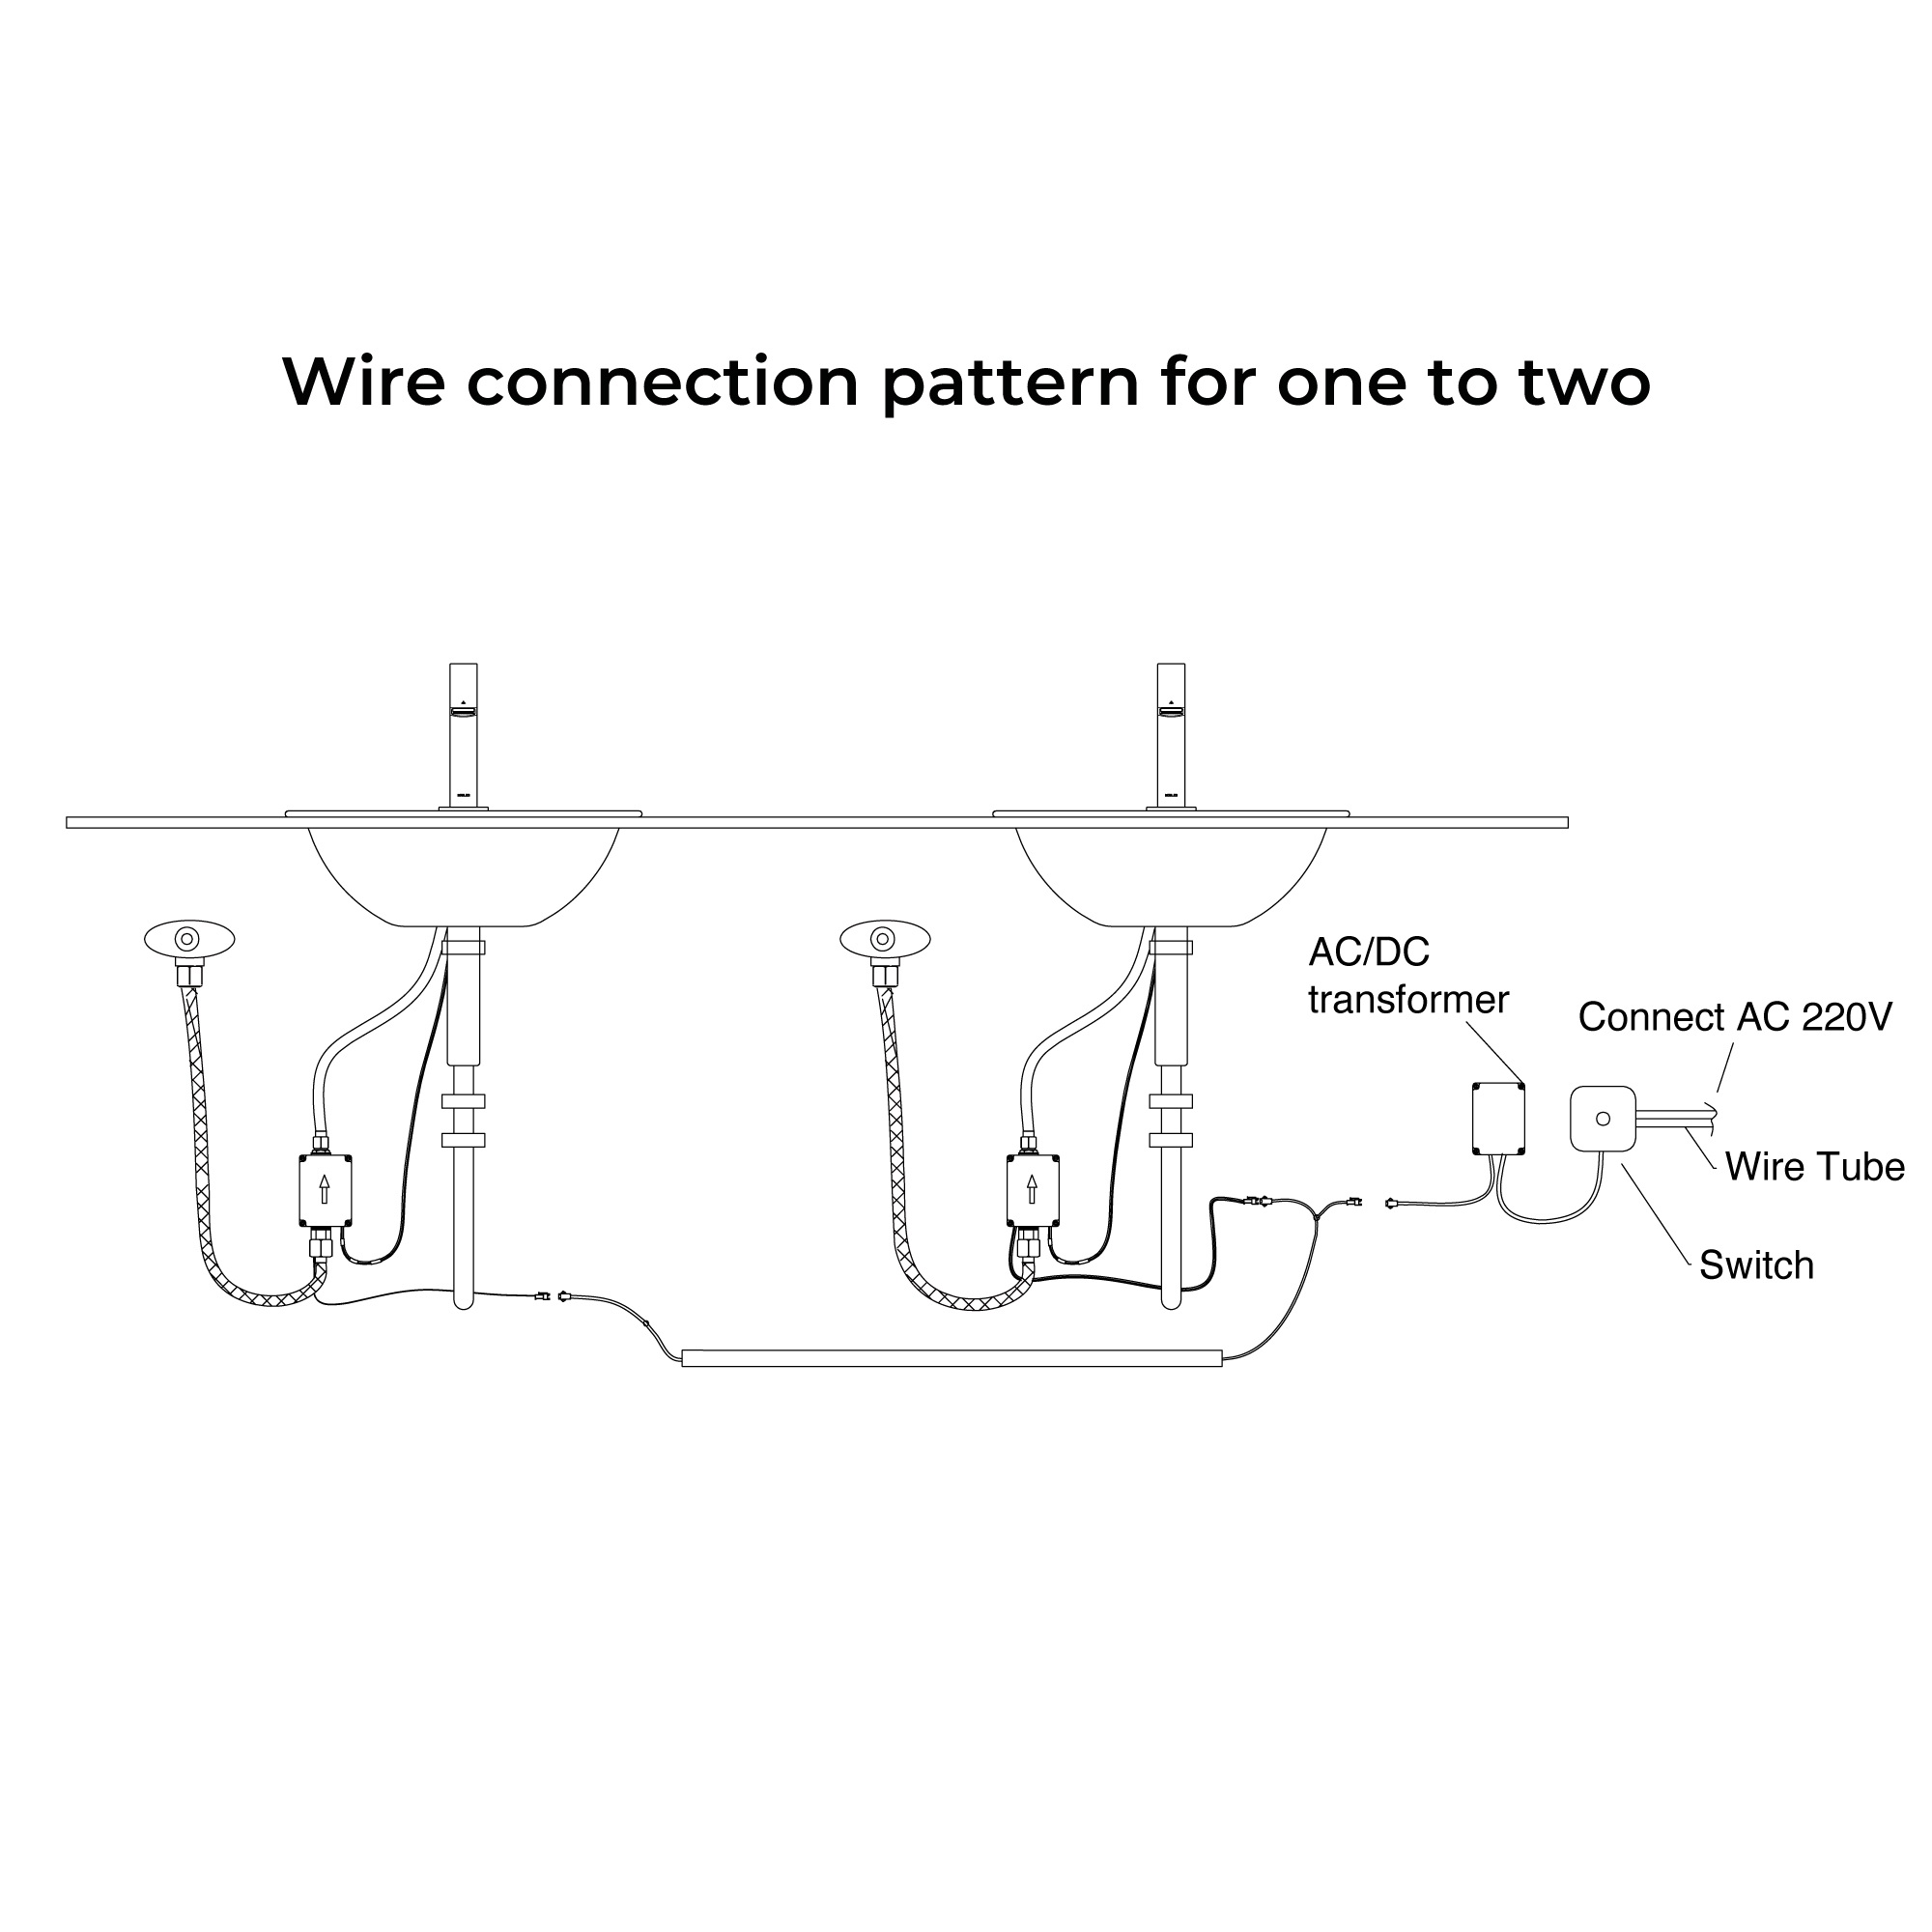
Step 12: (Multiple Faucet Connection)
| |
 |
|
 | |
|
|
| |
|
|
|
| |
|
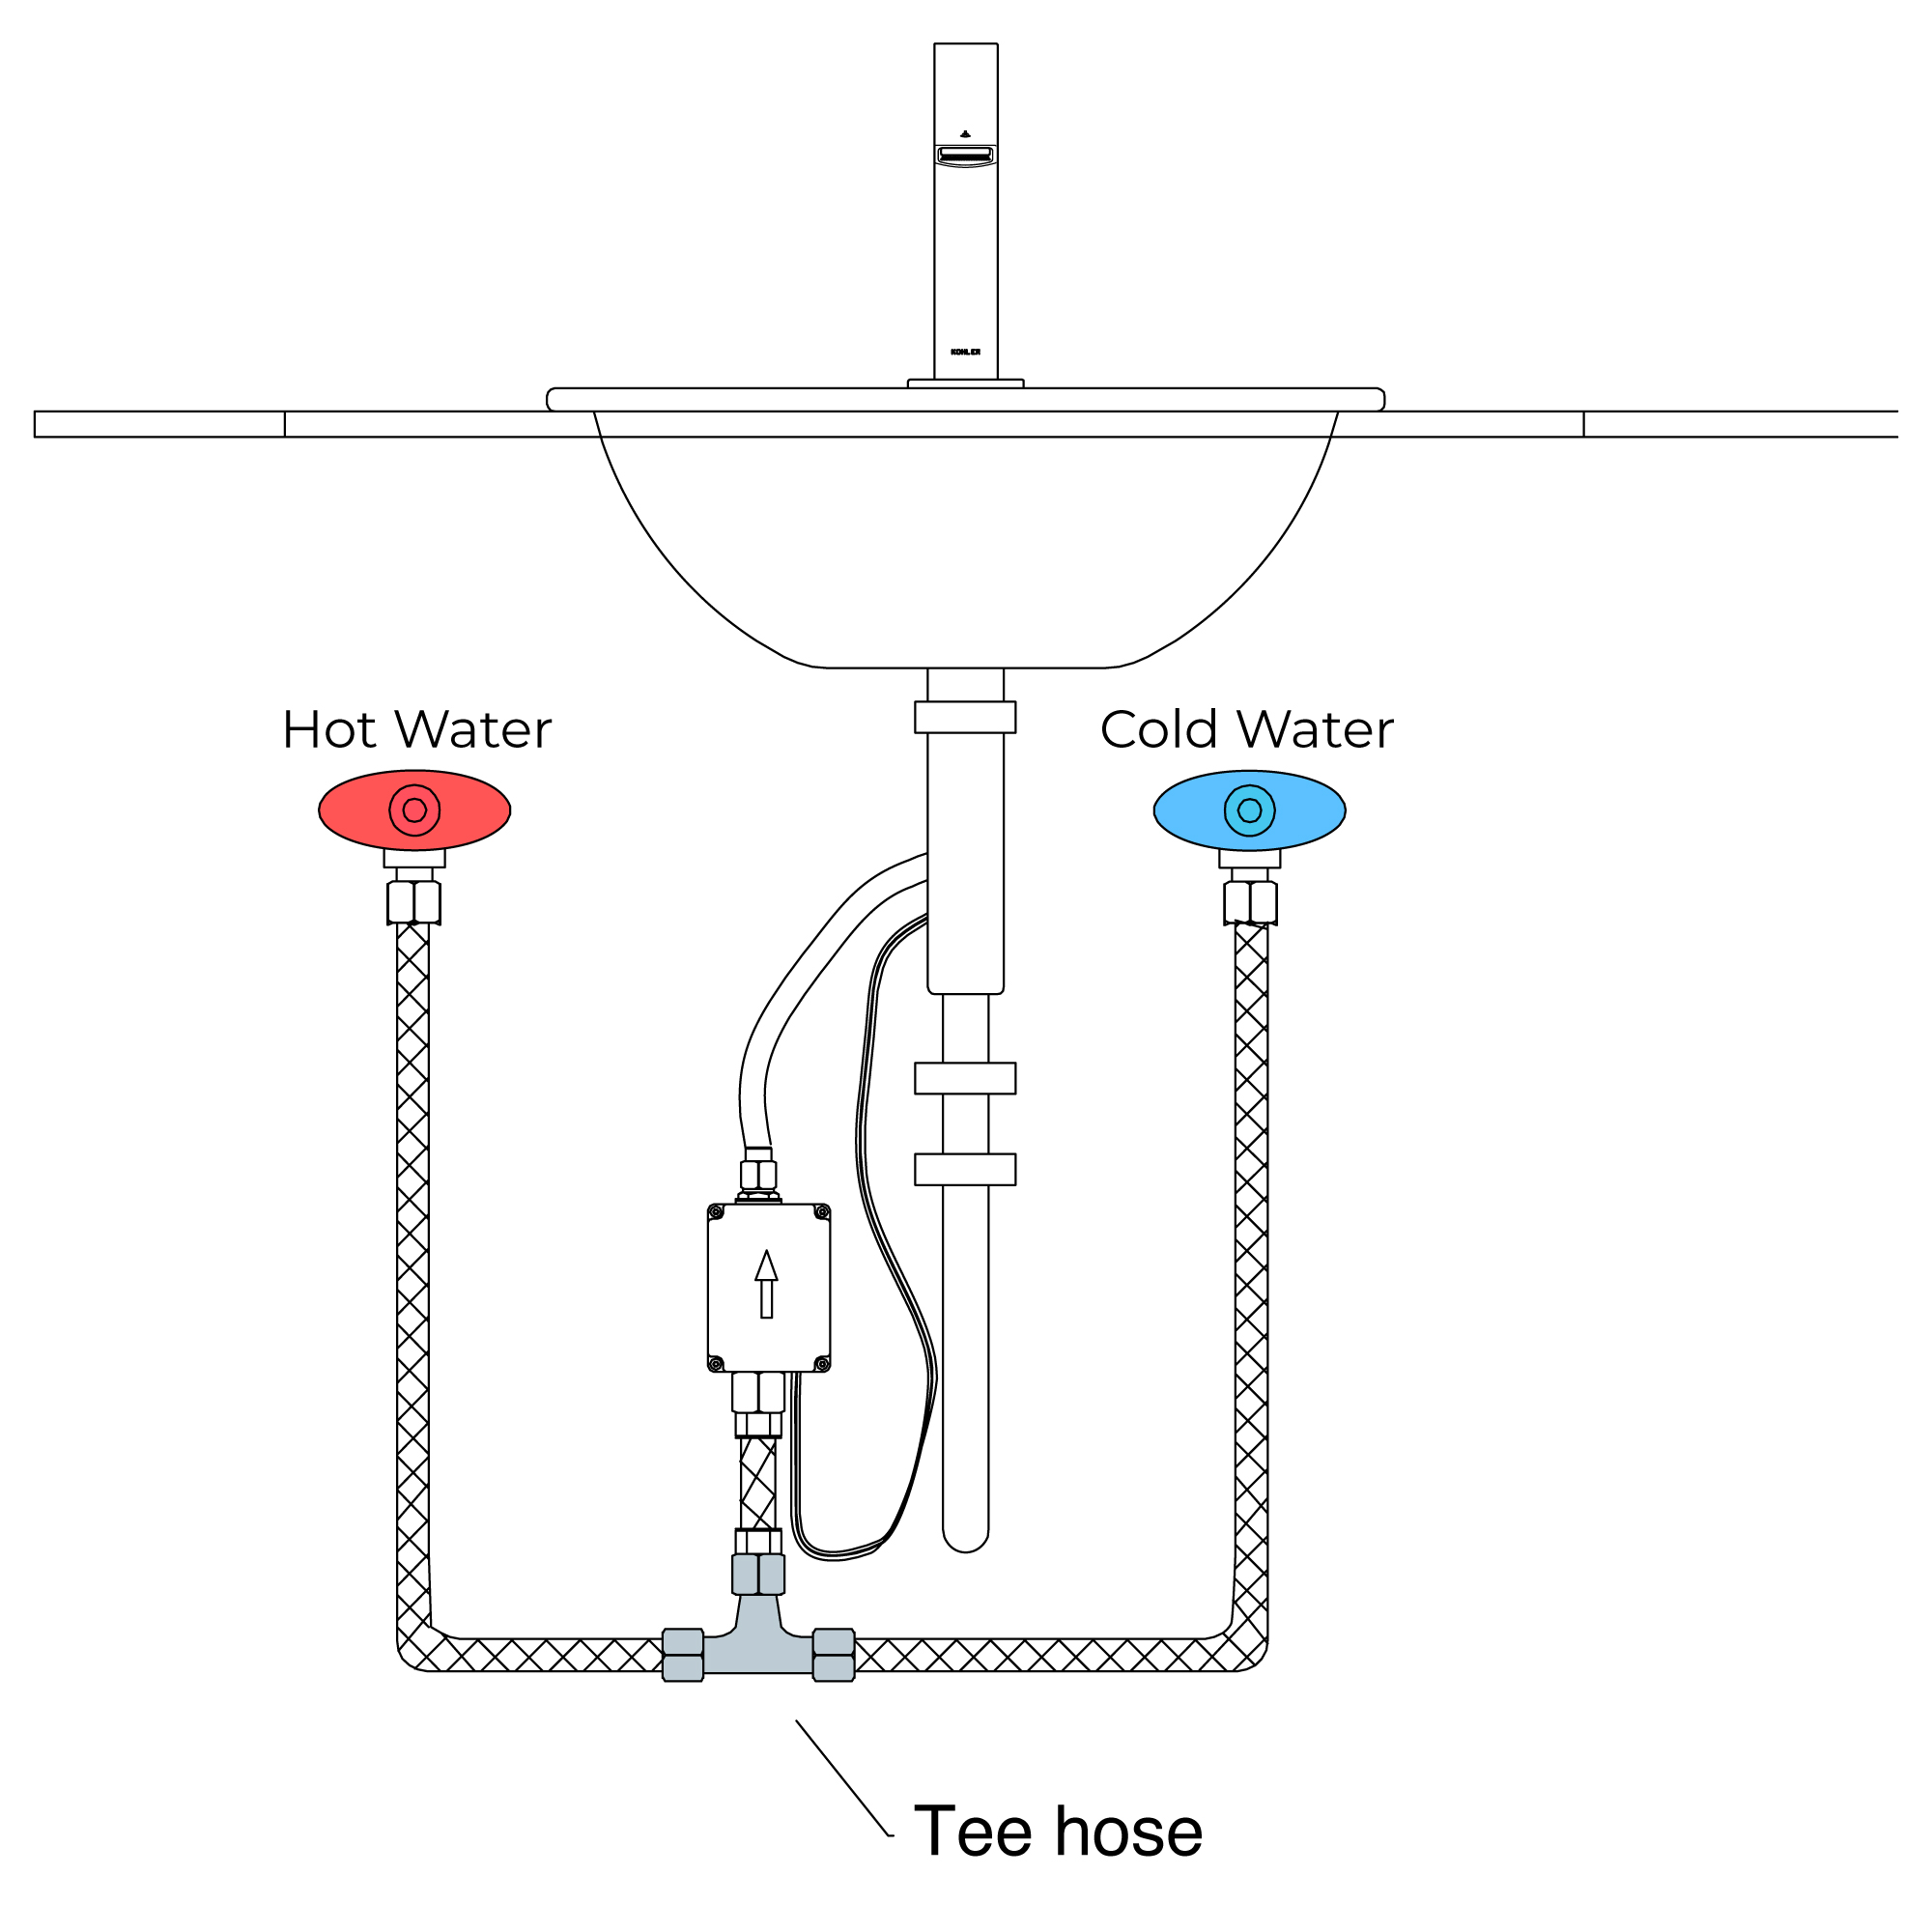
Step 13: (Hot & Cold Connection)
|
|
| |
| | | |
1. Note of the Indicator Flashing
The indicator is the only and effective way to learn the faucet's working conditions. So the users can use the sensor faucet correctly with knowing the meaning of the sensor indicator's flashing.
(1) Fast flashing means the faucet is in the period of adjusting sensing distance after power on for 2 minutes. During these 2 minutes, please do not put objects in the sensing range.
(2) The indicator flashes every 2 seconds: As for DC type faucets, the symptom indicates that the unit is out of battery and ceases working. Recommend to replace batteries. As for AC type faucets, there're two possibilities. One possibility is that the unit is out of battery while the other is that bad wire connection occurs to DC terminal of the power box provided AC supply functions normally.
(3) In normal conditions, the water will flow and the indicator will flash one time when objects are inducted. (The indicator does not flash when faucet stops flowing.)
2. Overtime Flowing Control
When the faucet works for about 1 minute continuously, the water will be shut off automatically. After that, objects must be removed from the sensing range. Then the water will flow when objects go into the sensing range again. Otherwise, the faucet will not work.
3. Intelligent Stopping Flowing
Water will flow out when objects are put into the sensing range. If the objects hold still for 15 seconds, the faucet will shut off automatically. After that, objects must be removed from the sensing range. Then the water will flow when objects go into the sensing range again. Otherwise, the faucet will not work.
4. Clean the Filtration System
The faucet includes a connector assembly with a high-quality filtration system. If there is a lot of debris in the supply pipes or the quality of water is bad, it will cause the flow in bad condition. Please clean the filtration system as the following steps:
(1) Turn clockwise the adjustment bolts on the connector assemblies with the hex wrench, in order to close the connector assemblies;
(2) Screw off the connector caps counterclockwise with the special key;
(3) Remove and clean the filters, then reinstall them;
(4) Tighten the connector caps clockwise with the special key. Turn counterclockwise the adjustment bolts on connector assemblies with the hex wrench.
If necessary, then reinstall it to improve the flow condition.
Note: the strainer must be fit back to the spout after it is cleaned.
|
|
|
Flexible Connecting Hose
Care must be taken when connecting the flexible connection hose from the power supply box to the spout to ensure it does not bend sharply and kink or twist.
See above for recommended ways to fit the flexible connecting hose.
Important: Failure to follow these guidelines may result in poor performance and damage to the flexible connection hose.
|
|
|
Manual Soap Dispenser Installations Instructions
| Size: | | Parts: | | | 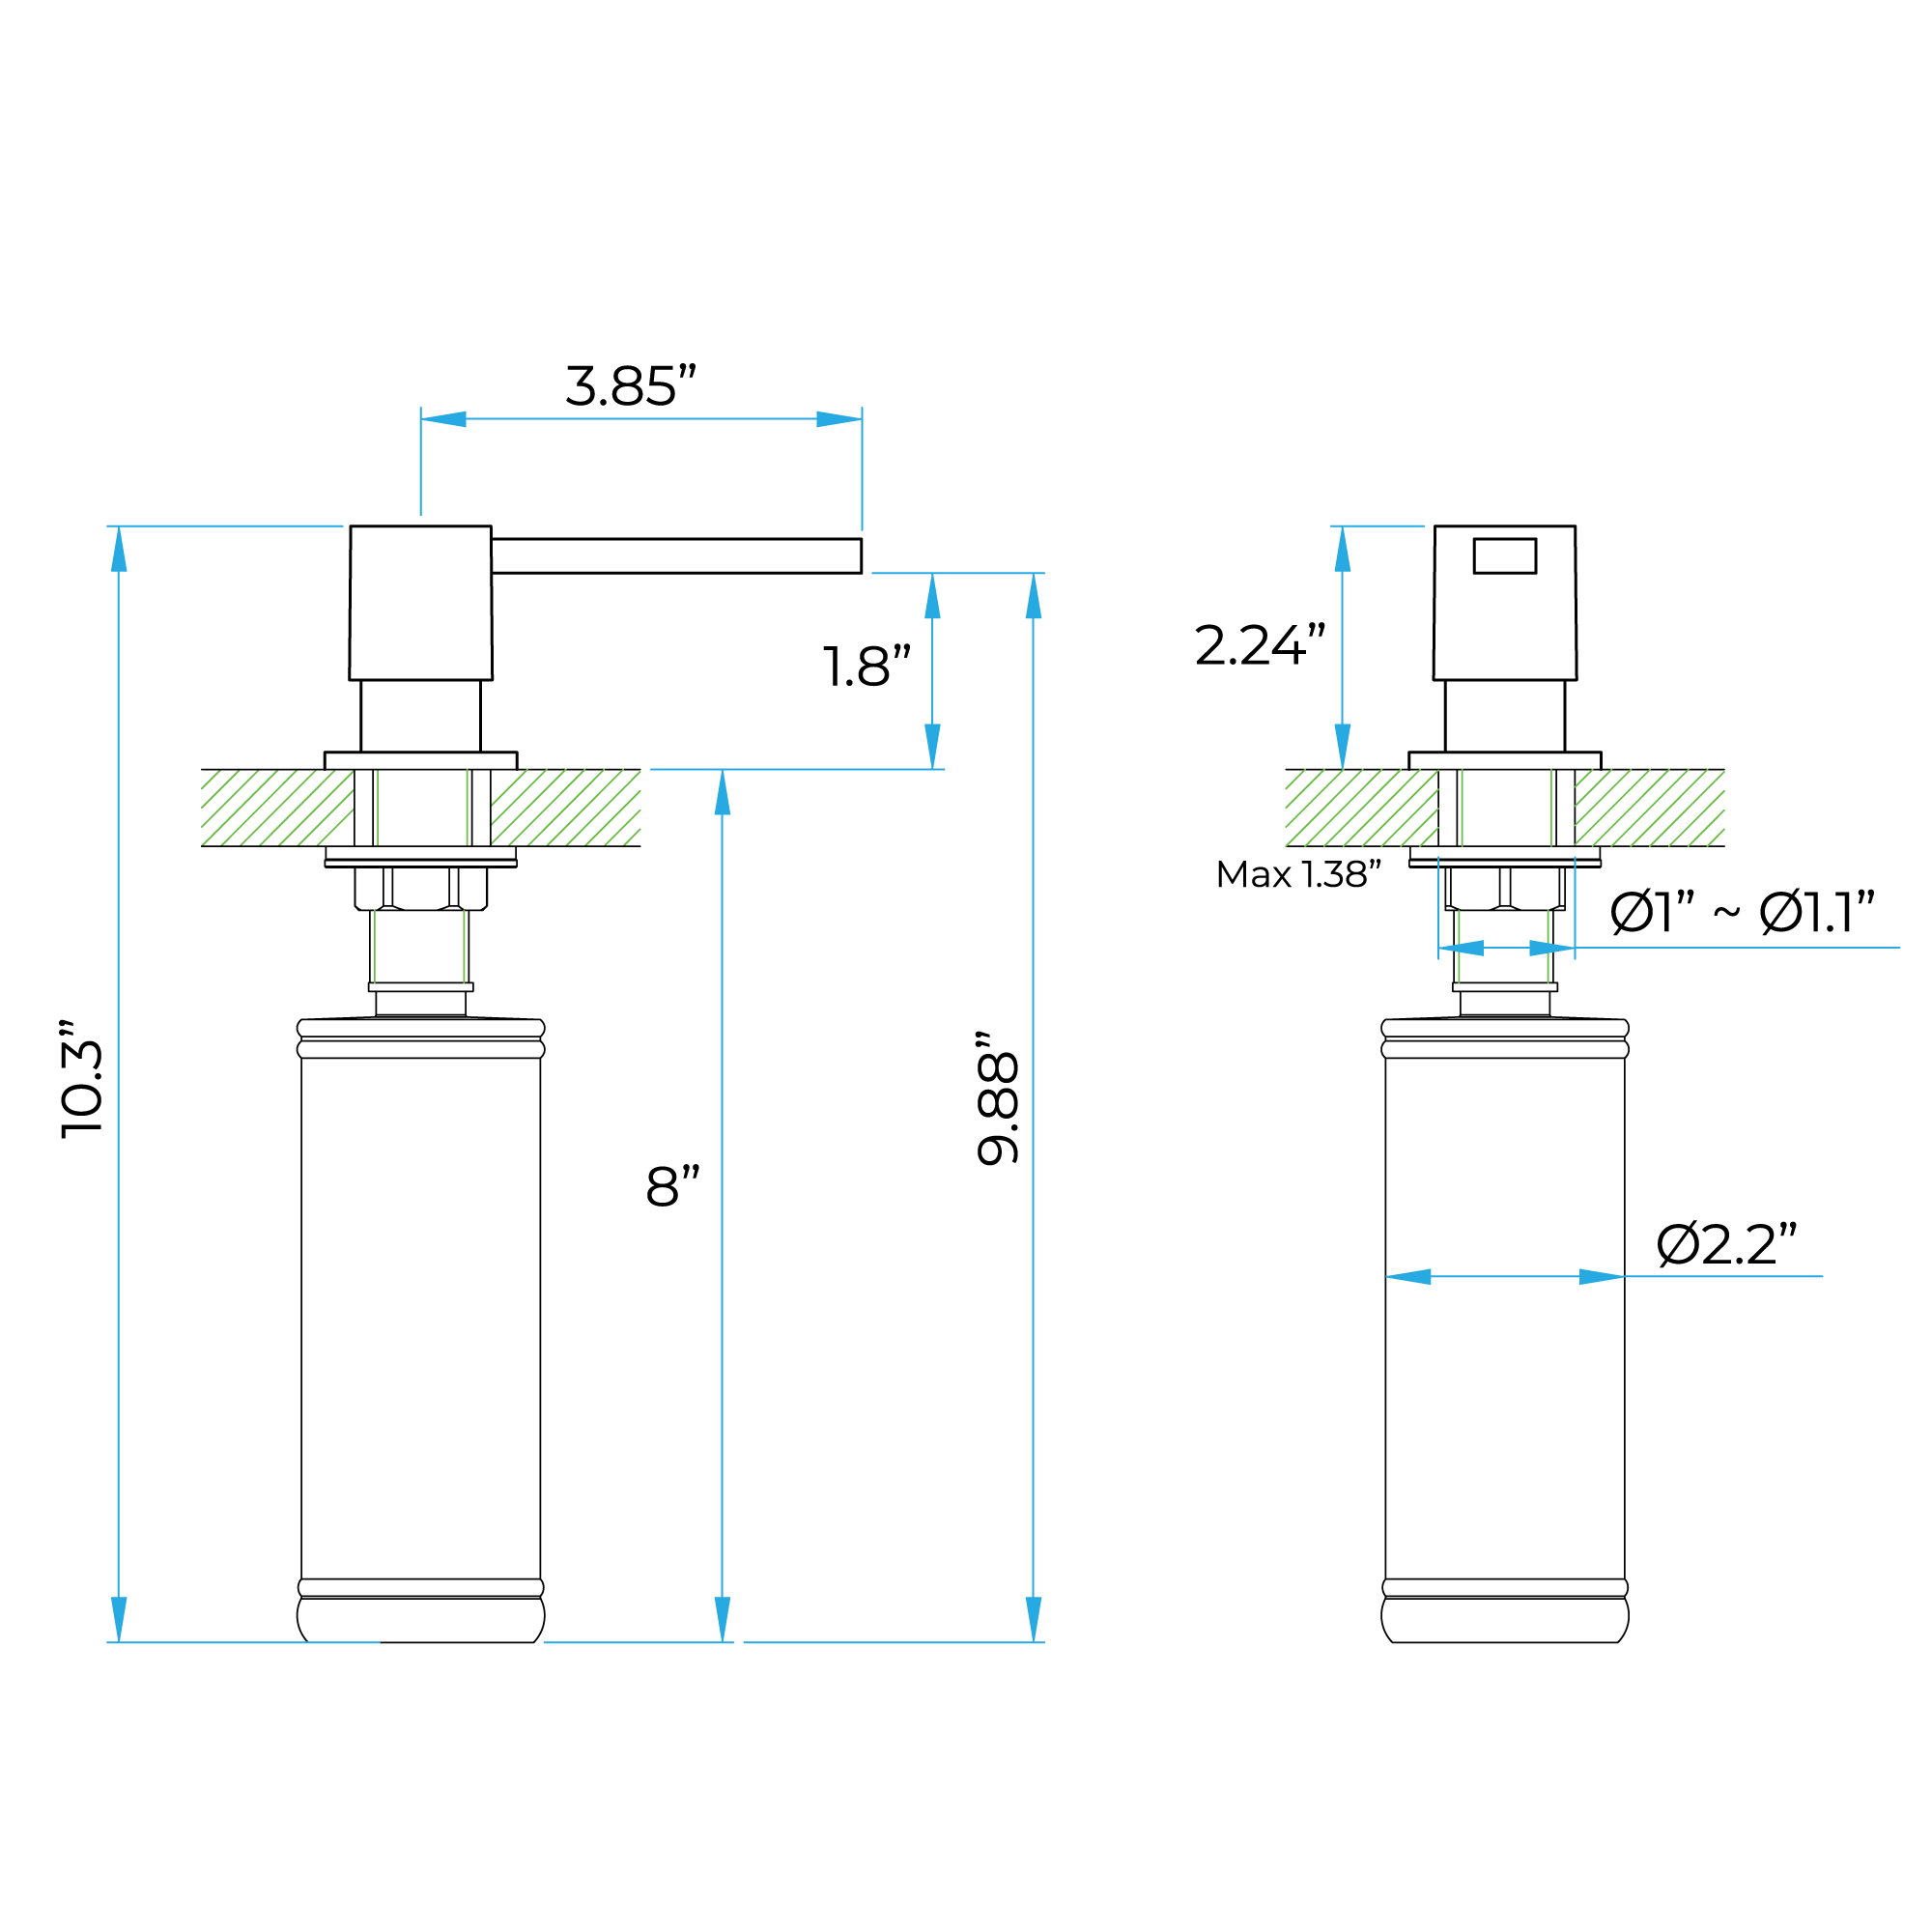 | soap
dispenser | 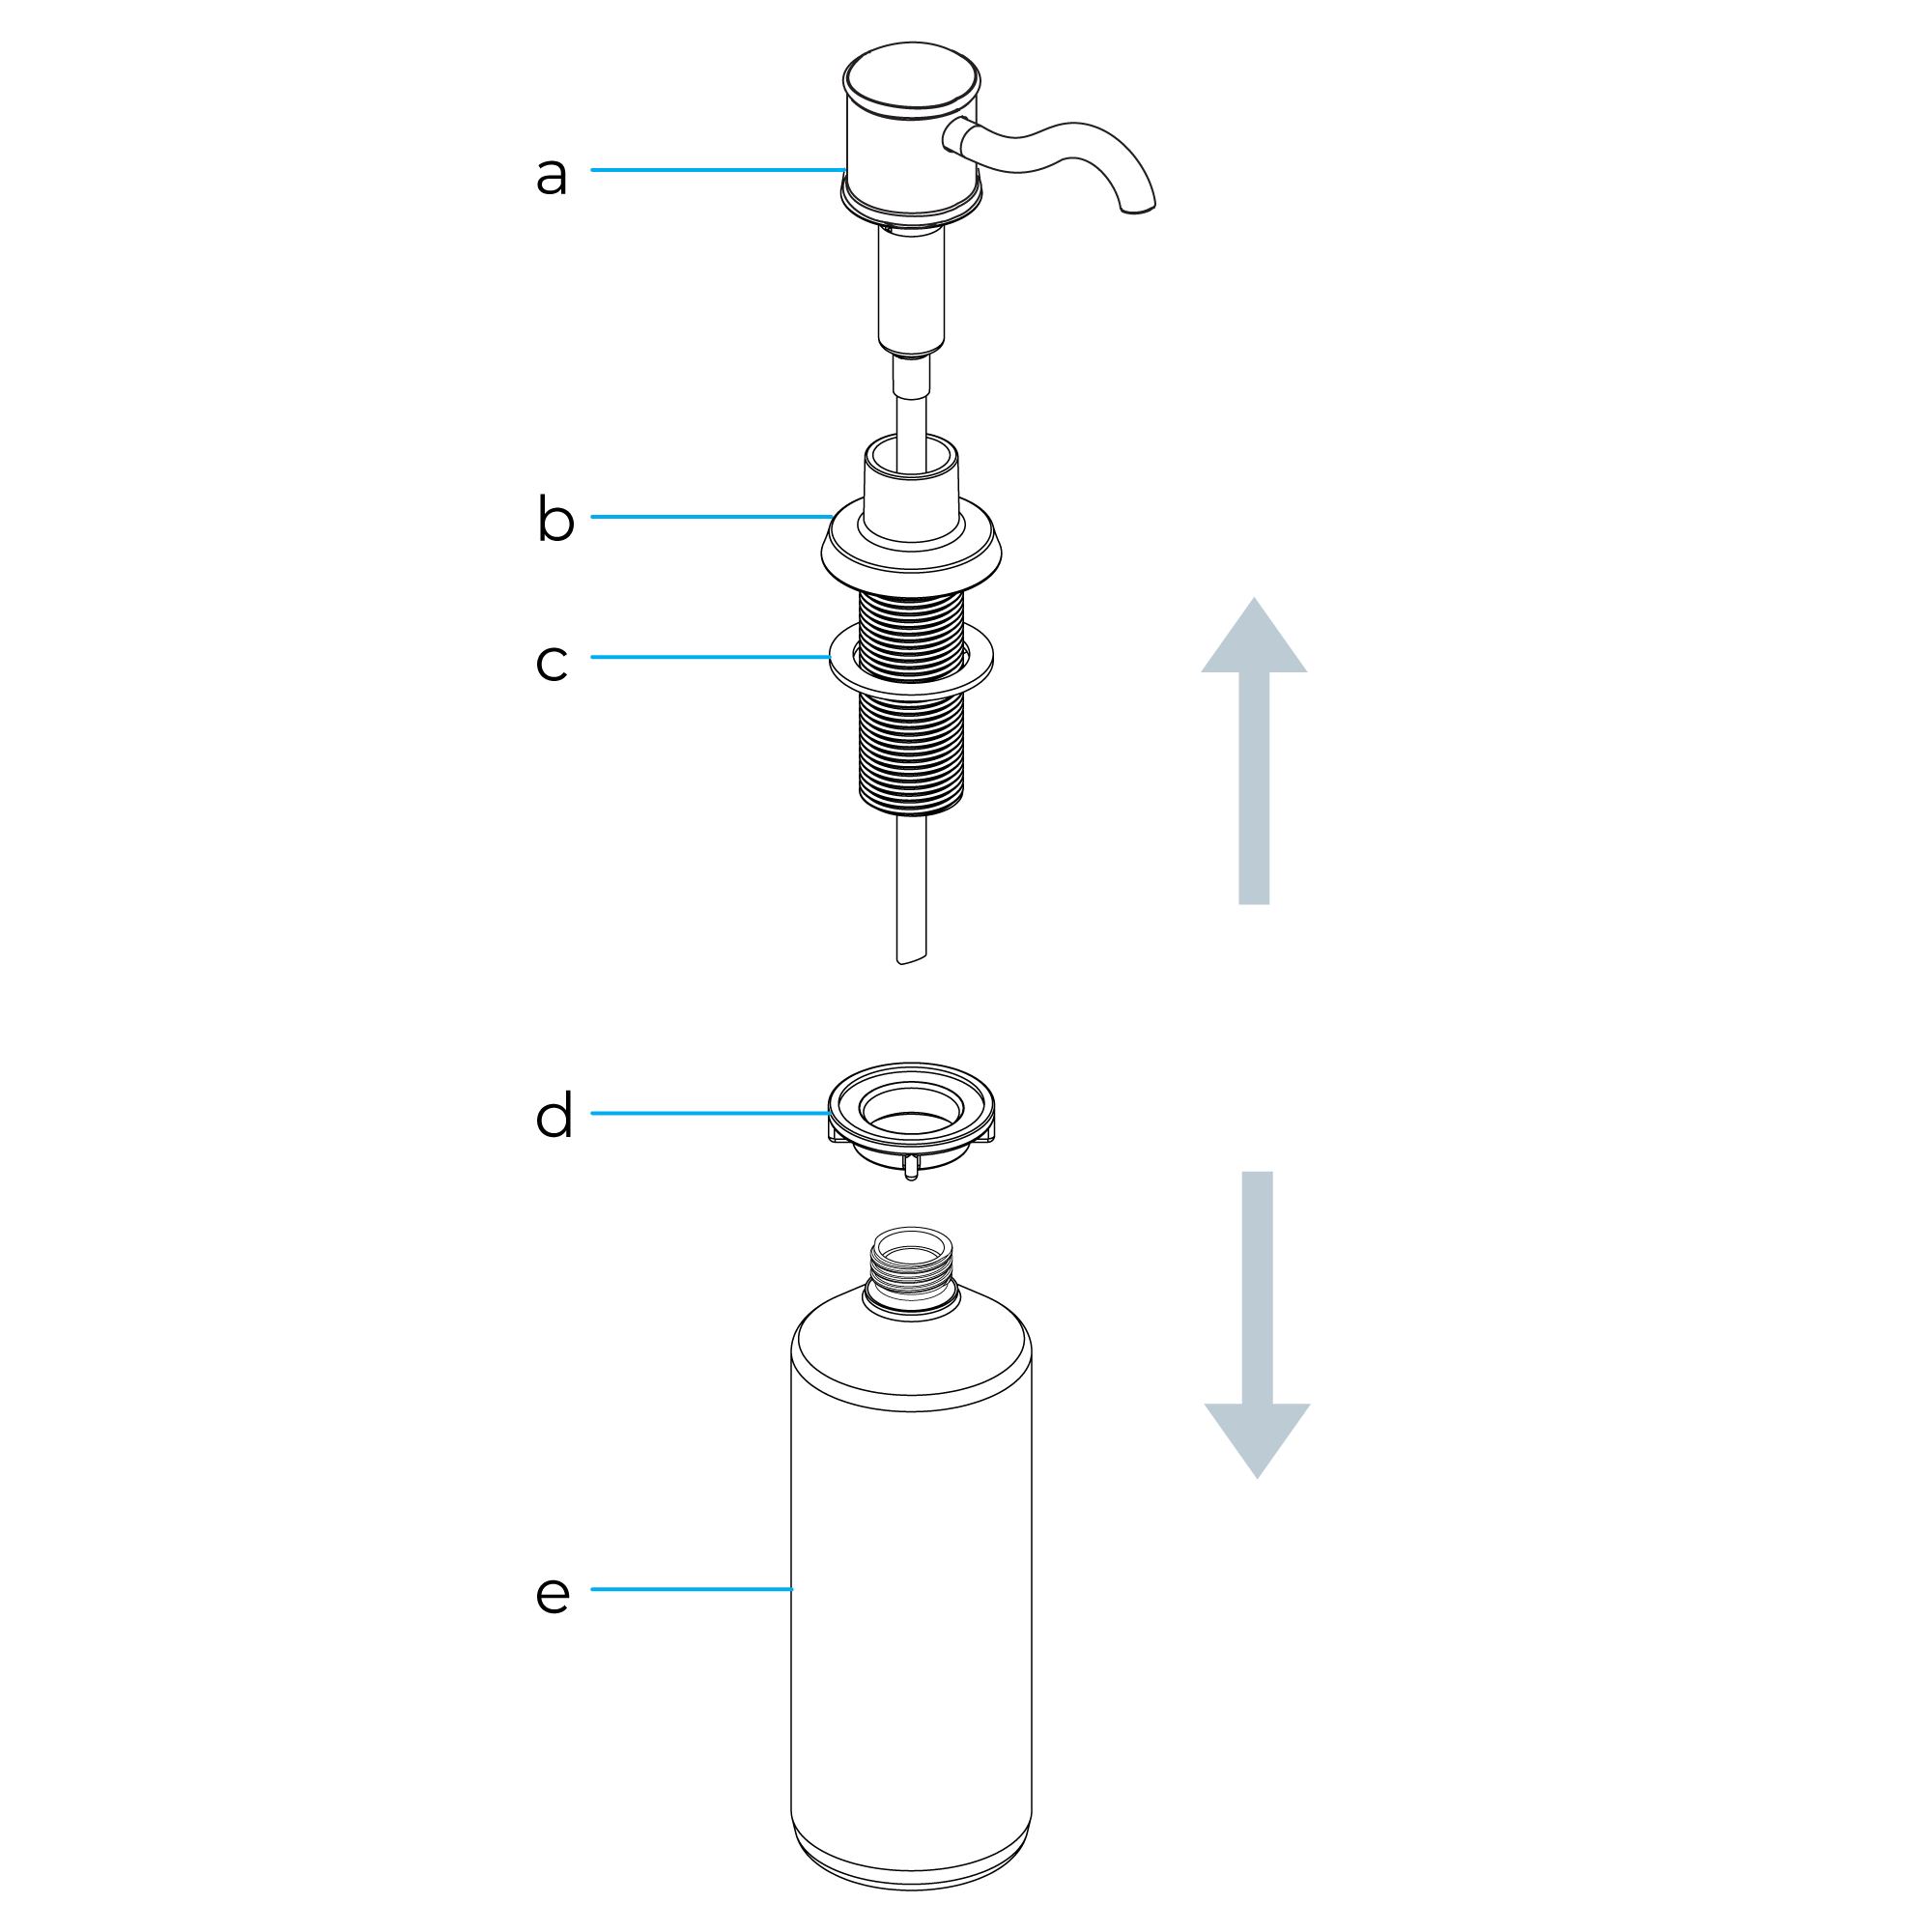 | a. Pump
b. Dispenser Base
c. Washer
d. Mounting Nut
e. Dispenser Bottle | |
| |
| | | | Step 1: | | Step 2: | | | 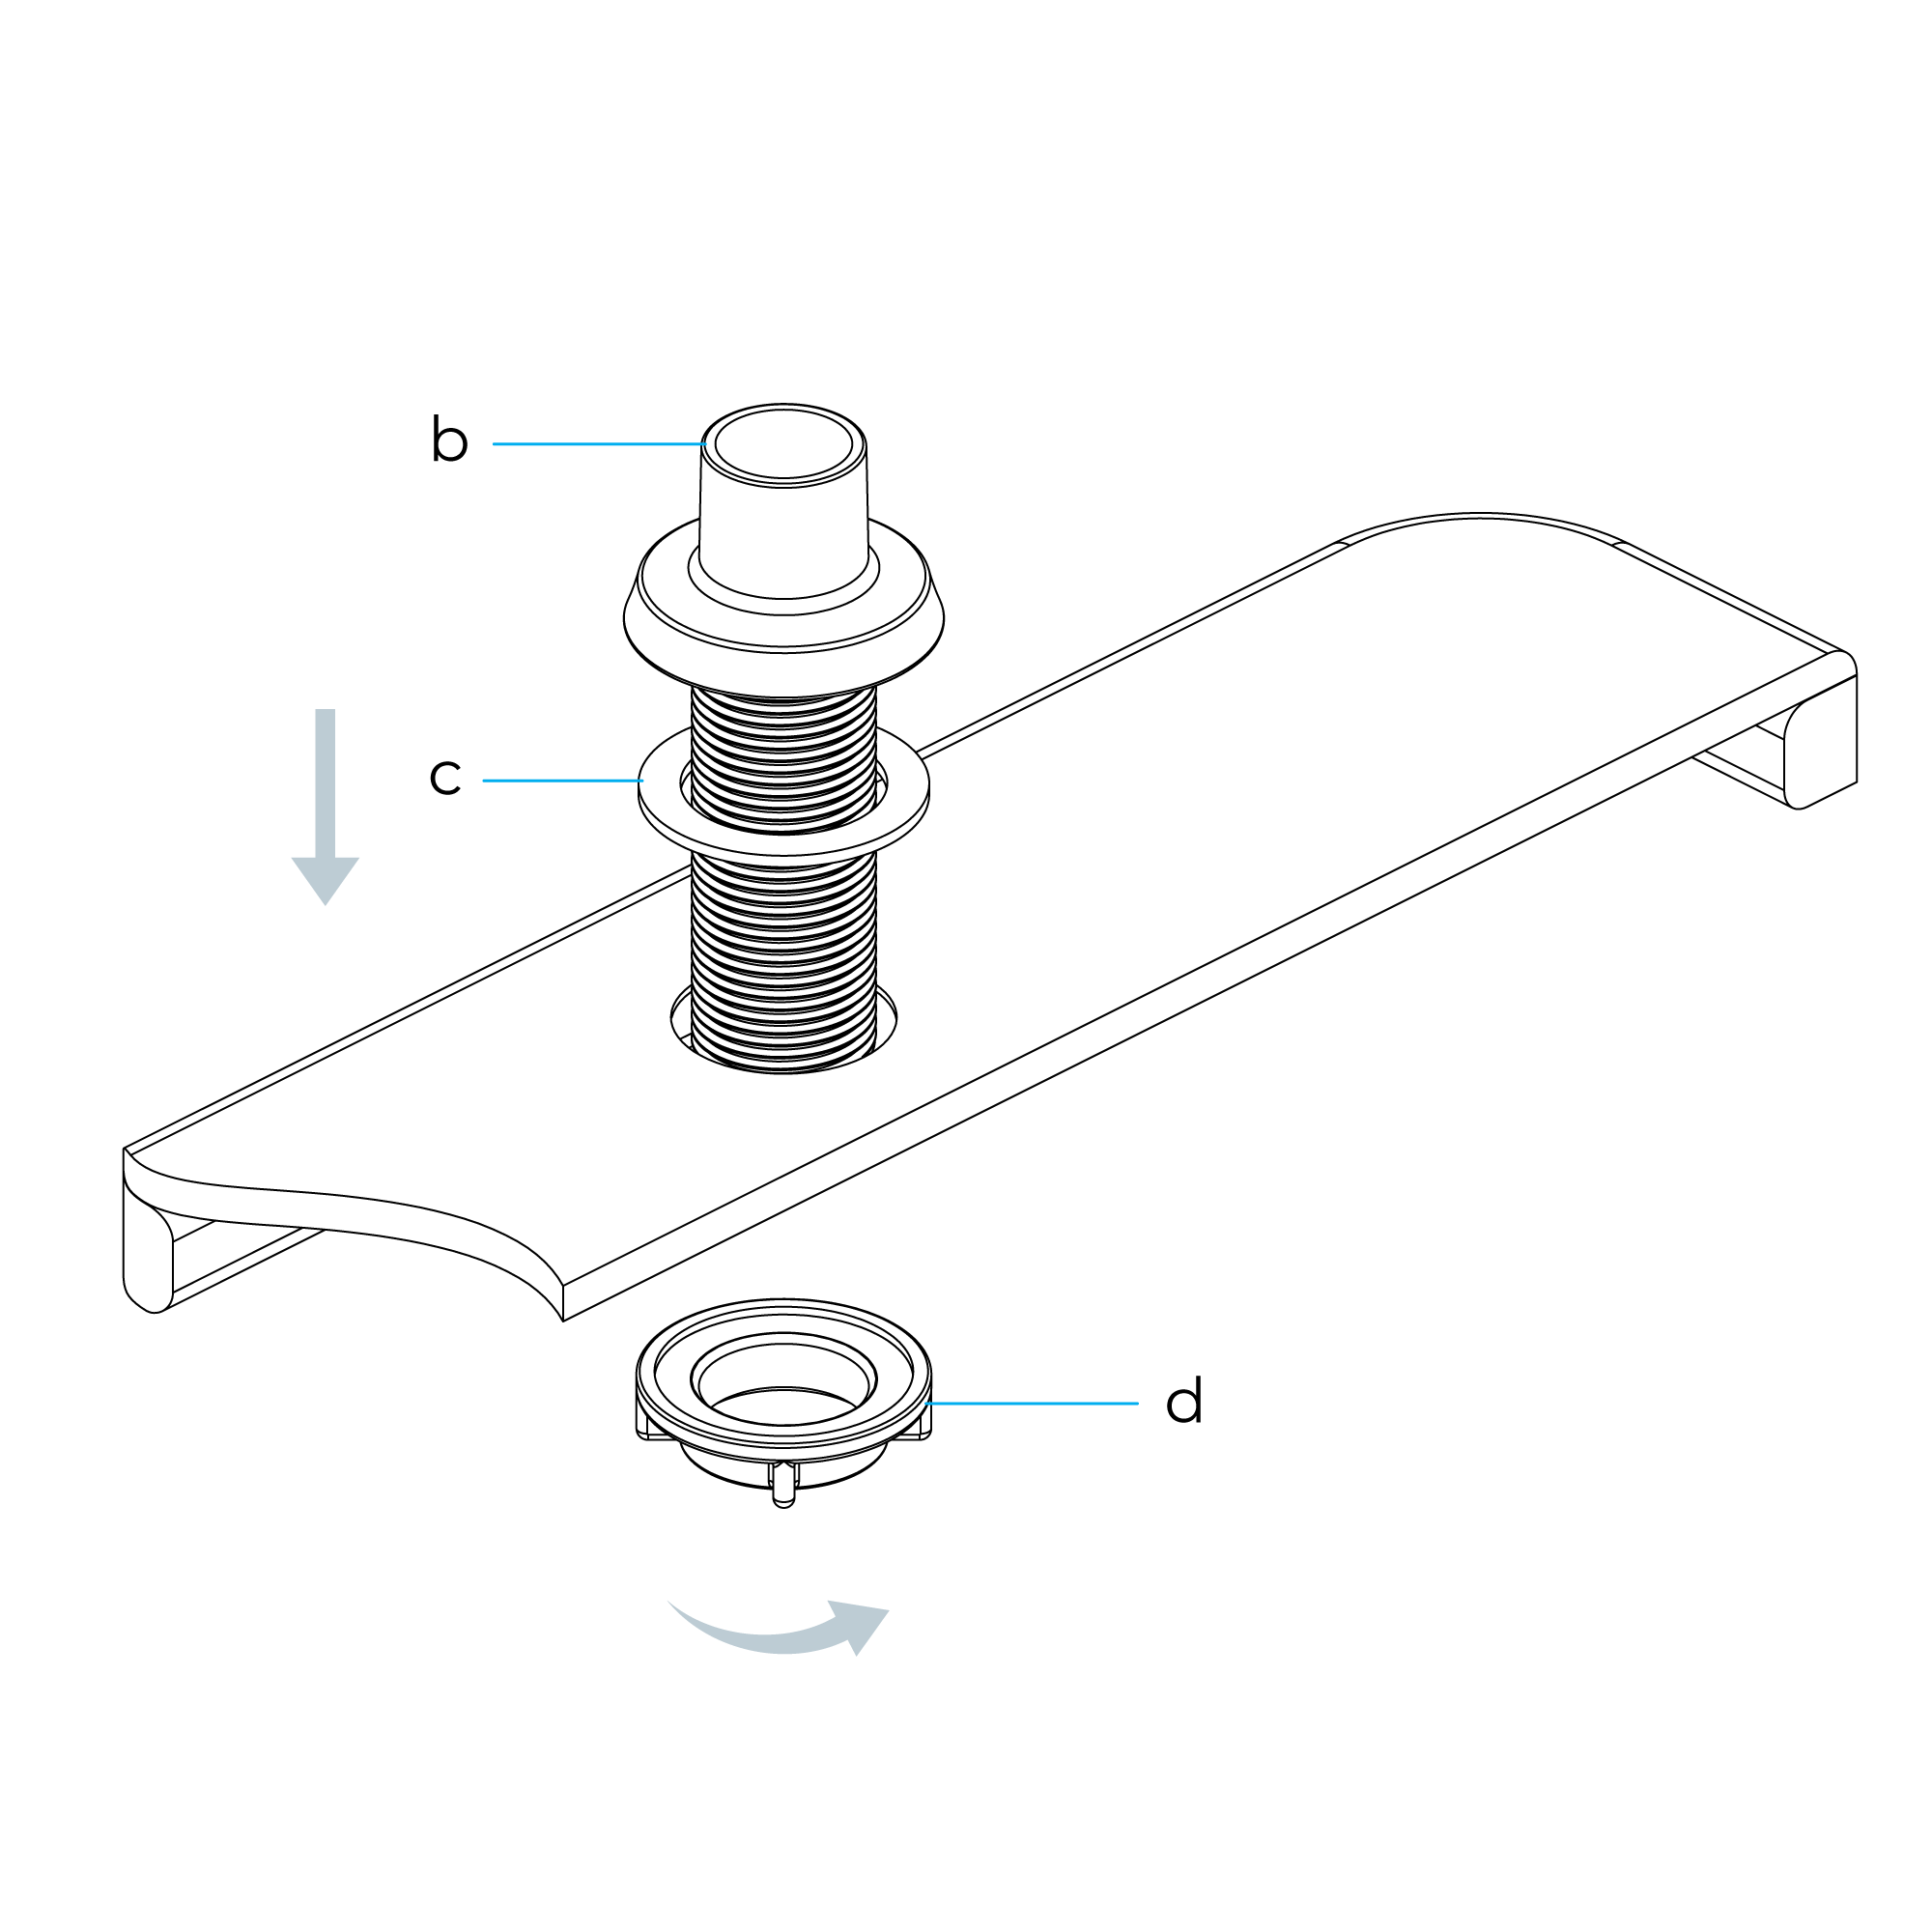 | |  | | |
|
|
| | | | Step 3: | | Step 4: | | | 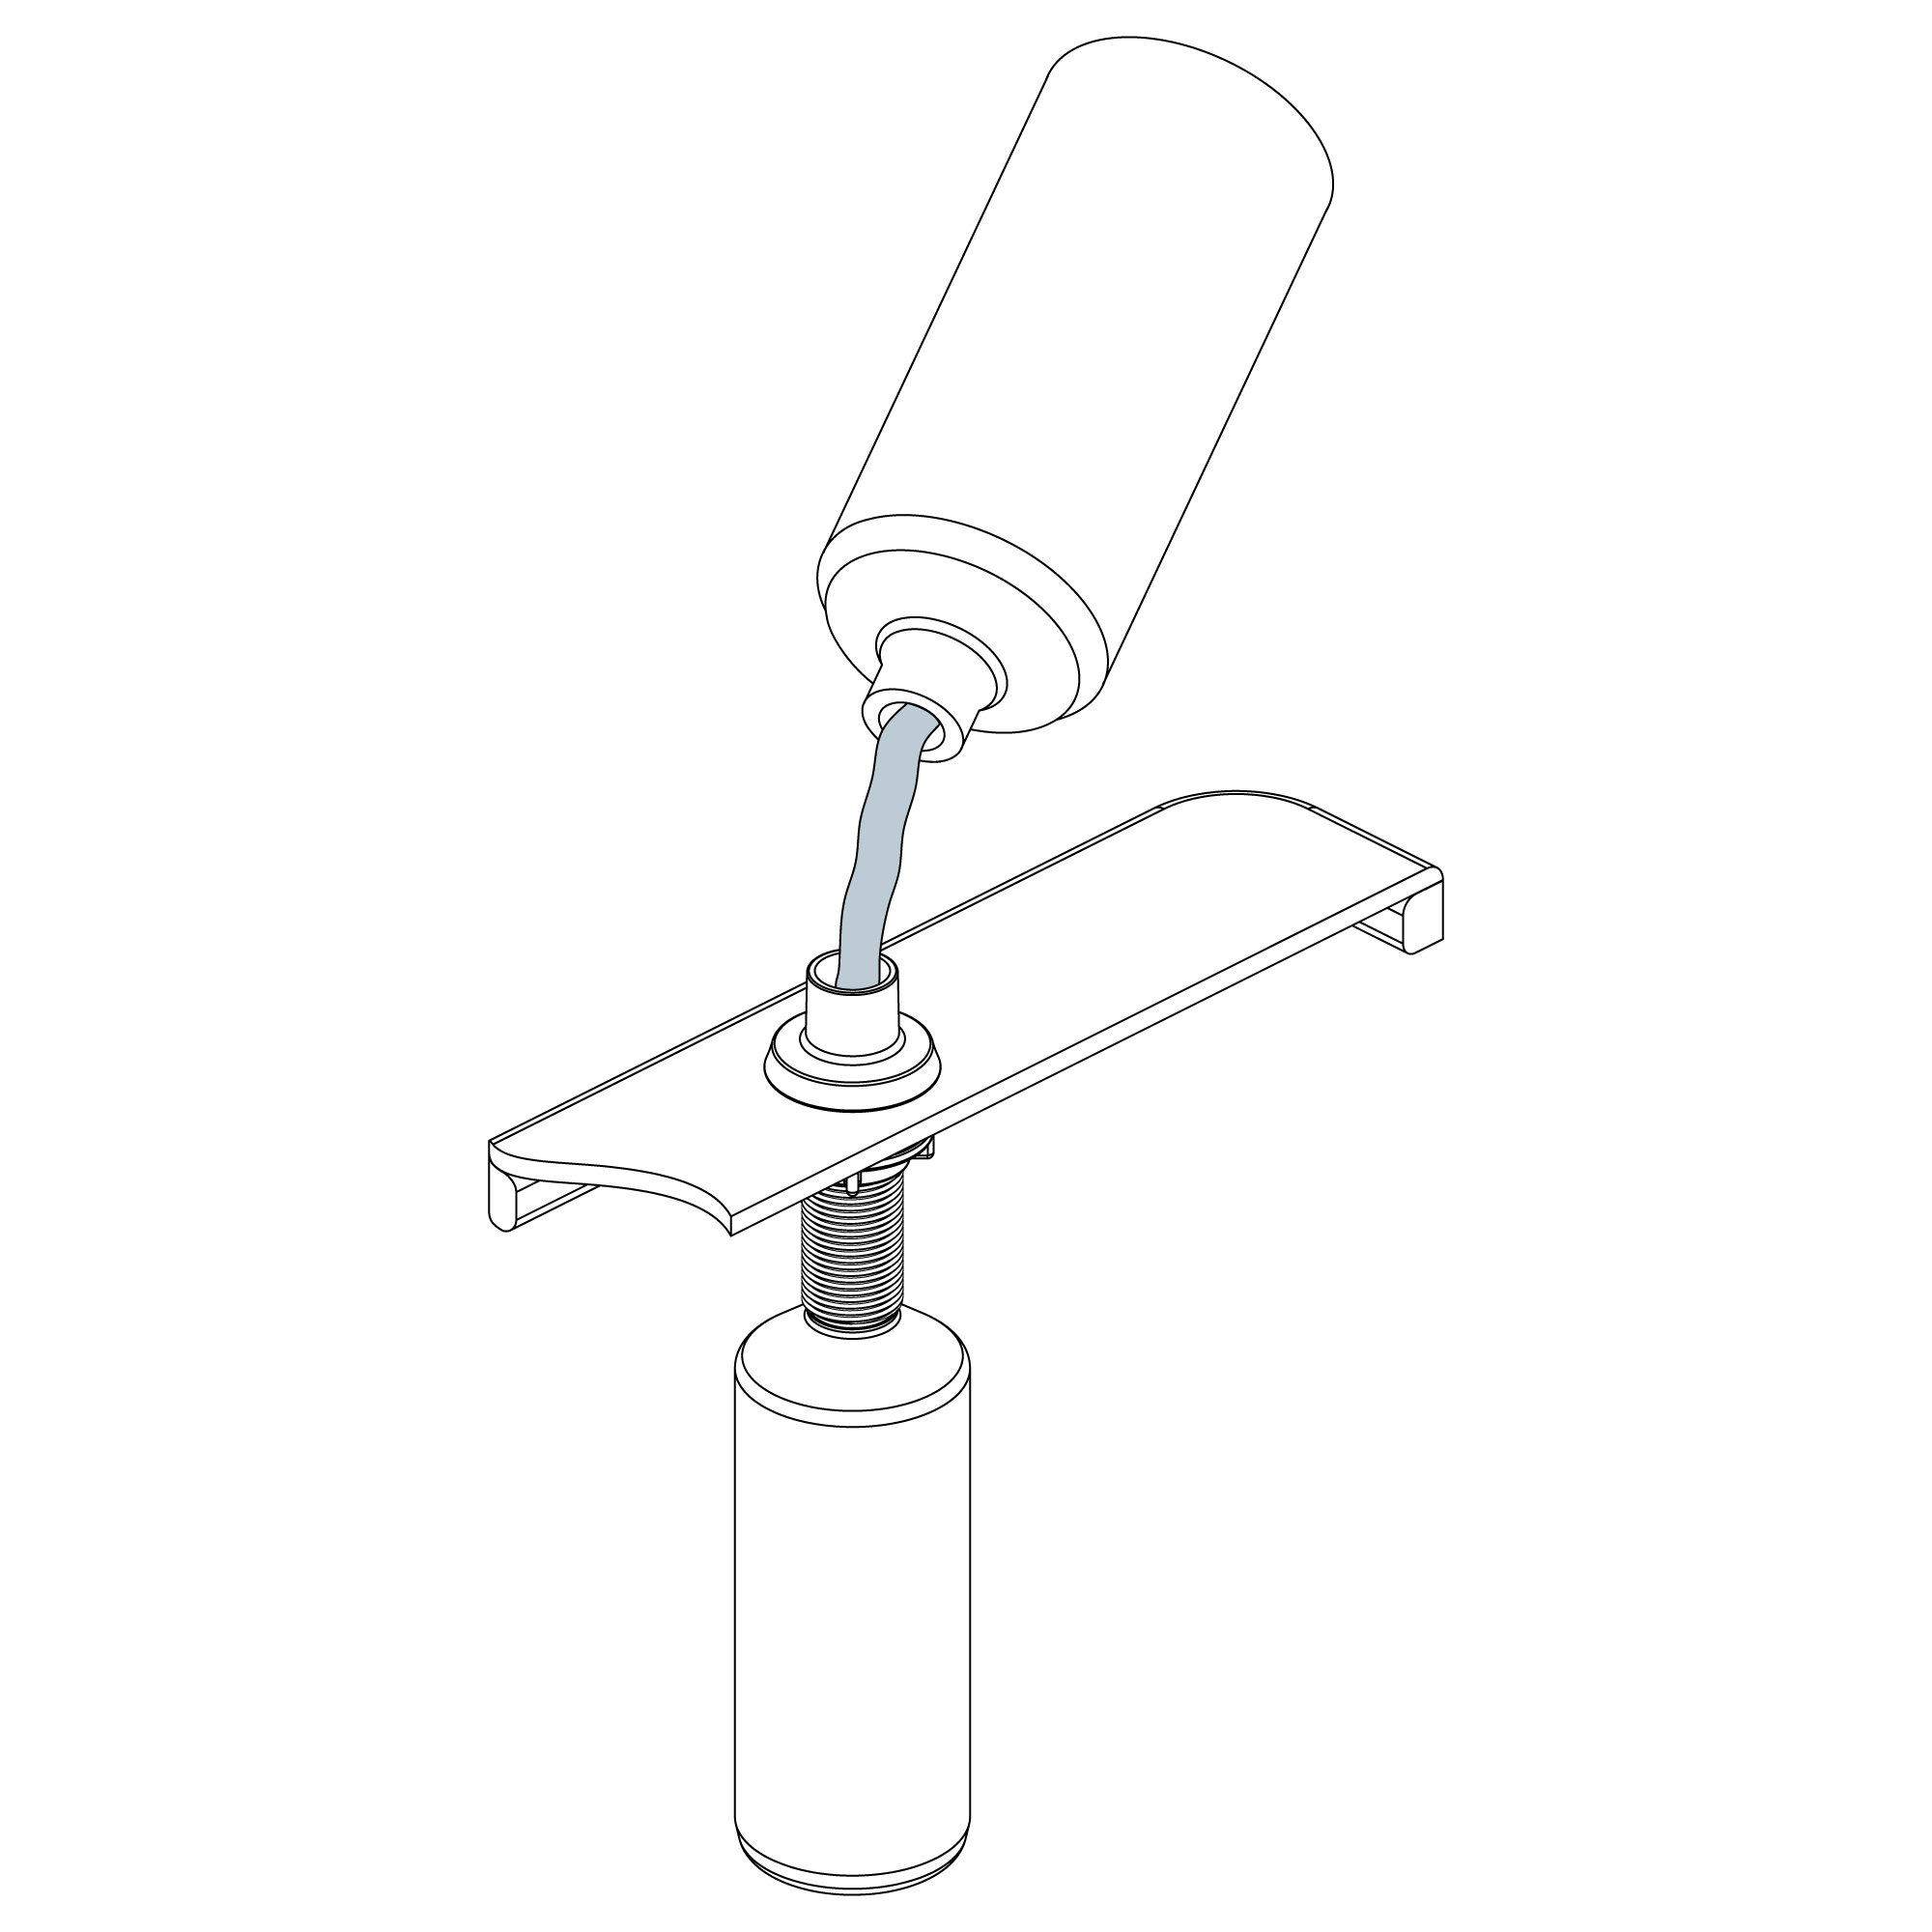 | | 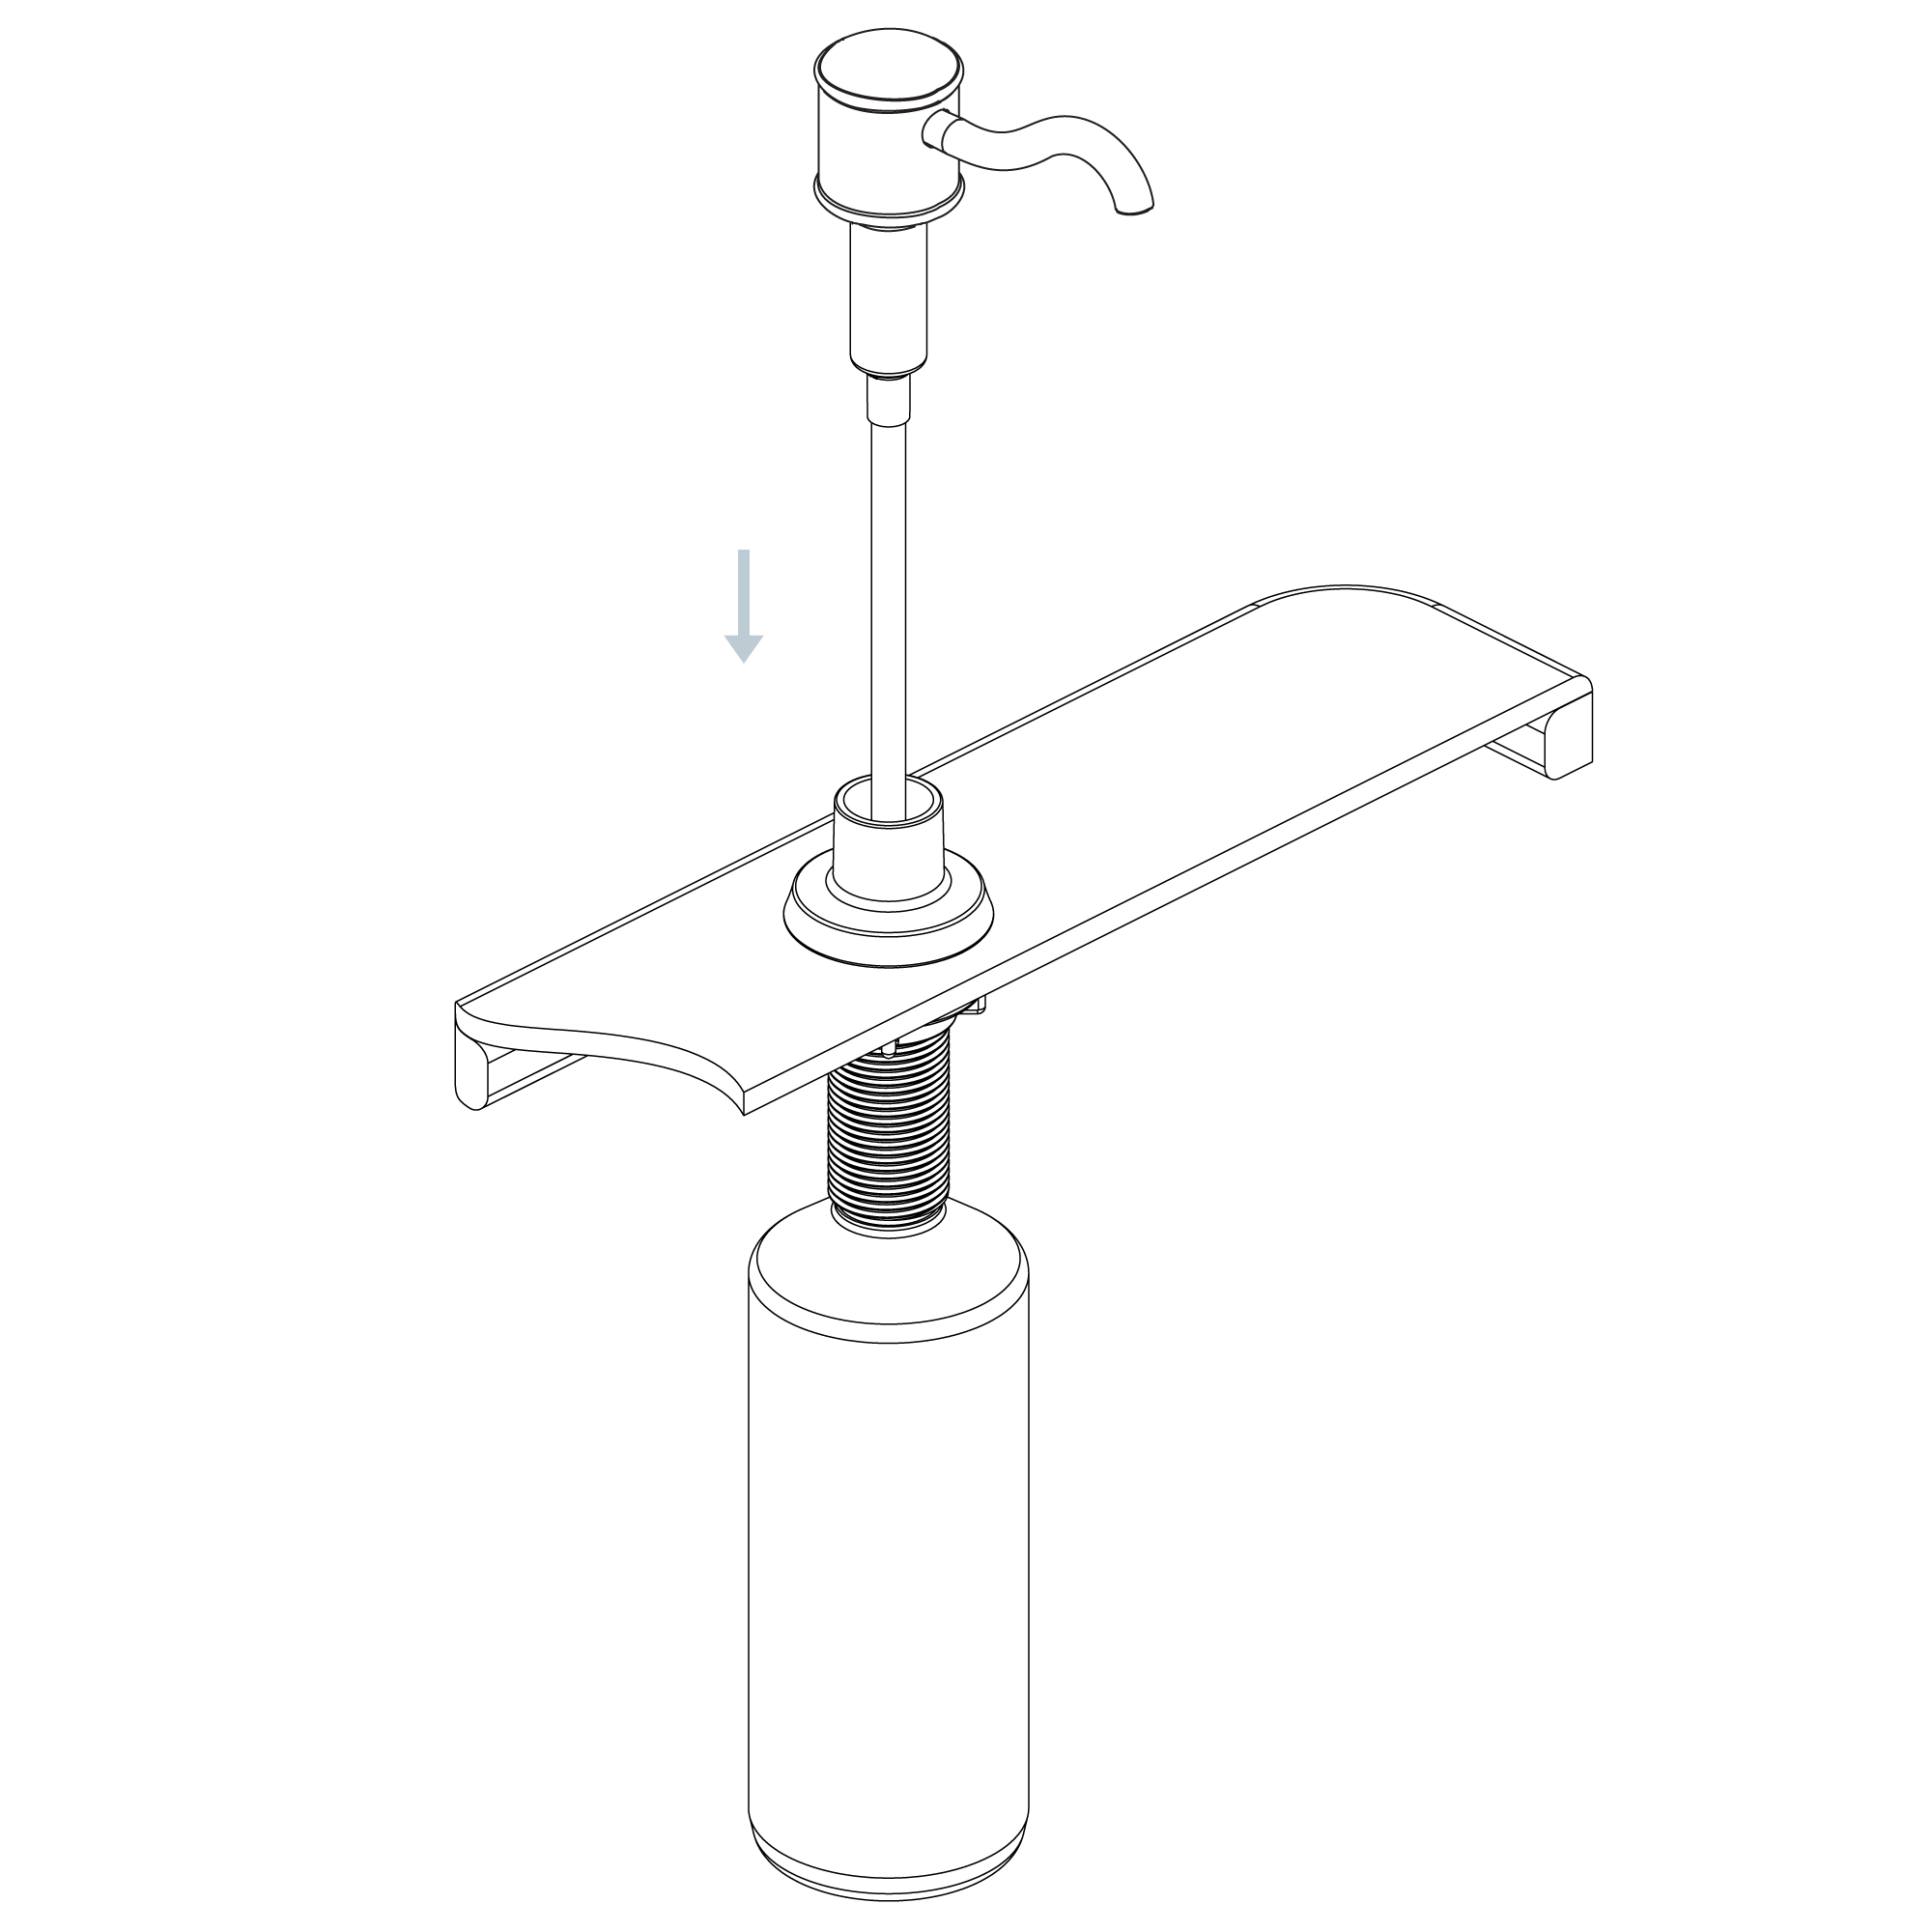 | | |
| |
| | | | | | | | | Step 5: | | | | | 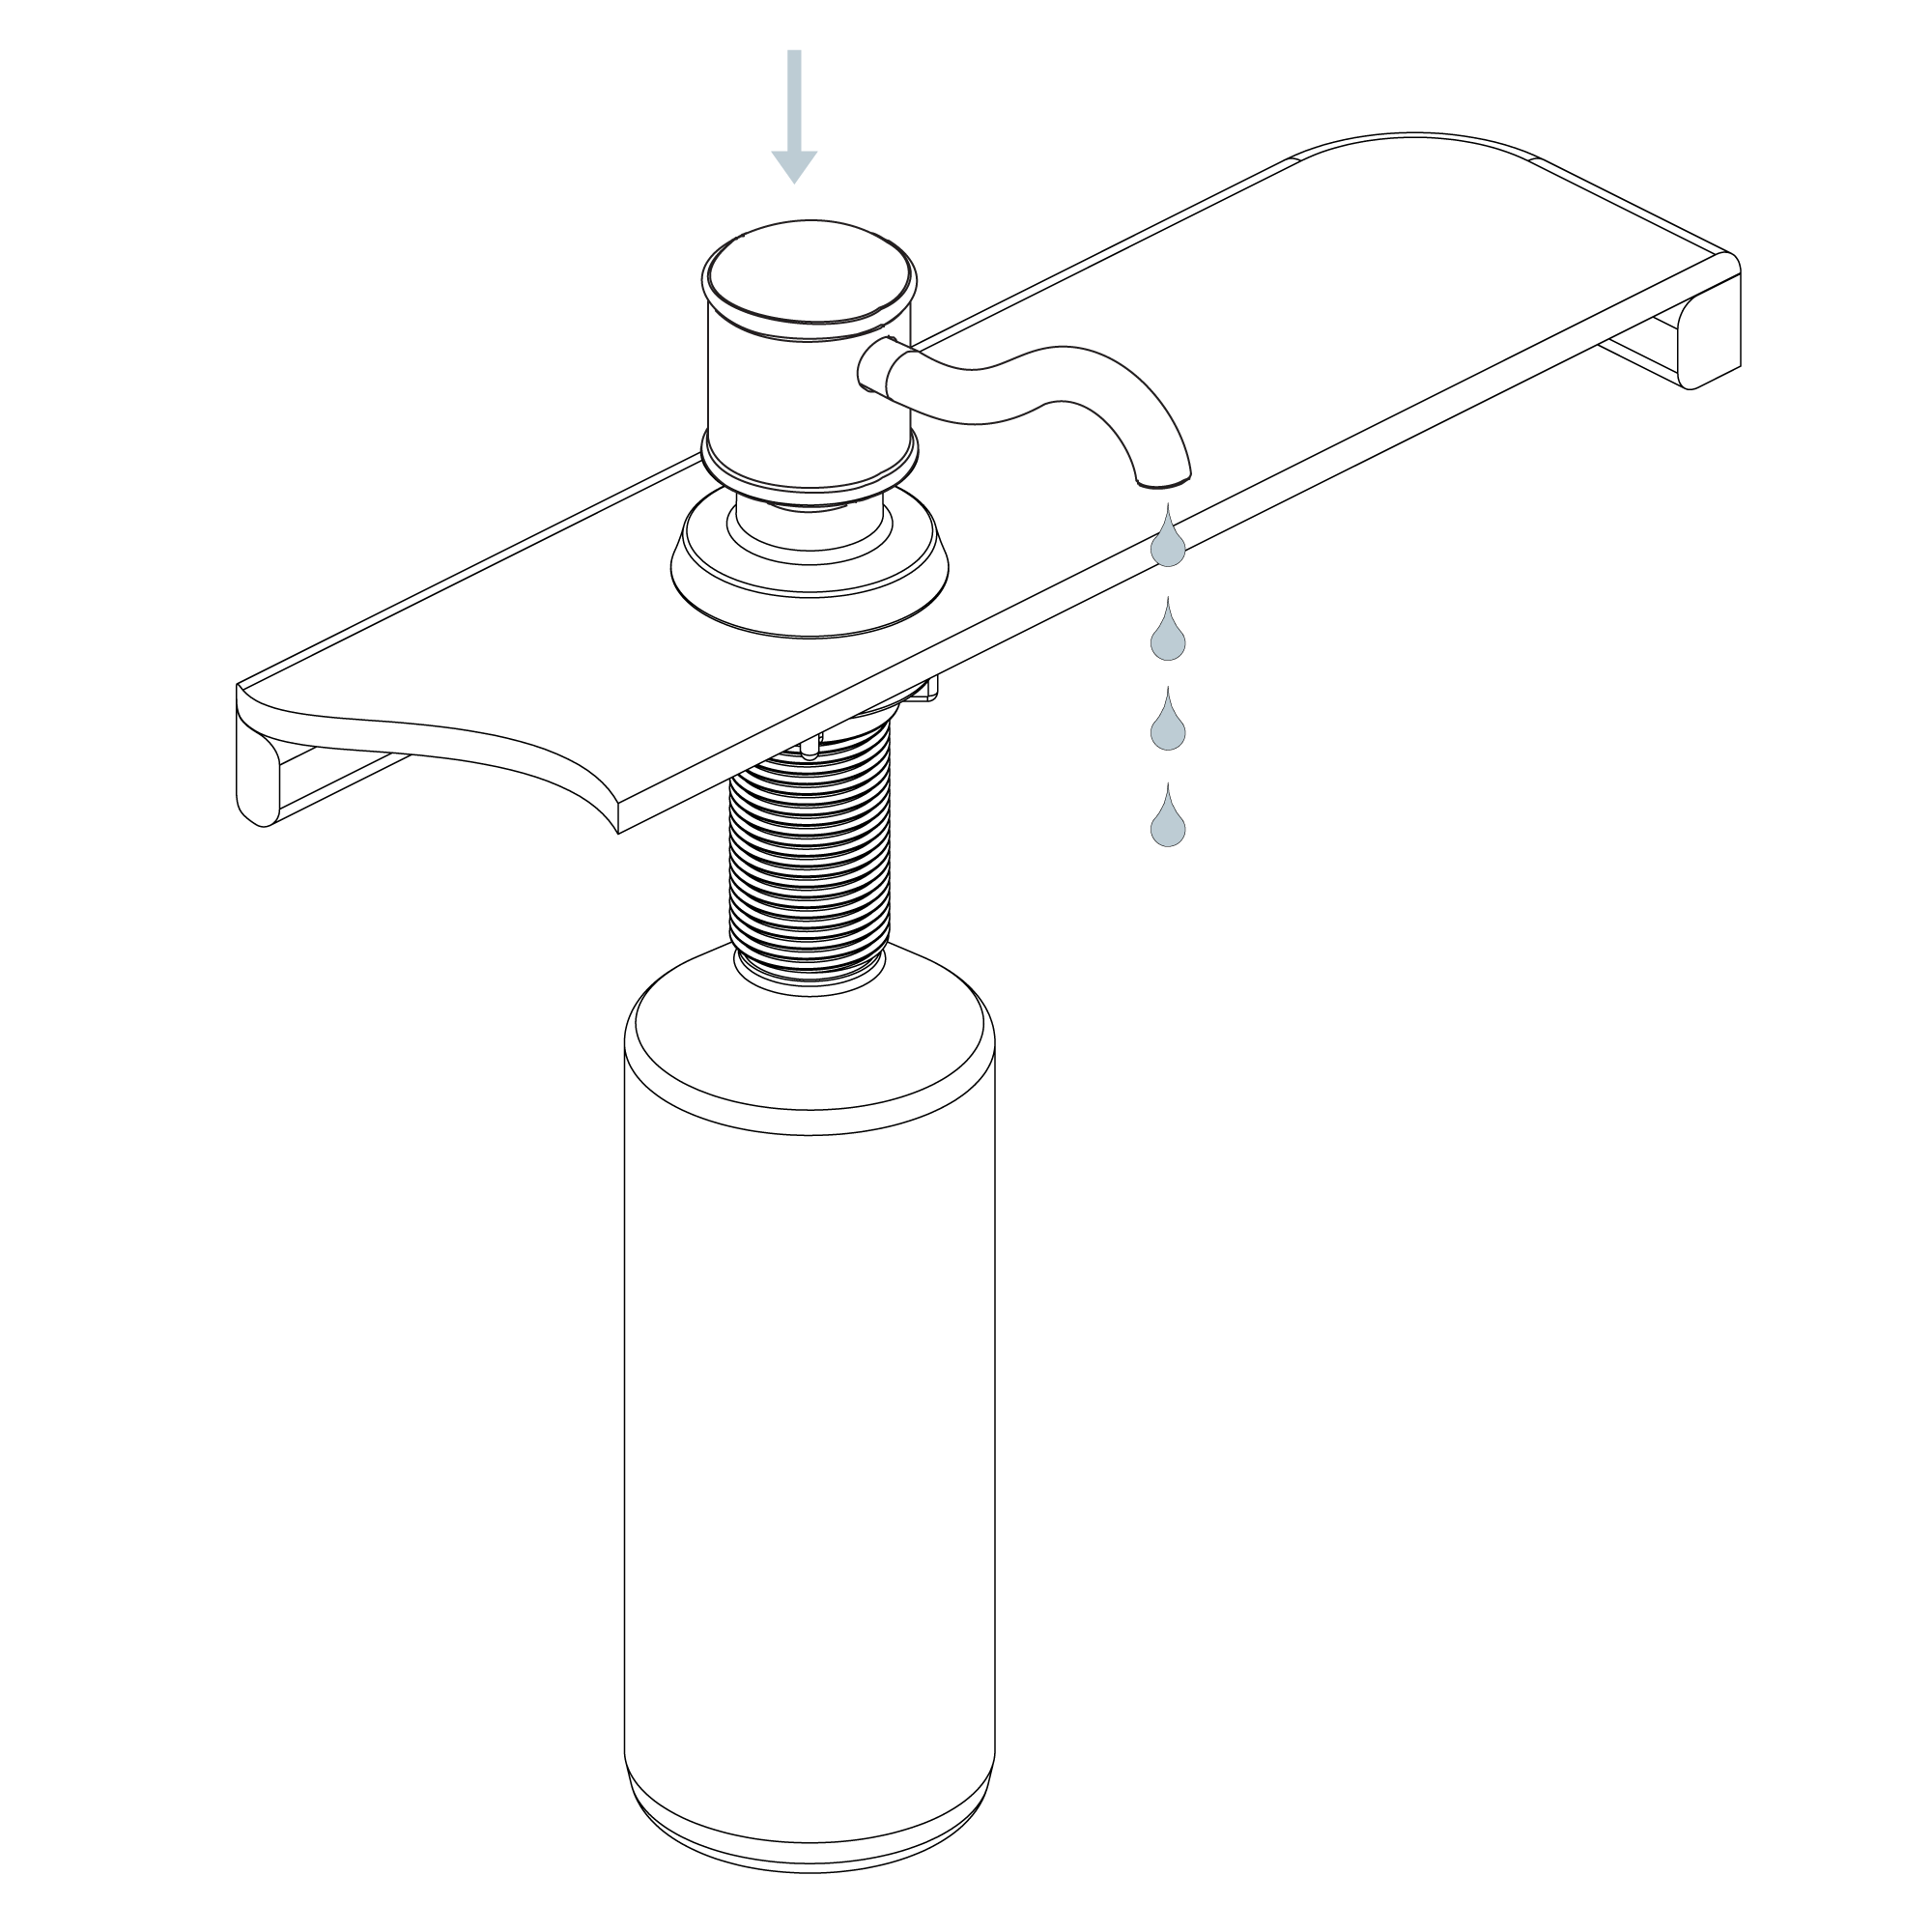 | | | | |
Disassemble soap dispenser
1. Install dispenser base (b) with washer (c) attached into the hole in the countertop. Re-install mounting nut (d) on the dispenser base (b) from underneath the countertop. Tighten mounting nut (d) by hand.
2. Screw the dispenser bottle to the dispenser base from underneath the countertop. Tighten as required.
3. Fill the dispenser bottle from the top with liquid soap.
4. Reinsert the pump into the dispenser base from the top.
5. Press the pump several times to make sure soap is evenly distributed.
Easy To Refill: Simply remove the pump head and refill from the top, no more crawling under the sink to remove the bottle.
| | | Specs:
- Solid Brass construction is corrosion & rust-resistant.
- Sleek design coordinates with a range of kitchen faucets.
- Self-priming pump.
- Refillable from above.
- Holds up to 14 oz. Of liquid.
- Pump Swivels 360° Degree for Easy access
- Height: 2.25"
- Reach: 3.8"
- Mounting hole size requirement: 1.25"
| | |
|
|
|